Image and Metadata Handbook for Wikimedia Commons
Francesca Farmer, Lucy Hinnie and Andrea Wallace
This handbook takes you through the process of organising your collections for upload to Wikimedia Commons.

About the GLAM-E Lab Toolkit
This handbook is part of the GLAM-E Lab Open GLAM Toolkit for cultural heritage organisations. The toolkit includes:
Onboarding Document, to introduce you to the GLAM-E Lab method of building an open access programme. It will give you a clearer picture of what open means in practice for you, your institution, your collections, and your community.
Internal Open Access Policies will help you identify works in. your collection that may be good candidates for your open access programme.
Assessing and Mitigating Risk, an overview of how to set and apply risk tolerances and takedown procedures for your images and data.
Copyright Clearance Handbook for Public Domain Publication of Digital Collections and Copyright Clearance Log, which guides you through the process of clearing copyright with the goal of assigning the CC0 1.0 Universal Public Domain Dedication when it is appropriate and lawful to do so. Once you have cleared copyright, you can then add the creator or work to the Copyright Clearance Log to document that process.
Image and Metadata Handbook for Wikimedia Commons and Sandbox Template for Wikimedia Commons Metadata Management, which guides you through the process of organising your images and metadata for upload to Wikimedia Commons.
Selecting an Alternative License or Label addresses which machine readable statements to use when CC0 cannot be applied.
External Open Access Policies, which contains a model open access policy you can modify and use on your website or other communications.
Glossary, a list of terms used in this handbook and other GLAM-E Lab resources.
Together, these materials will help you identify, prepare, and publish your digital collections for open access using public domain statements or other machine readable statements.
Before using this handbook, you will likely benefit from reading the Onboarding Document, Assessing and Mitigating Risk the Copyright Clearance Handbook for Public Domain Publication of Digital Collections. These resources will help you to understand open access and how to clear copyright in digital collections.
This toolkit is not intended to be legal advice. You should always contact a qualified professional for legal support.
Image and Metadata Handbook for Wikimedia Commons
Using this handbook
This handbook takes you through the process of organising your collections for upload to Wikimedia Commons across five checklists:
Checklist 1 provides guidance on creating a Wikimedia account and downloading the software packages Java and Pattypan.
Checklist 2 provides guidance on organising your images and using the programme Adobe Bridge to embed image metadata that includes your organisation’s information and a clear CC0 statement for image circulation and reuse beyond Wikimedia Commons.
Checklist 3 provides guidance on verifying whether your organisation has a Wikidata entry and a Category page for images uploaded by your organisation, as well as organising the descriptive metadata about images using the Sandbox Template for Wikimedia Commons Metadata Management.
Checklist 4 provides guidance on generating the Pattypan Artwork Template spreadsheet to use for the final upload to Wikimedia Commons.
Checklist 5 provides guidance on Pattypan bulk image uploads to Wikimedia Commons.
What you need before you start
You will need to install software, organise your images in one folder on your computer, and rename the files according to your preferred naming convention (e.g., Artwork title, Artist, Accession number, Year). Ensure that you have access to the metadata or other relevant information that your institution maintains about the images so you are able to organise the image metadata in a spreadsheet.
If using a work device, the relevant permissions to install new software on the device or IT support
Your images and descriptive metadata
What this Handbook guides you through
Creating a Wikipedia account
Downloading and installing the latest release of the Java Development Kit (Windows) or the latest release of Java (Mac OS)
Downloading and installing Pattypan
Downloading and installing Adobe Bridge (optional)
Using the GLAM-E Lab Sandbox Template (link and key provided in this document)
Generating and using the Pattypan Artwork Template (generated by Pattypan prior to upload)
Creating a Wikidata entry for your organisation (Checklist 3)
Creating a Category page on Wikimedia Commons (Checklist 3)
Understanding and preparing the tools you will use
All tools covered by this handbook are free to download and use. You are likely already familiar with some.
About Wikimedia Commons
Wikimedia Commons is a free media file repository for publishing public domain and openly-licensed images, sound and video clips. It uses the same technology as Wikipedia, which allows for images uploaded to Wikimedia Commons to be easily used on Wikipedia articles and other Wikimedia platforms. Content on Wikimedia Commons can be reused elsewhere, from academic research to personal blogs or news sites.
About Java
Java is a computer language that powers many web and mobile applications. Java is run by the Java Runtime Environment (or ‘JRE’), the underlying technology that communicates between a Java-based programme and the operating system. Wikimedia’s image upload tool, Pattypan, runs on Java, which is facilitated by JRE. You will need to download the Java Development Kit (or ‘JDK’) to run Pattypan. Rest assured that you will not need to learn how to code or operate Java for Pattypan to run on your computer.
About Pattypan
Pattypan is an open source Java-based tool for bulk image and metadata uploads to Wikimedia Commons. Once your images and metadata are ready, Pattypan syncs the images with the metadata during upload to Wikimedia Commons. Each image will have its own File Page on Wikimedia Commons with multiple sections containing summary information. Pattypan was developed with cultural institutions in mind, and it has been used by a range of organisations around the world to upload more than 105 million media files (and counting!) to Wikimedia Commons.
Why do we recommend Pattypan? Pattypan is a simple and reliable tool, albeit glitchy at times, but requires low-levels of investment for staff who may not have the technical knowledge or capacity to learn more advanced image upload software. For example, OpenRefine is another open source tool for cleaning and uploading structured data in bulk. If you have the time and technical capacity, it could be worthwhile to invest in learning OpenRefine because it can further streamline the bulk upload and editing process. A larger amount of upskilling and preparation may be needed at first. Wikimedia has an online course and other support on how to edit and upload with OpenRefine.
About Adobe Bridge
You can also batch update the embedded image metadata to include your organisation’s name and the link to the preferred machine-readable public domain statement. We recommend using Adobe Bridge, a free programme available for download online. Adobe Bridge allows you to add or edit any embedded image metadata, such as XMP, IPTC, or EXIF data, and create a metadata template to apply to the entire folder of images at once.
About the GLAM-E Lab Sandbox Template
The Sandbox Template for Wikimedia Commons Metadata Management is a spreadsheet created by the GLAM-E Lab. Use the Sandbox Template to gather information about the image, underlying work, your organisation and other details. It should help you organise and record the metadata in a way that is more user-friendly than the Pattypan Artwork Template spreadsheet. Because the Sandbox Template is a Google Sheet, you and others at your organisation can also work in the spreadsheet at the same time.
About the Pattypan Artwork Template Spreadsheet
Pattypan will generate a metadata spreadsheet using the Artwork Template defined by Wikimedia Commons. While the Pattypan Artwork Template mirrors the structure of the GLAM-E Lab Sandbox Template, the Pattypan version is less user friendly for organising metadata. This means that once your images are organised in a folder, you have two options for metadata organisation:
Option 1. Use the Sandbox Template spreadsheet and guidance that we have provided to organise your metadata. You can find this guidance in the first tab of the spreadsheet, as well as in the Sandbox Template Key at the end of this document. While our version of the spreadsheet is more accessible for beginners, you will still need to generate the Pattypan Artwork Template and copy over the metadata from the Sandbox Template prior to image upload.
Option 2. Use Pattypan to generate the Artwork Template spreadsheet, then manage metadata directly in that spreadsheet with the assistance of Wikimedia Commons guidance or the Sandbox Template Key at the end of this document.
Pattypan will give you the option of using more than one template (e.g., the ‘Photograph Template’ or ‘Information Template’). This handbook uses the Artwork Template. Once you feel comfortable using Pattypan, these other templates might be useful for uploading media file types, such as historical photographs or correspondence.
Tip: For uploads of 10 or fewer images, use the Wikimedia Commons Upload Wizard rather than Pattypan.
About Wikidata
Wikidata is an open knowledge base that can be edited and read by humans and machines. It stores structured data for Wikimedia projects like Wikimedia Commons and Wikipedia.
Wikidata is helpful for a number of reasons: it is multilingual and collaborative, and can be used by anyone in the world. For organisations, it is a useful way to link items in specific collections or by specific artists.
Once an item is in the Wikidata ecosystem, it can be queried. This allows institutions and users to learn more about how collections are connected, both within and outside of the institution.
Everything in Wikidata is assigned a unique identifier called a ‘QID’. QIDs include a Q followed by a string of numbers, e.g., Q513. You can include QIDs in the metadata that you prepare to link images with different relevant identifiers. For example, you can include your institution’s QID to link images to your Wikidata entity. Checklist 3 includes Wikidata tips.
About Category pages
Category pages on Wikimedia Commons can be used to group related pages and media, such as all images uploaded by an institution. Anyone can create a Category page. If your institution does not have one, Checklist 3 will help you get set up. It is also possible to create multiple categories for particular parts of your collection.
The Category structure on Wikimedia Commons is the primary way to organise and find media files (images, audio, etc). Adding or uploading image files directly to a Category page will improve their discoverability. Each Category should itself be added to other more general categories, forming a hierarchical structure. You can add multiple categories to the metadata of an image. For example, for a portrait by an Ecuadorian artist, you could add the Category tag for the Portraits Category page and Artists from Ecuador Category page. More on this in Checklist 3.
Wikimedia Commons categories also allow institutions to use tracking tools like GLAMorgan, which you can set up on your own. Once your images are uploaded to Wikimedia Commons and placed on Wikipedia articles, these tools show how many views the Wikipedia pages receive which include your images.
About Wiki-created template tags
Some aspects of image description on Wikimedia Commons can be automated using text-based shortcuts. These 'template tags', for example, will result in certain templates being included on a Category or File page.
For example using{{Template:GLAM-E Lab}} in the metadata under the Partnerships field will auto-generate the following template on the File page:

For more information on the metadata fields where template tags can be included, see the Sandbox Template Key at the end of this document.
How to delete or replace files and metadata uploaded to Wikimedia Commons
Mistakes happen. If you or someone in your organisation uploads an image to Wikimedia Commons in error, you can nominate the file for deletion by going to the individual file media description page and selecting ‘Nominate for deletion’ in the ‘Tools’ menu.
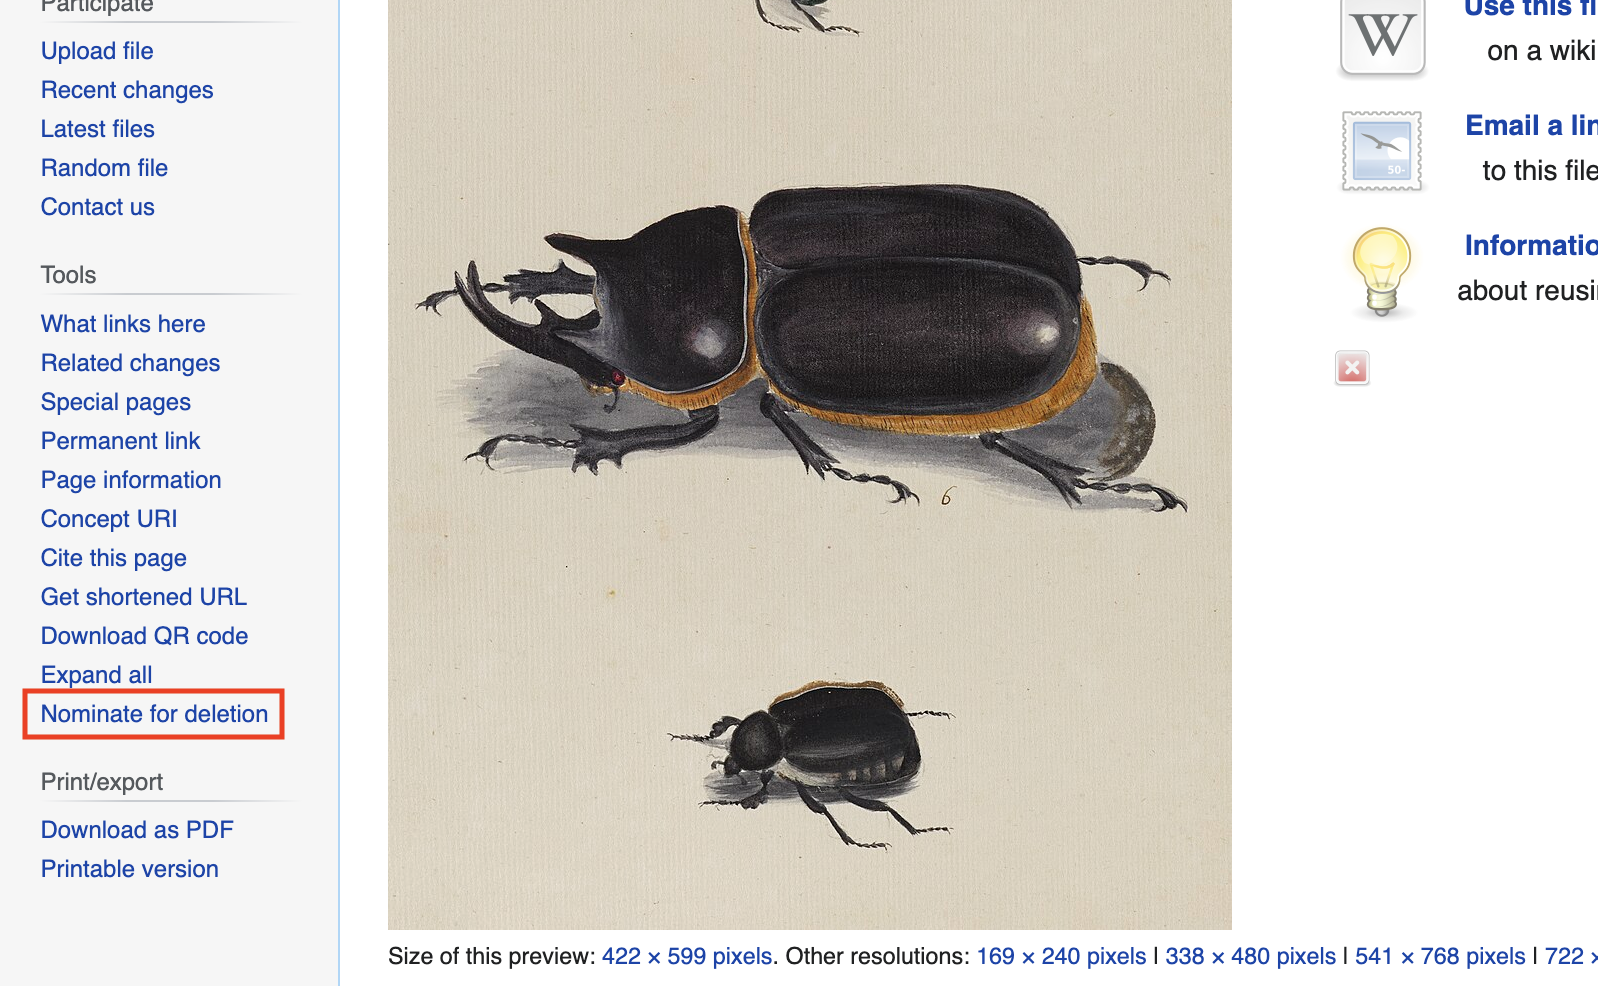
You should explain why the file requires deletion, and an administrator will review and confirm the deletion within 7 days. Read more about the Wikimedia Commons Deletion Policy and how to make Deletion Requests on Wikipedia.
Tip: You can also edit information or media files rather than deleting them.
Replace an image in the ‘File history’ by selecting ‘Upload a new version of this file’.
Edit summary data for an image by clicking ‘Edit’ at the top-right of the File page for the image to edit the text directly.
Edit the File name by clicking the ‘More’ drop-down in the top-right of the File page for the image, then select ‘Move’. So long as you are the user who uploaded the image, you will be able to change the File name.
Getting Started: Wikimedia, Java and Pattypan
Overview
Checklist 1 provides a guide to getting set up with a Wikimedia account and downloading and installing Java and Pattypan for Windows or Mac OS. This five-step process differs by operating system, so make sure you use the correct Checklist below.
Step 1. Create a Wikipedia account
Step 2. Check your device for Java
Step 3. Download and install the most recent version of Java Development Kit
Step 4. Download Pattypan
Step 5. Open Pattypan
If your device uses Windows, go to Checklist 1a.
If your device uses Mac OS, go to Checklist 1b.
Rest assured that Checklists 1a and 1b are the only checklists that vary depending on whether you use Windows or Mac OS.
The remaining checklists are applicable to both devices. While most illustrative screenshots in this handbook were taken when using a Mac, the screenshots should be similar to what is seen when using Windows.
Tip: If you have a choice between using Windows or Mac OS, it is easier to download and install Pattypan with Windows.
Checklist 1a: Getting Started on Windows
This Checklist will guide you through the process of creating a Wikipedia account and downloading the software needed to bulk upload images onto Wikimedia Commons using Windows.
Tip: First, decide whether the Wikipedia account should be related to:
1. You as an employee of the organisation (recommended) 2. You as an individual, in your personal capacity (for example, if you are a volunteer or plan to edit Wikipedia beyond the scope of your organisation)
For 1: If using an account solely in your capacity as an employee of the organisation, please add a note explaining this to your User page. Under the Wikimedia Conflict of Interest guidelines, any affiliations must be disclosed by users.
For 2: If using a personal Wikipedia account to upload and edit on behalf of an organisation, please add a note explaining this to your User page. Under the Wikimedia Conflict of Interest guidelines, any affiliations must be disclosed by users.
Having more than one Wikipedia account is discouraged. If you wish to have both a professional and personal account, please disclose both accounts on your User pages, with a sentence such as:
This is my professional account: my personal account can be found at [link to User page].In addition to ensuring transparency, disclosing professional interests or affiliations on your User page improves the reliability of edits and data contributed by your account.
Step 1
Create a Wikipedia account
You will need a Wikipedia account to upload images to Wikimedia Commons. This account enables you to sign in using the same login details across all Wikimedia platforms.
Visit https://en.wikipedia.org/wiki/Special:CreateAccount and register for an account. For privacy reasons, do not use personal information in your username.
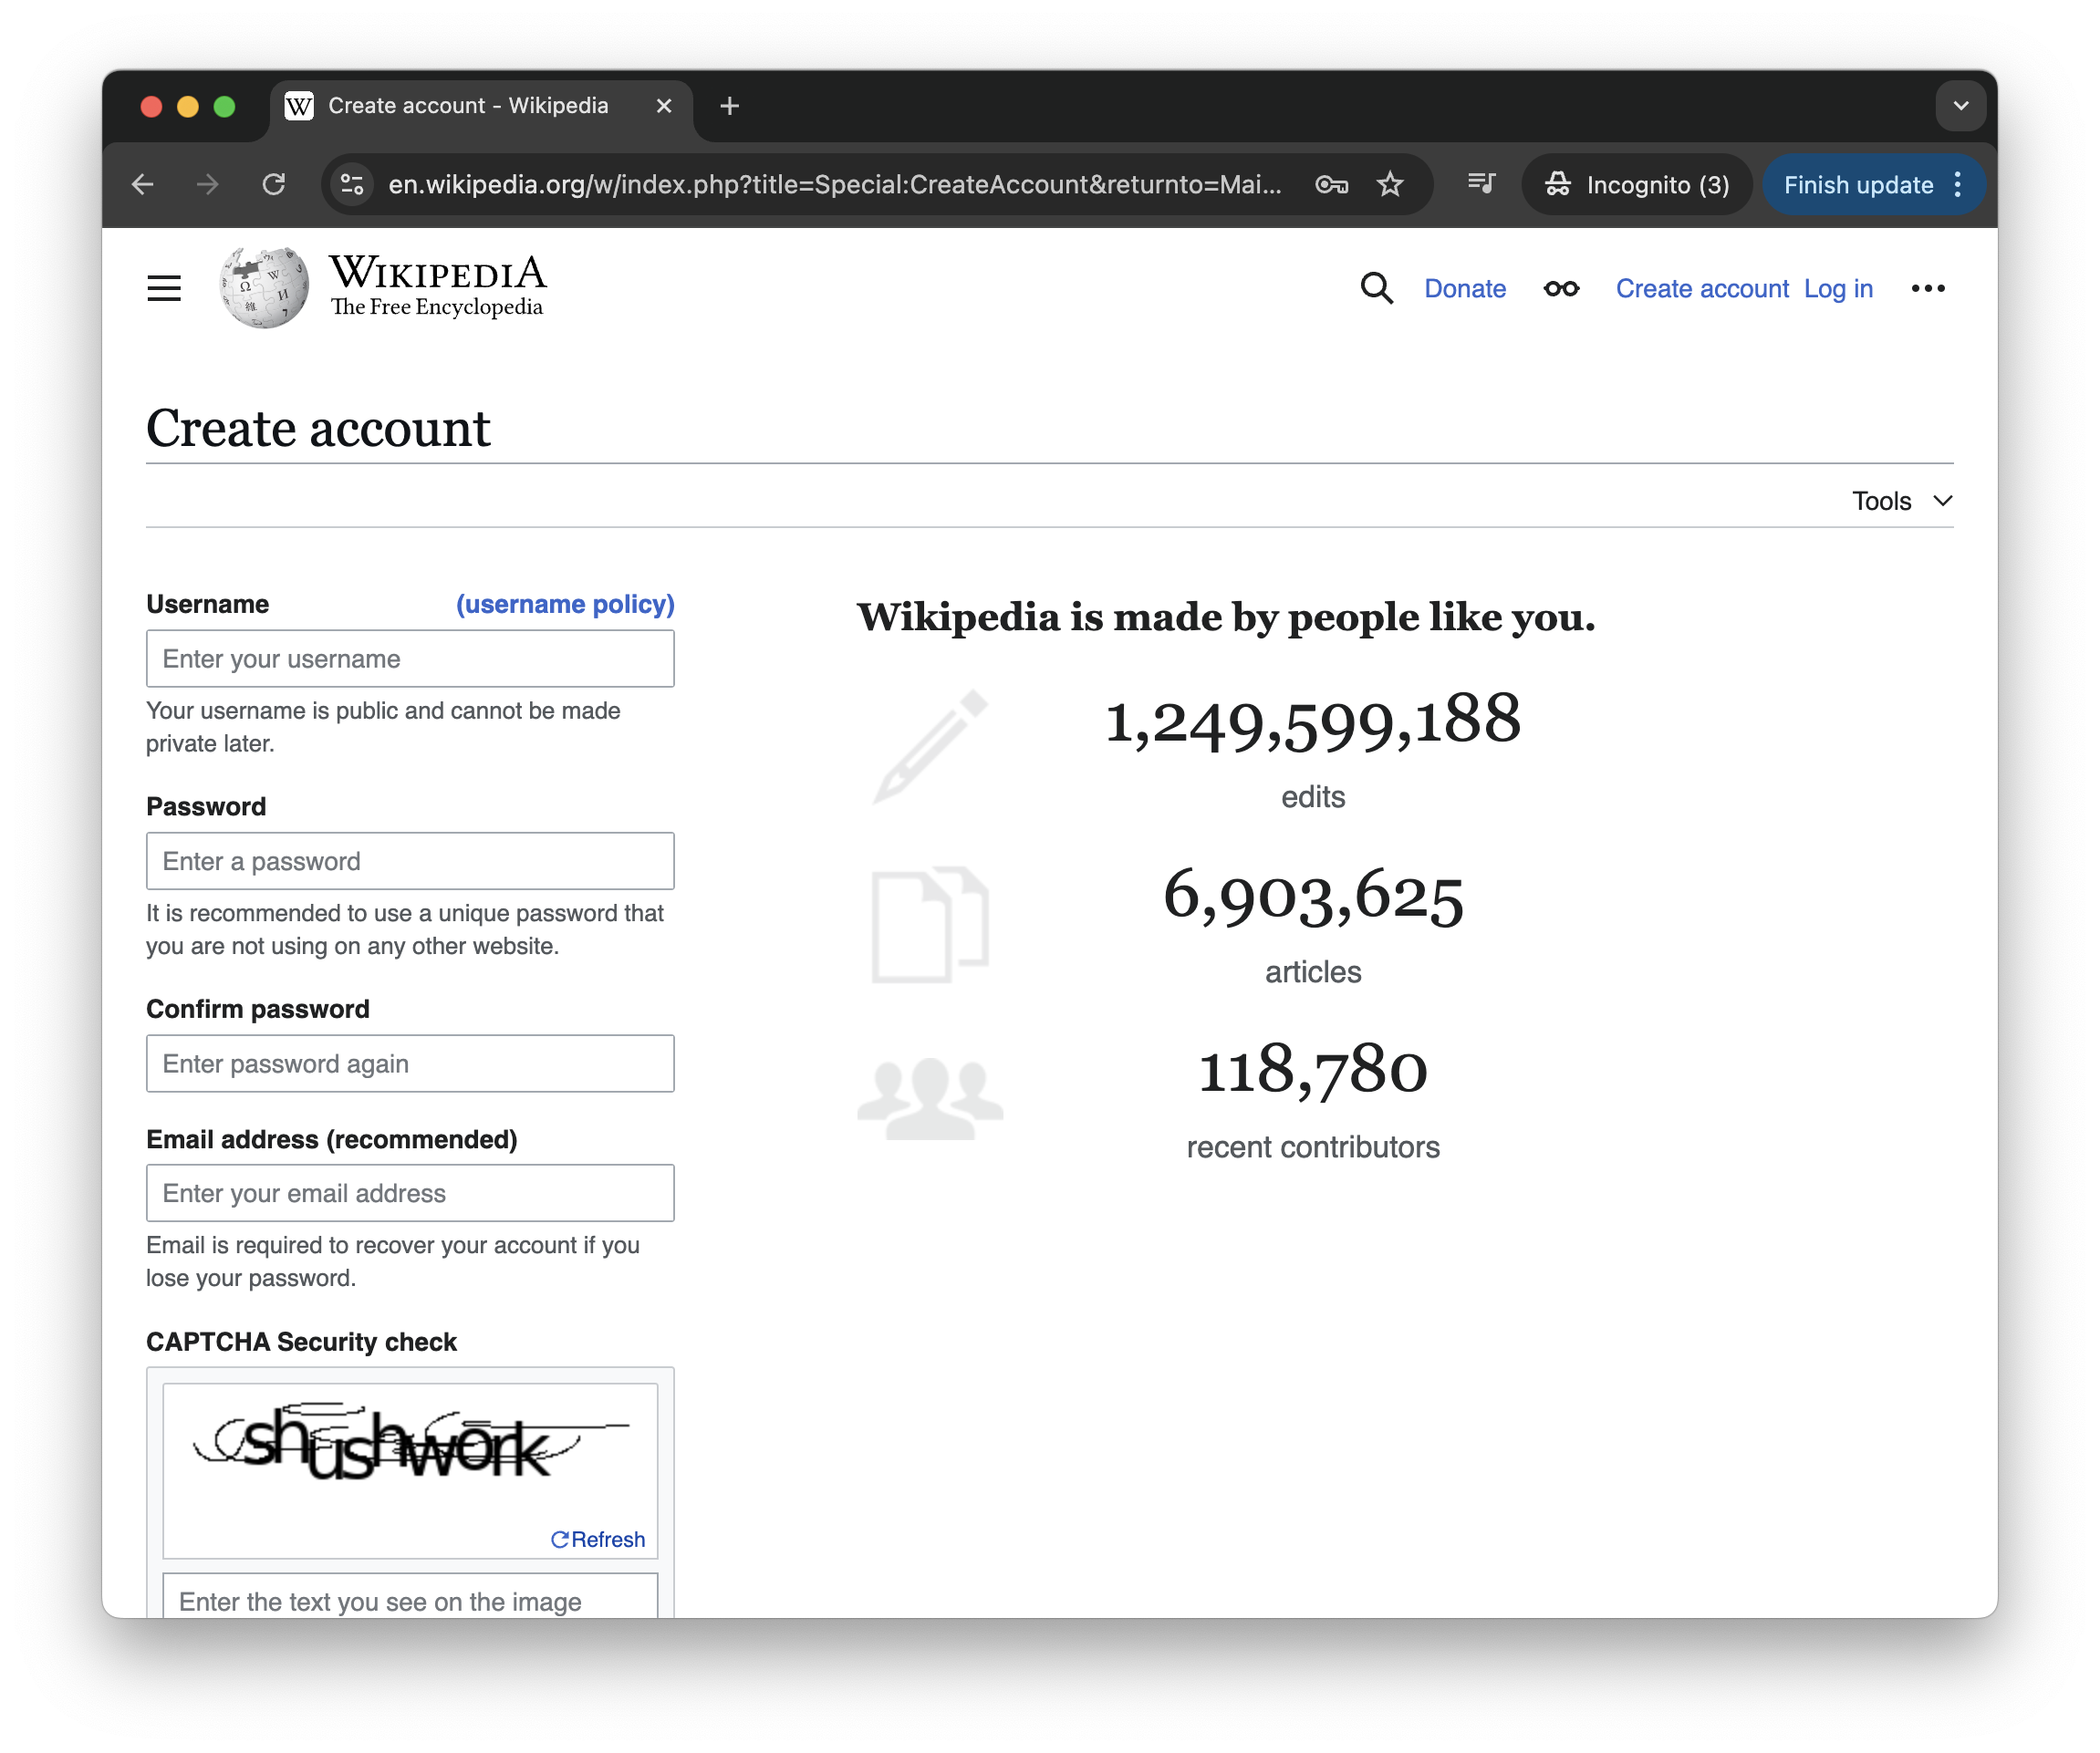
For more support, see https://www.youtube.com/watch?v=19l7fqd3Vww.
Step 2
Check your device for Java
Check whether Java is already installed on your device by going to Start > scrolling down in the Start menu to Java Development Kit.
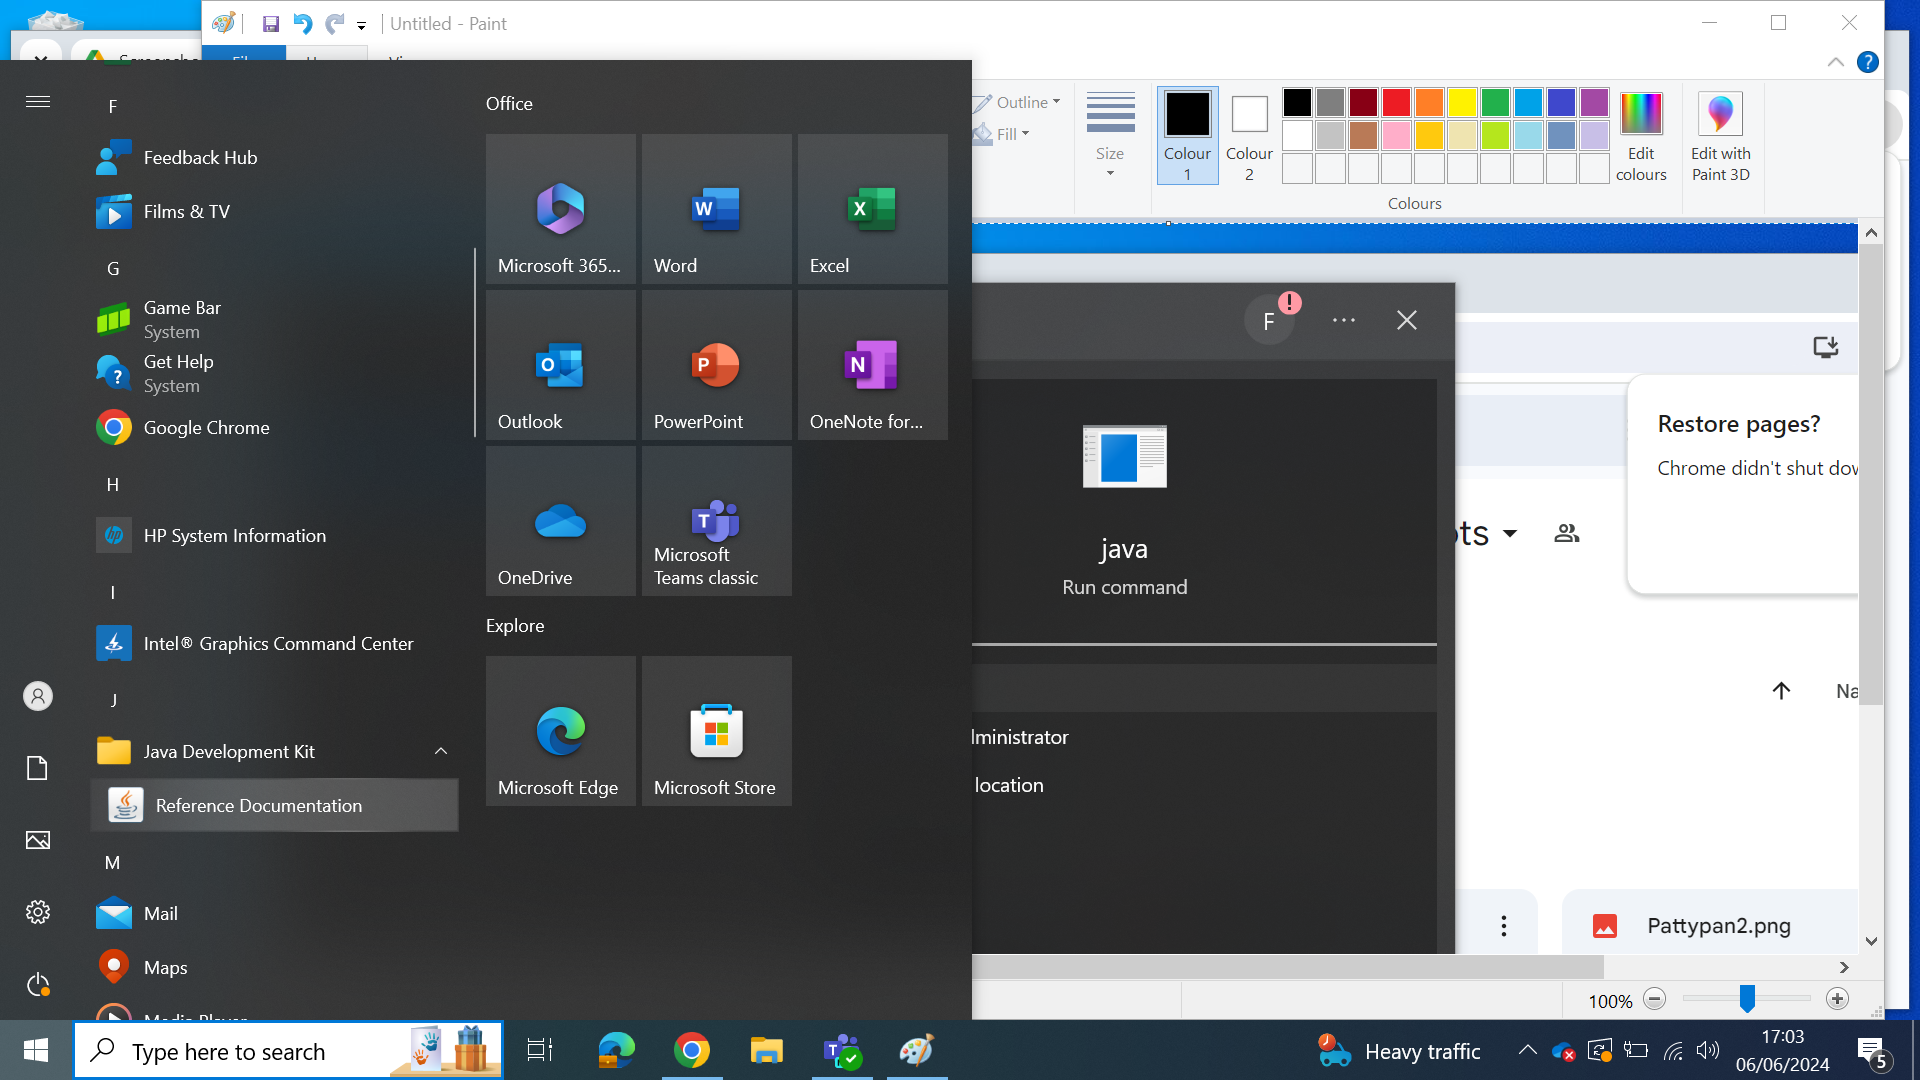
If you do not see Java listed, you will need to download it. Go to Step 3.
If you do see Java listed, make sure you have the most recent version. Click on ‘Reference Documentation’ to see your version.
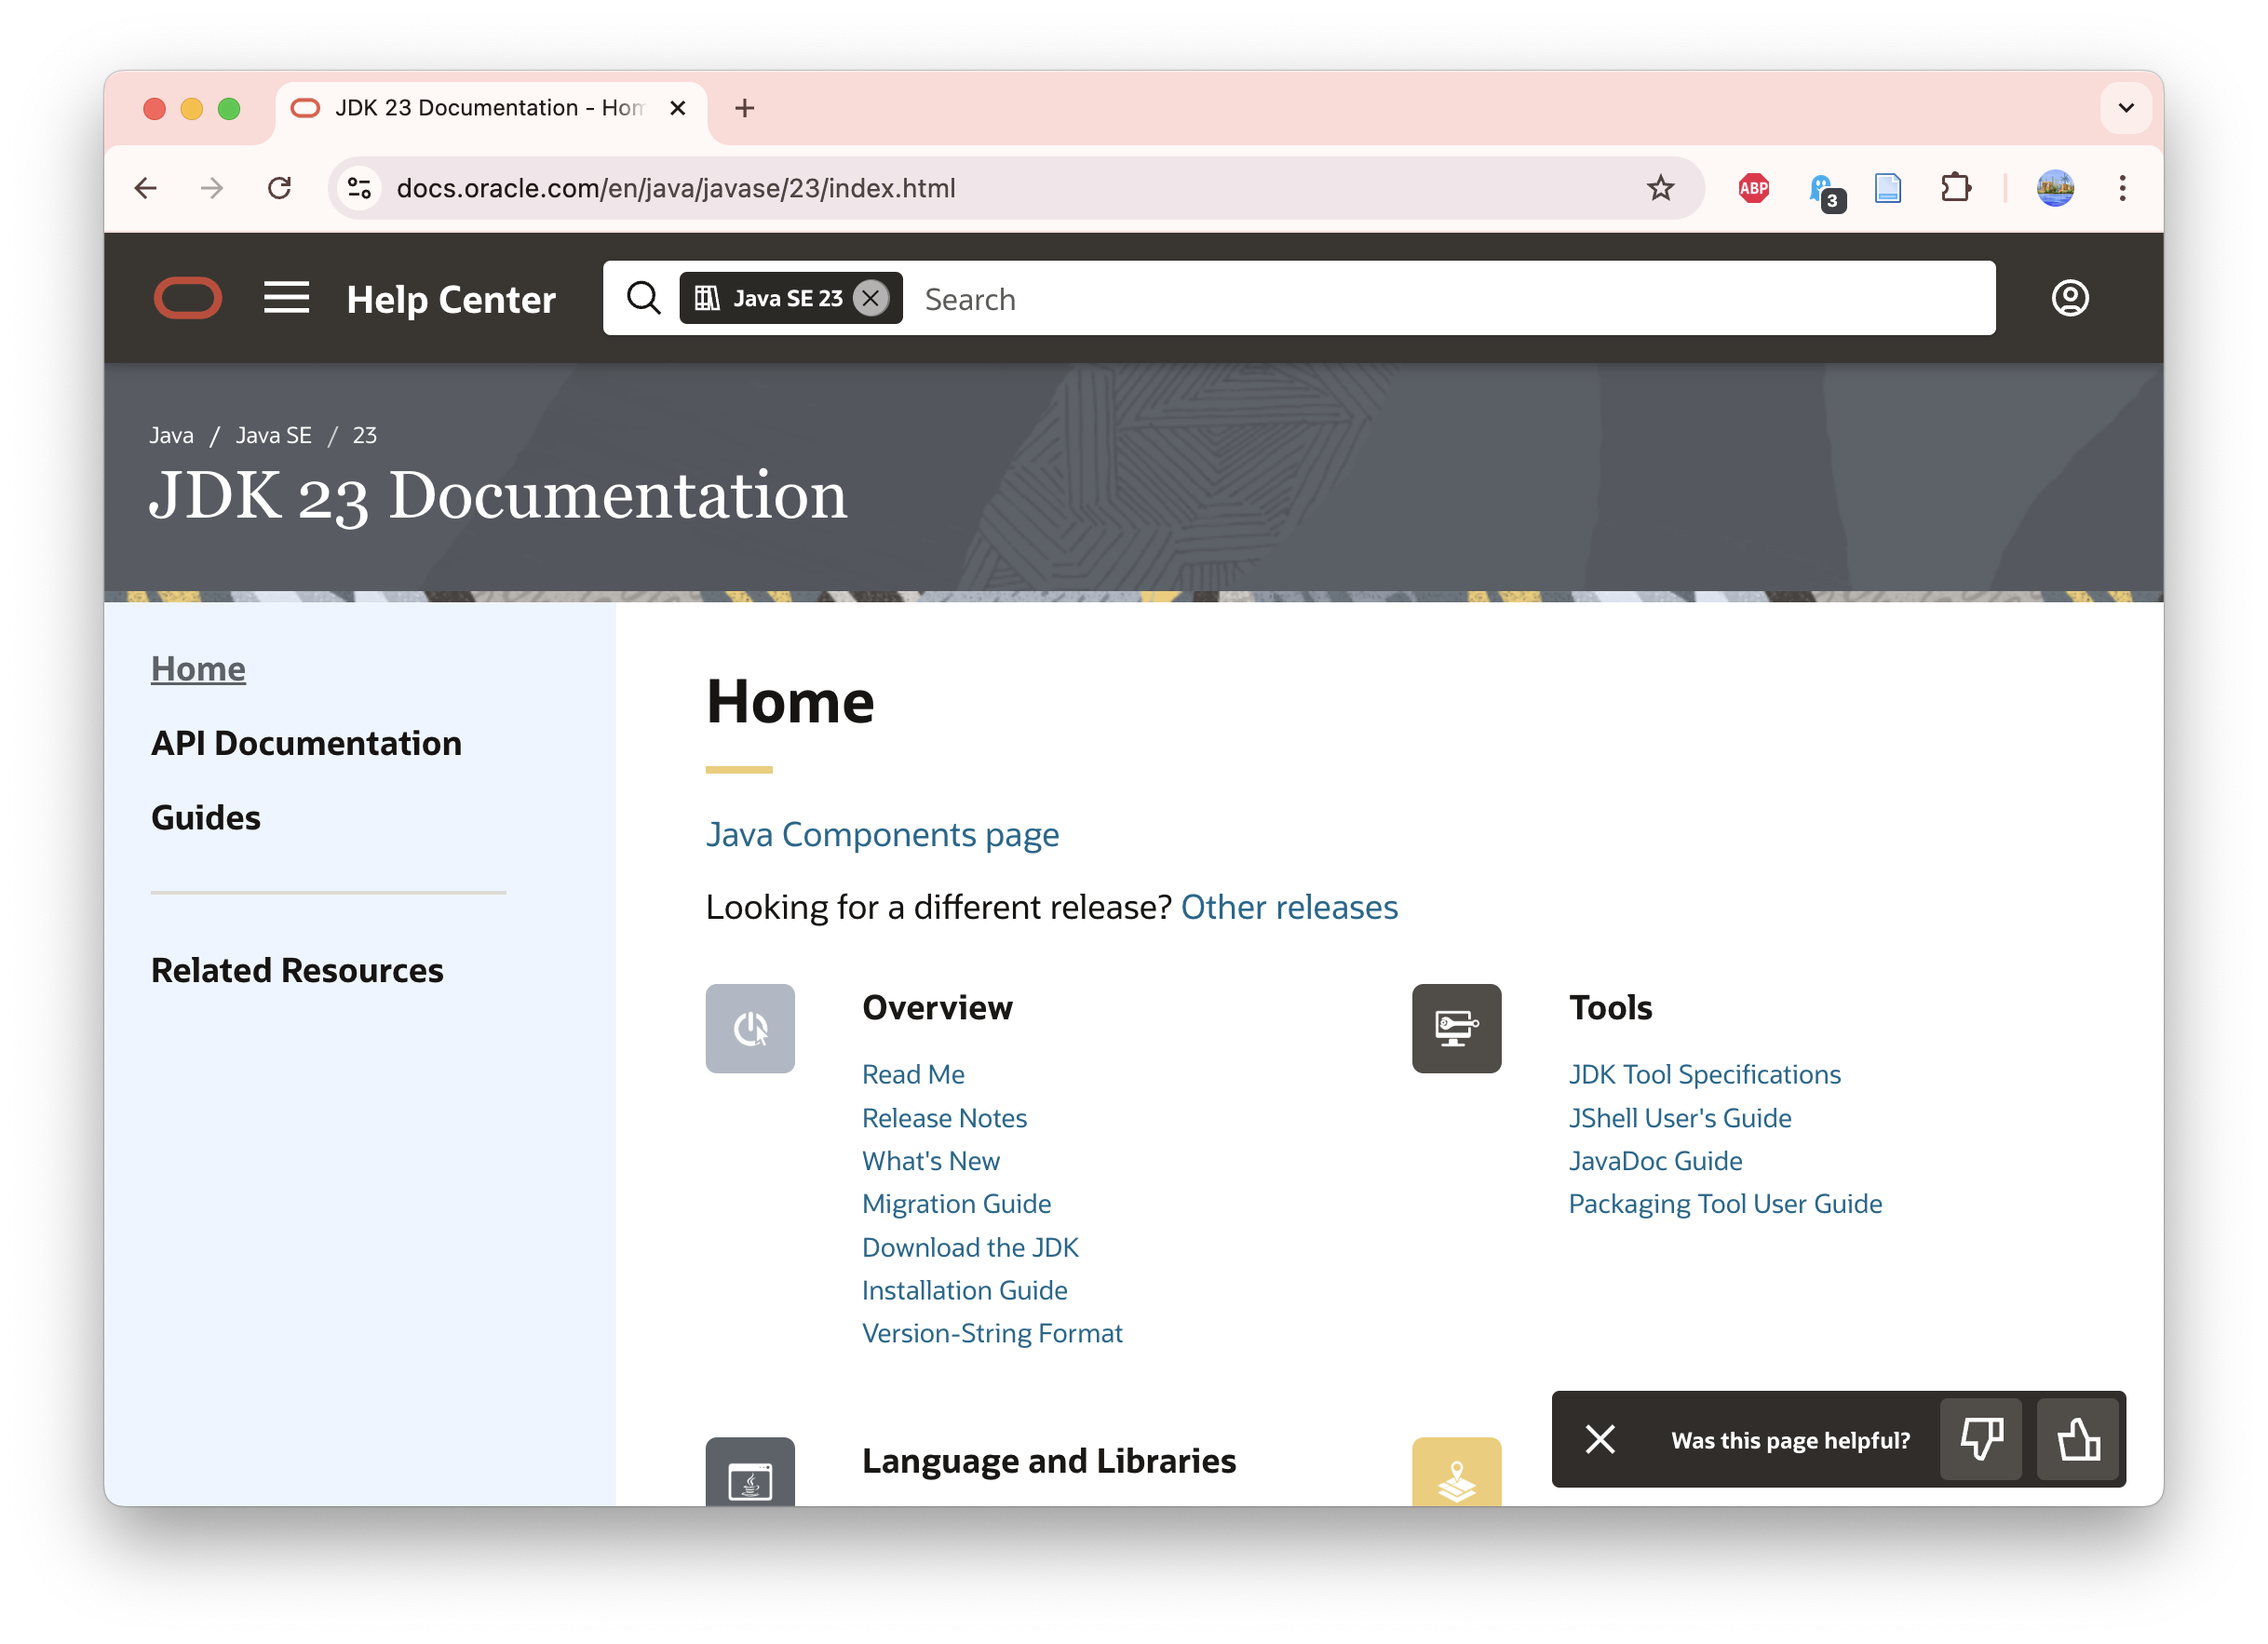
This will open up a browser window that tells you which version of Java you have (e.g., JDK 23, image on the right).
If your version is not up-to-date, go to Step 3.
If your version is up-to-date, go to Step 4.
Step 3
Download and install the most recent version of the Java Development Kit (JDK)
Visit the Oracle website and click on the link under ‘What’s new’ to view and download the latest release.
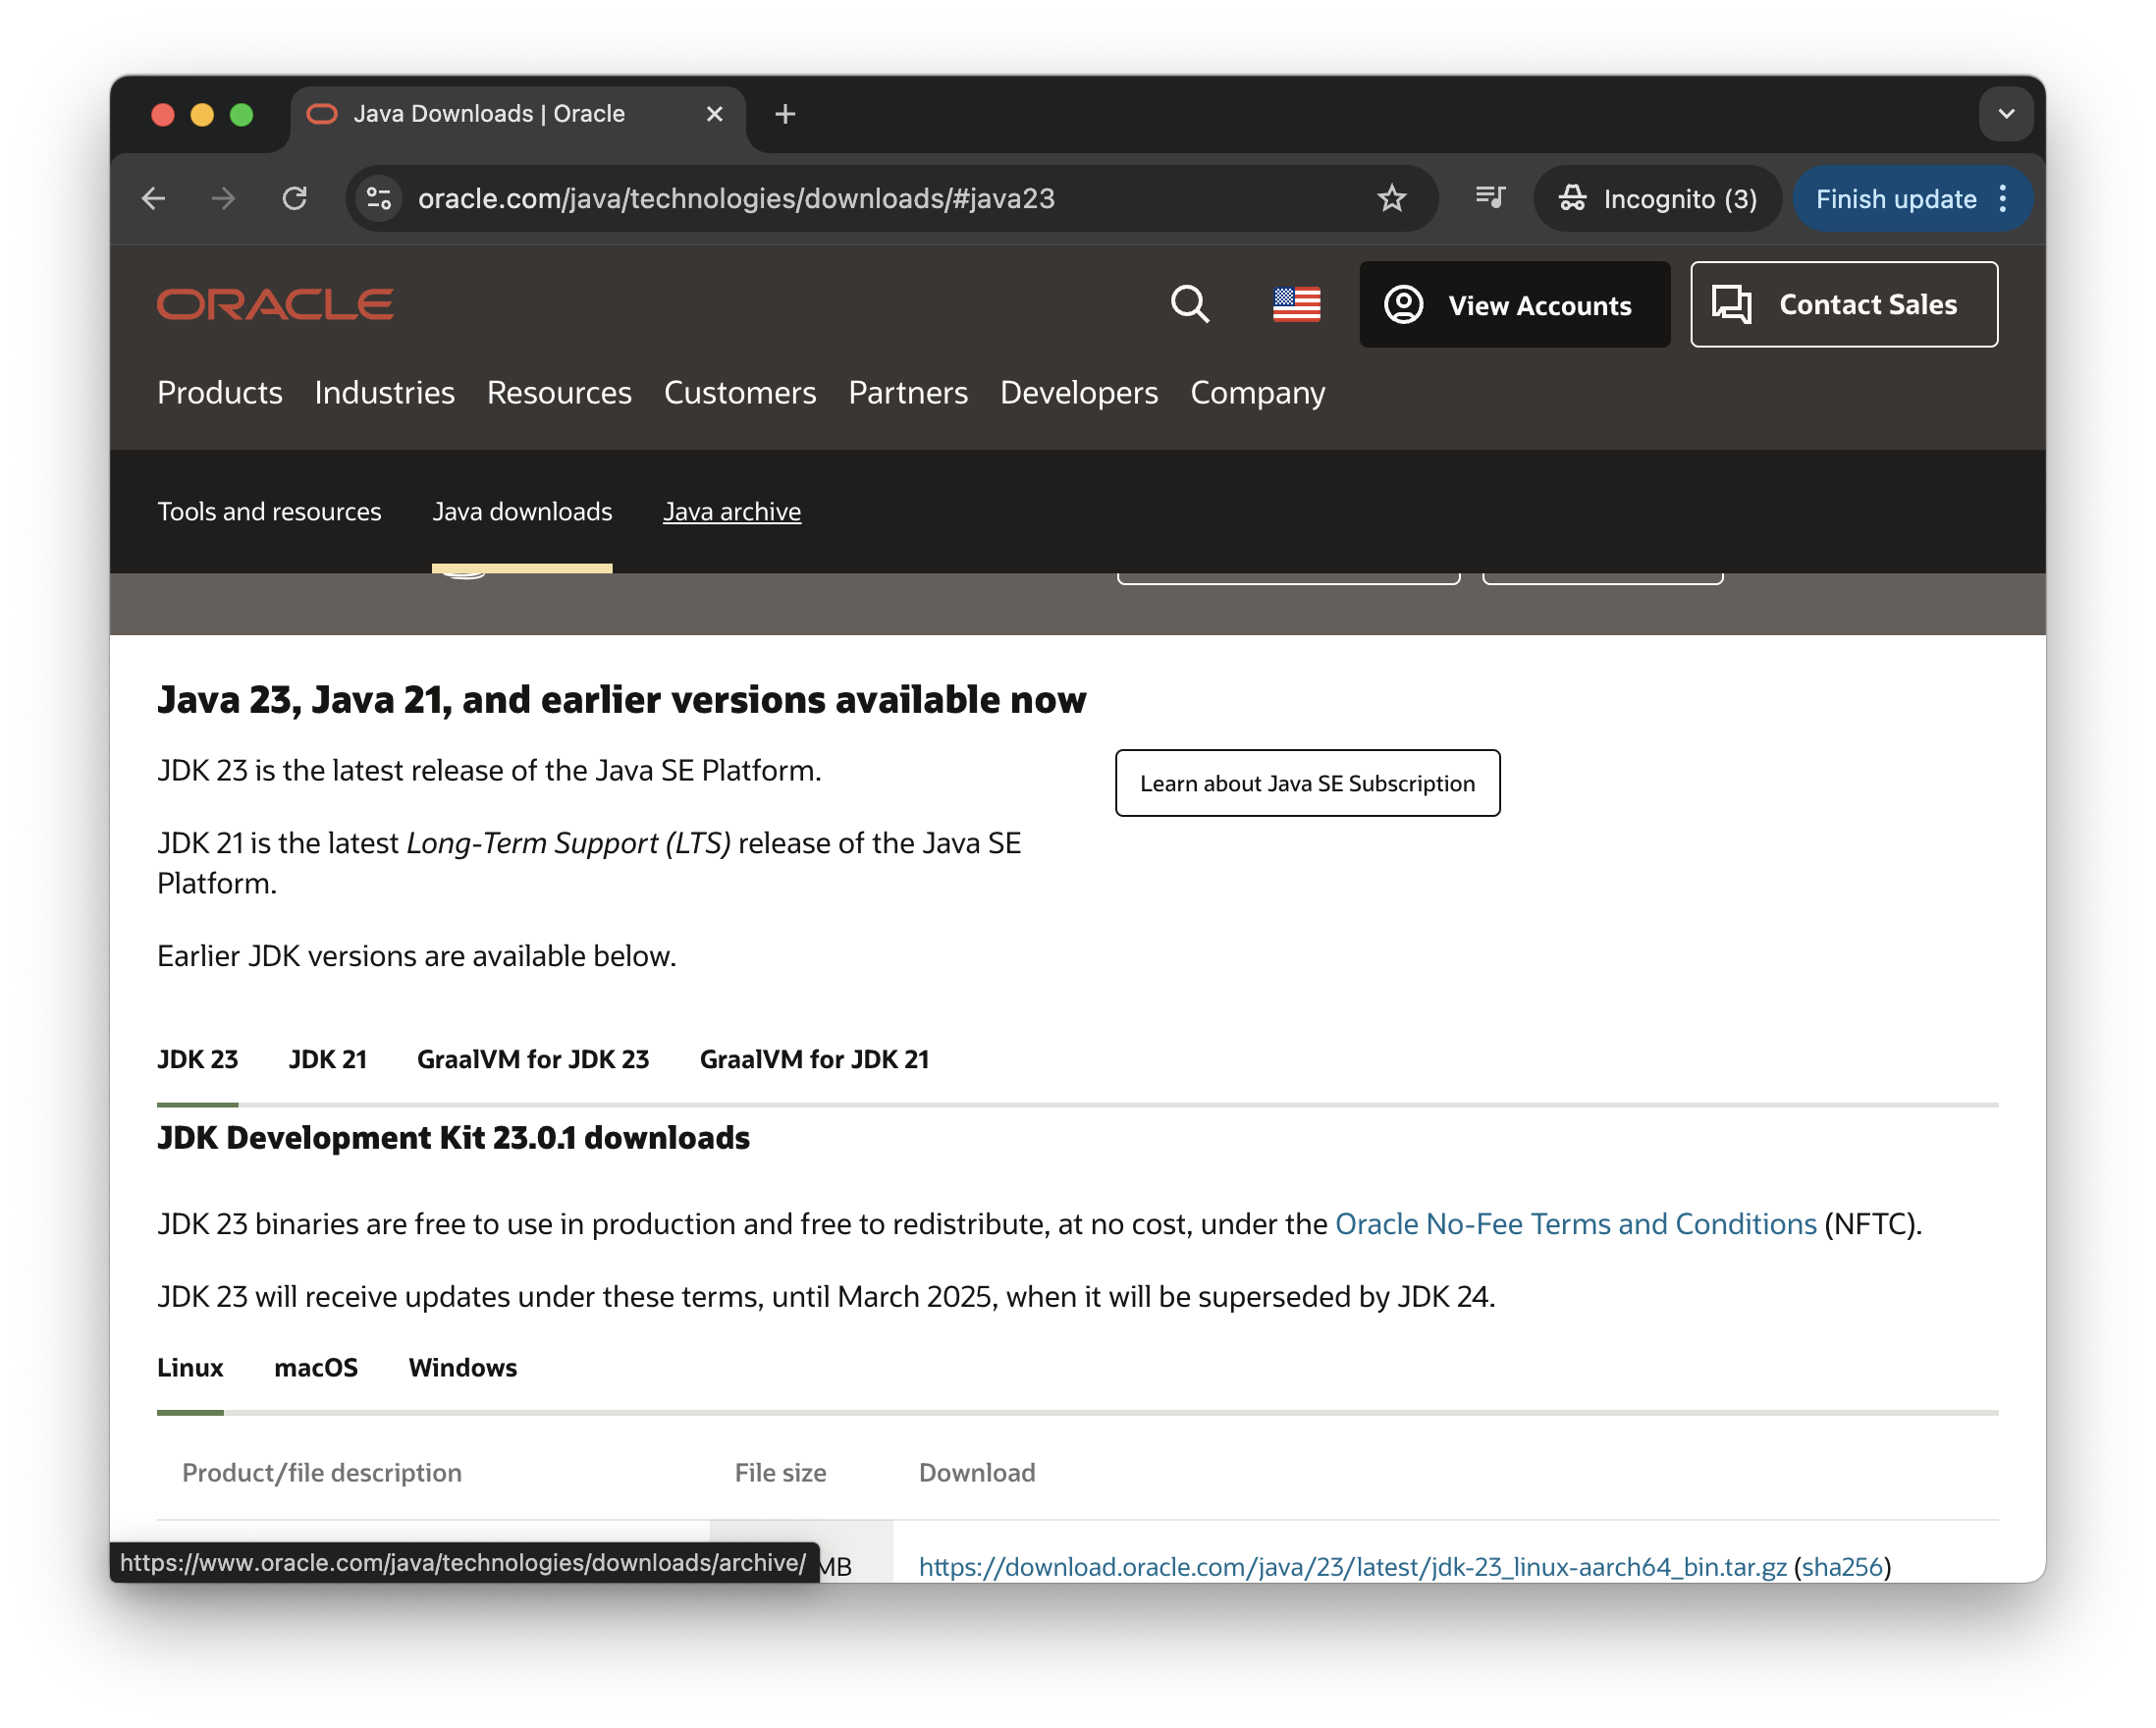
For more support, see How do I install Java for my PC?
Make sure that you download JDK and not JRE.
Step 4
Download Pattypan
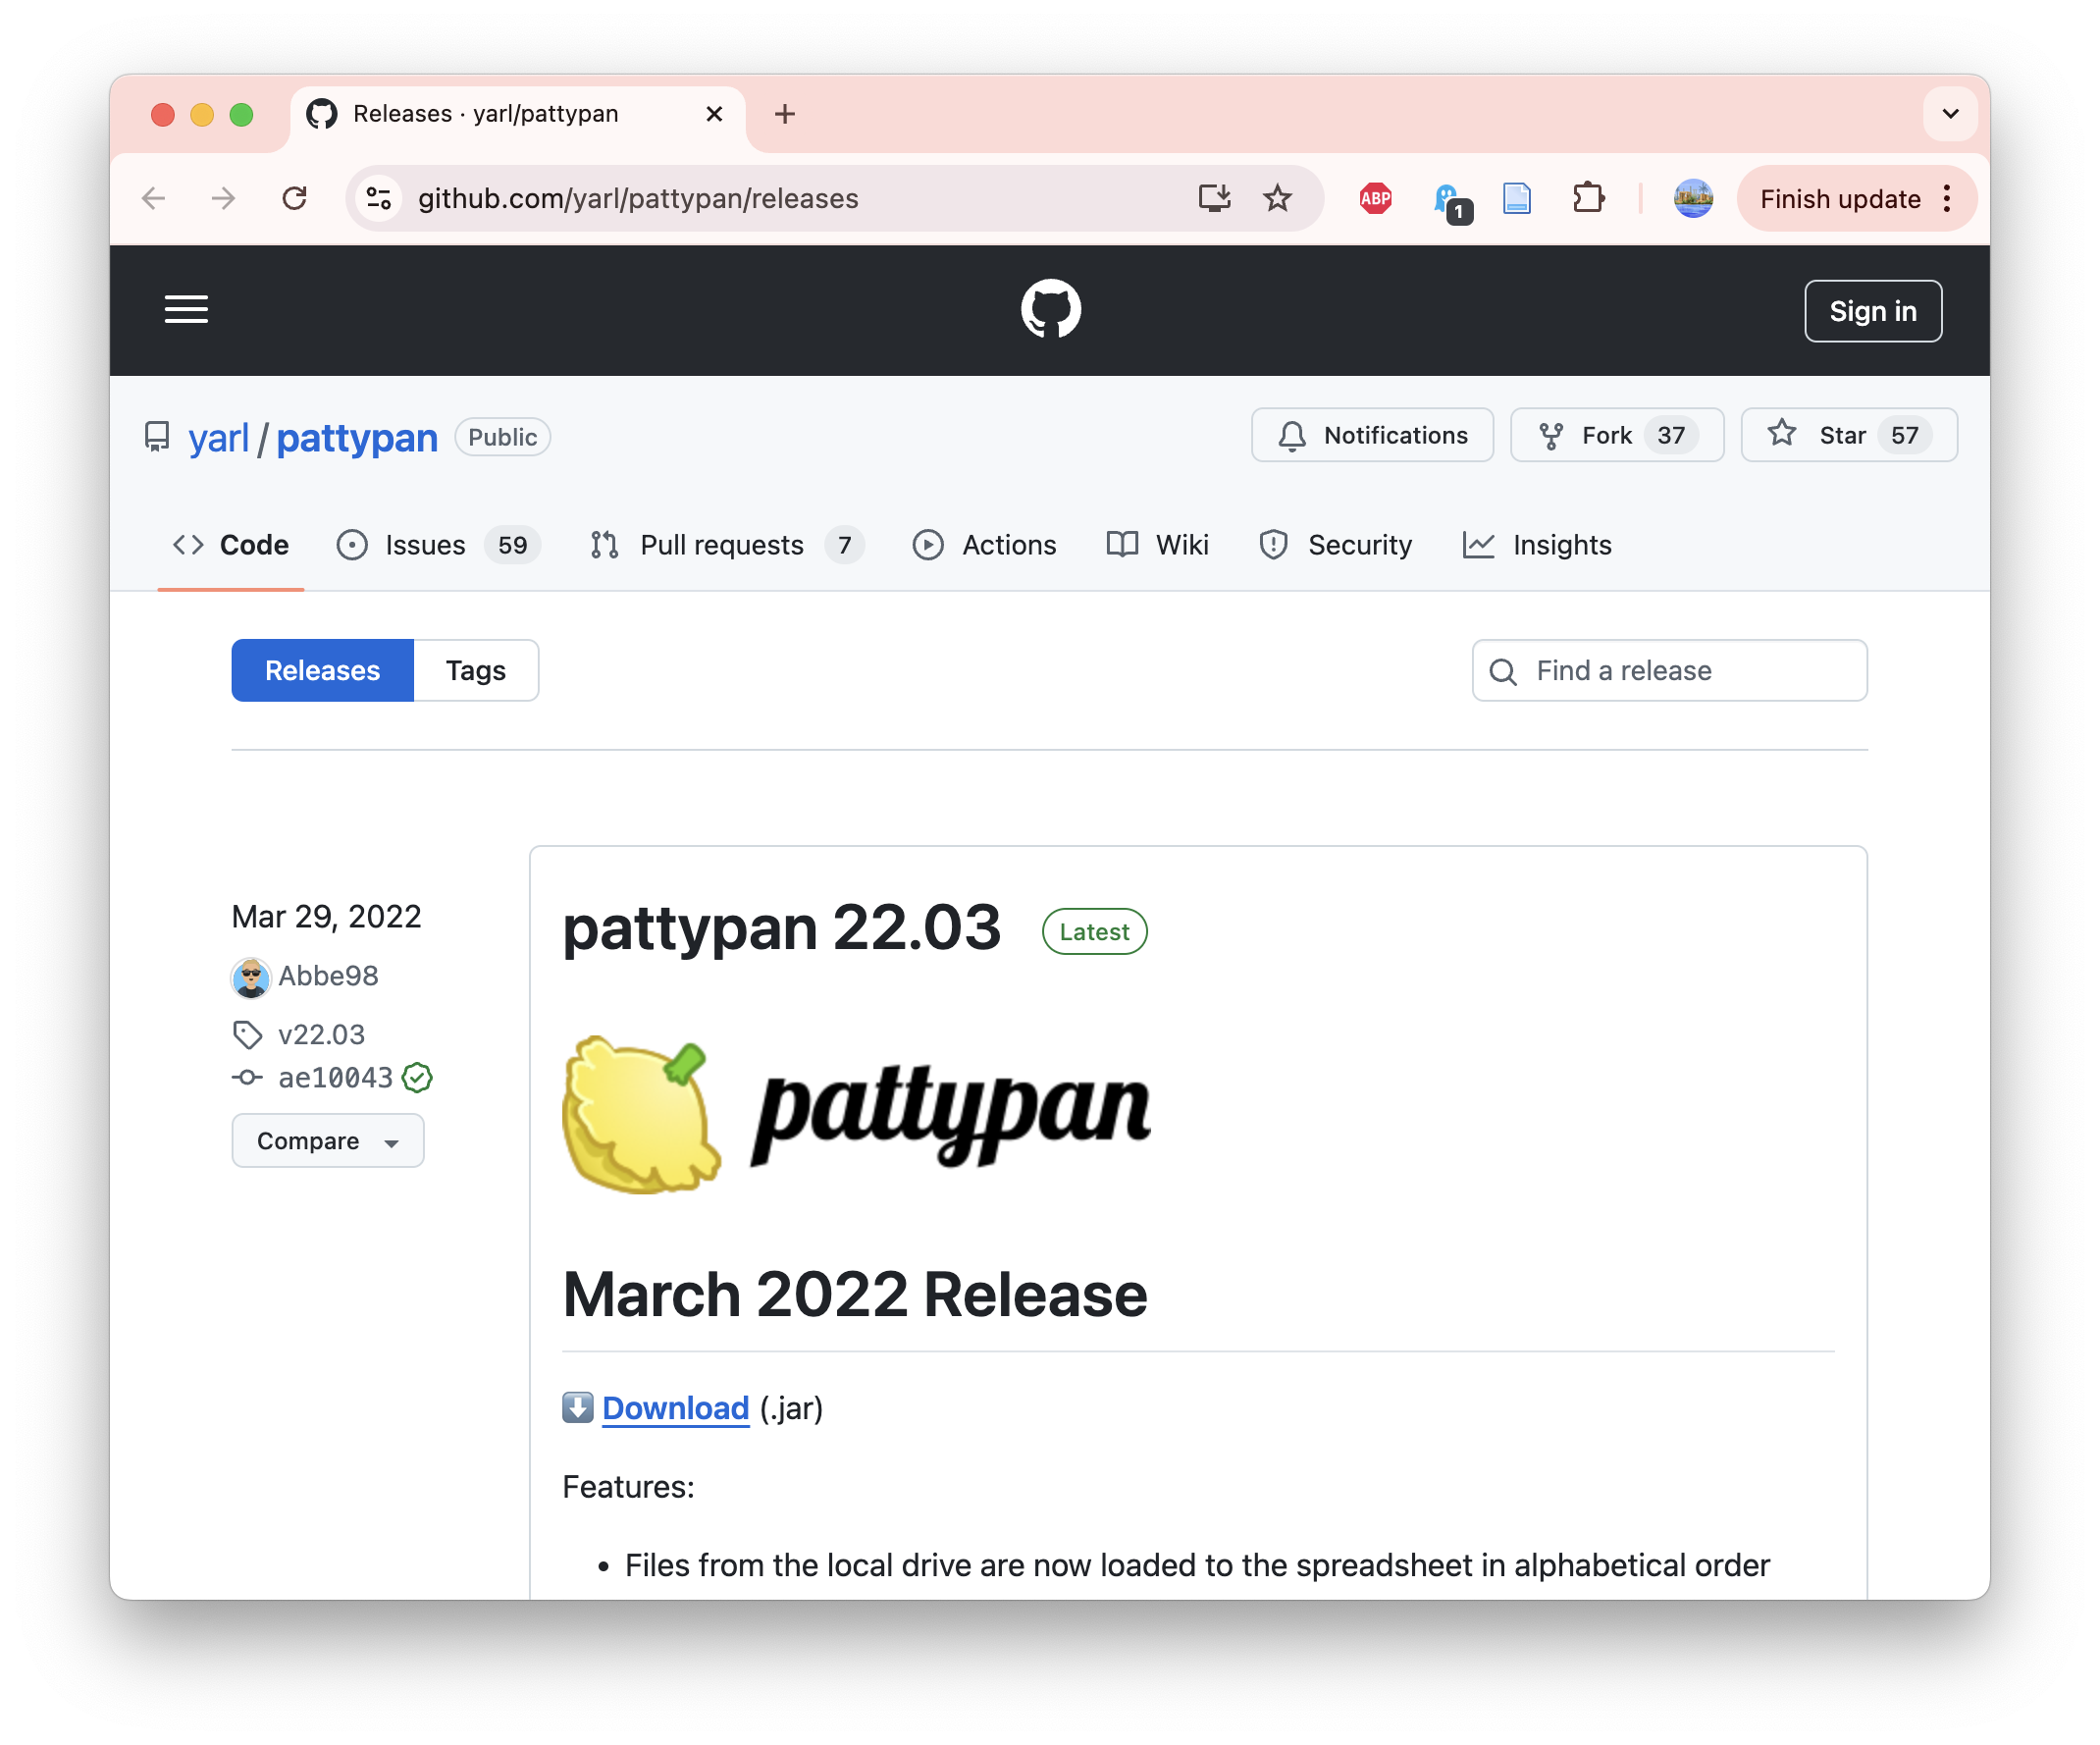
The most recent version is available on GitHub: https://github.com/yarl/pattypan/releases
Download the most recent version of Pattypan onto your computer.
Step 5
Open Pattypan
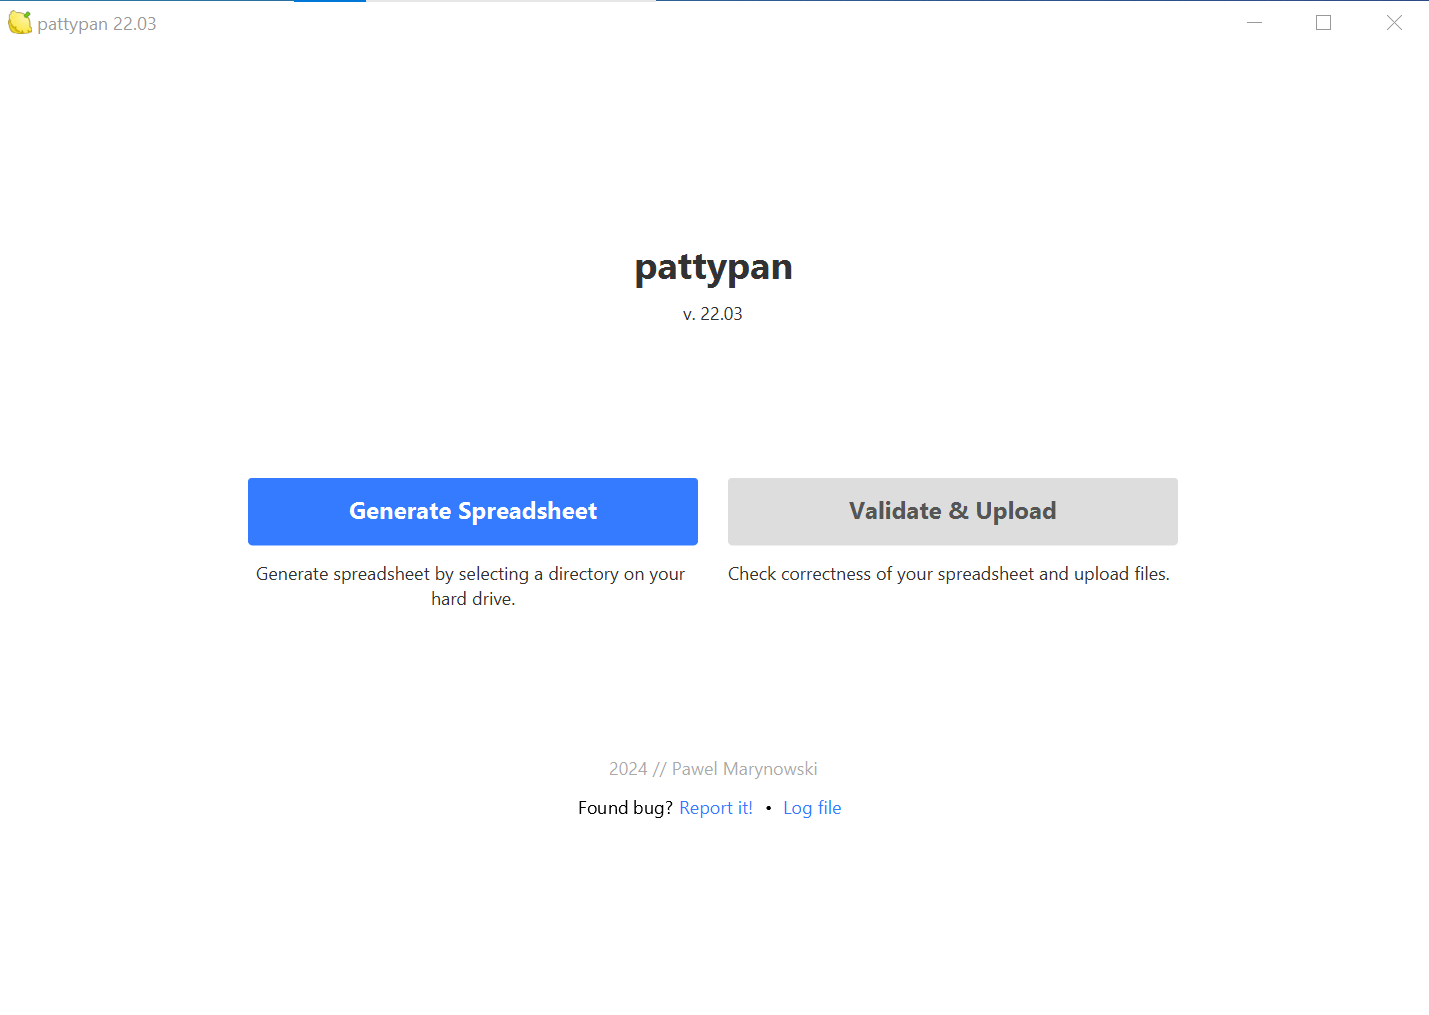
If successful, you should see the screen in figure 8.
Proceed to Checklist 2.
Checklist 1b: Getting Started on Mac OS
At the moment, only Mac devices with Intel Graphics Processors can support Pattypan. This means Macs that use M1, M2 or M3 processors cannot support Pattypan.
To confirm whether your Mac supports Pattypan, go to the Apple Menu > System Settings > and click ‘About This Mac’ to view the processor in ‘Graphics’.
Step 1
Create a Wikipedia account
You will need a Wikipedia account to upload images to Wikimedia Commons. This account enables you to sign in using the same login details across all Wikimedia platforms.
Visit https://en.wikipedia.org/wiki/Special:CreateAccount and register for an account. For privacy reasons, do not use personal information in your username.

For more support, see https://www.youtube.com/watch?v=19l7fqd3Vww.
Step 2
Check your device for Java
Check whether Java is already installed on your device by clicking on the Apple icon in the top left corner of your desktop > System Settings > and then scrolling down to find ‘Java’ listed in the left hand menu.
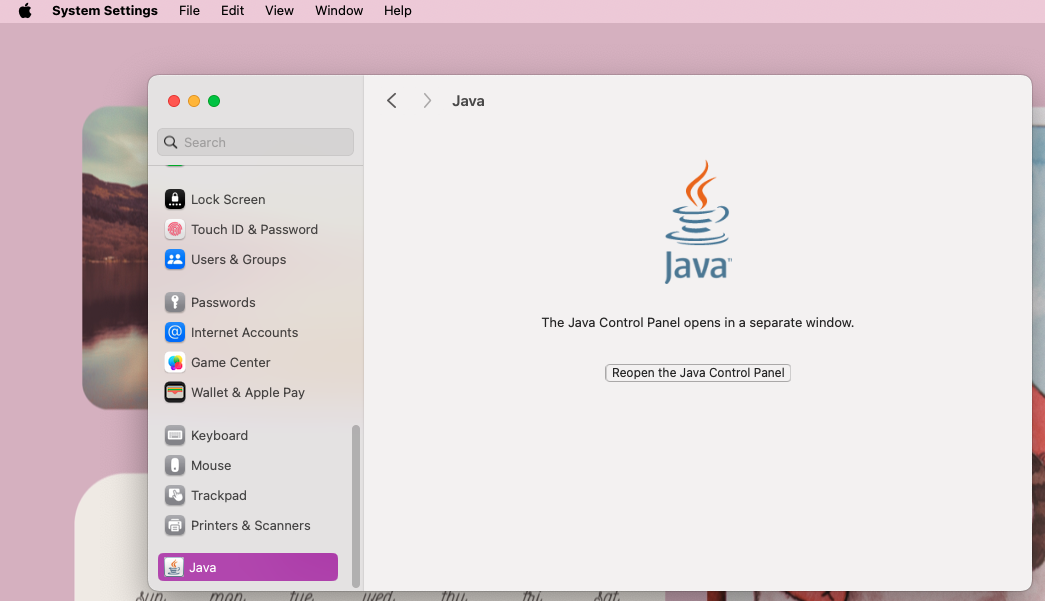
If you do not see Java listed, you will need to download it.
If you do see Java listed, make sure you have the most recent version. Click ‘Java’.
This will open a new window. Click on the ‘Update’ tab where you can view the version of Java installed on your computer (e.g., Java 8, on right).
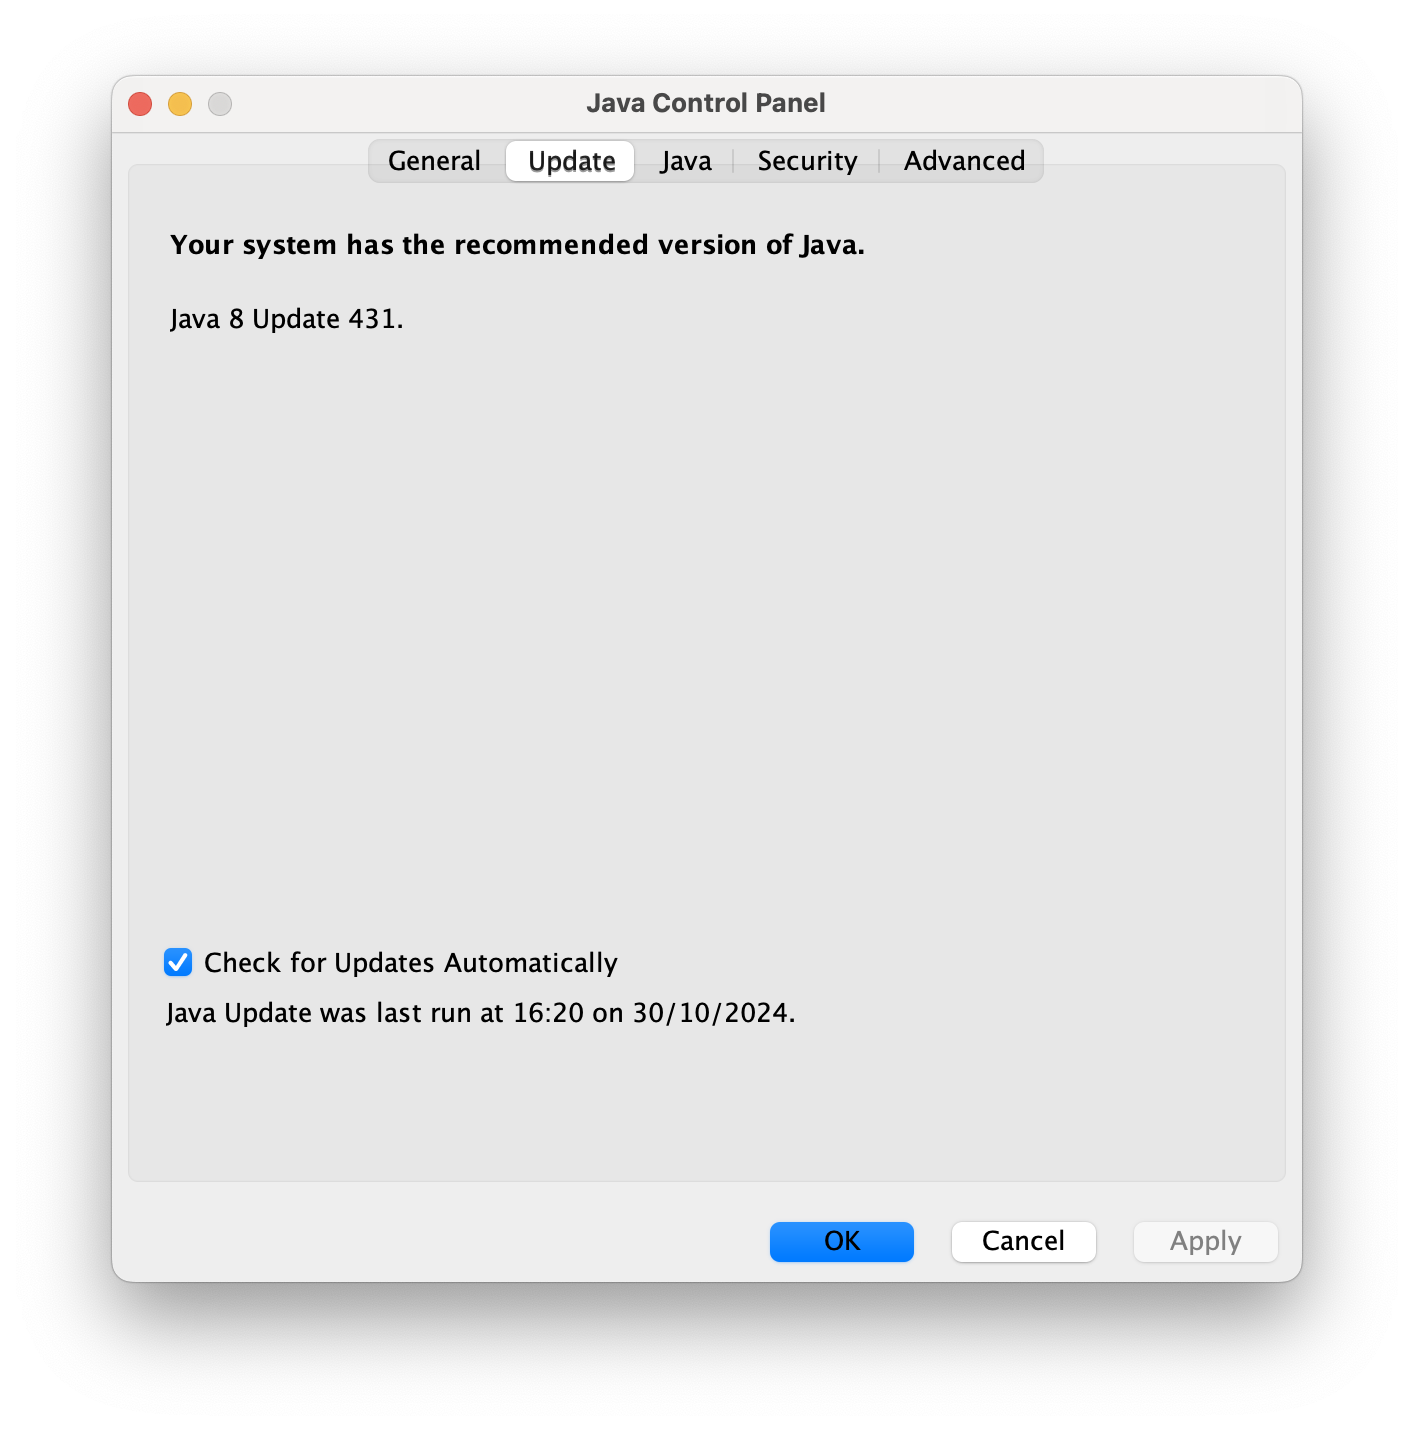
If your version is not up-to-date, go to Step 3.
If your version is up-to-date, go to Step 4.
Step 3
Download and install the most recent version of the Java Development Kit (JDK)
Visit the Oracle website and click on the link under ‘What’s new’ to view and download the latest release.

For more support, see How do I Install Java for my Mac?
Make sure that you download JDK and not JRE.
Step 4
Download Pattypan
The most recent version is available on GitHub: https://github.com/yarl/pattypan/releases

Pattypan does not require a separate installation.
Step 5
Open Pattypan
Find Pattypan in your Downloads folder. It will appear as a coffee cup icon.
Double click on the Pattypan icon. Your Mac OS will prevent you from opening Pattypan for security reasons.
To change this, click on the Apple icon in the top left corner of your desktop > System Settings > then scroll down to ‘Privacy & Security’ and select ‘Open Anyway’ (as shown on bottom right).
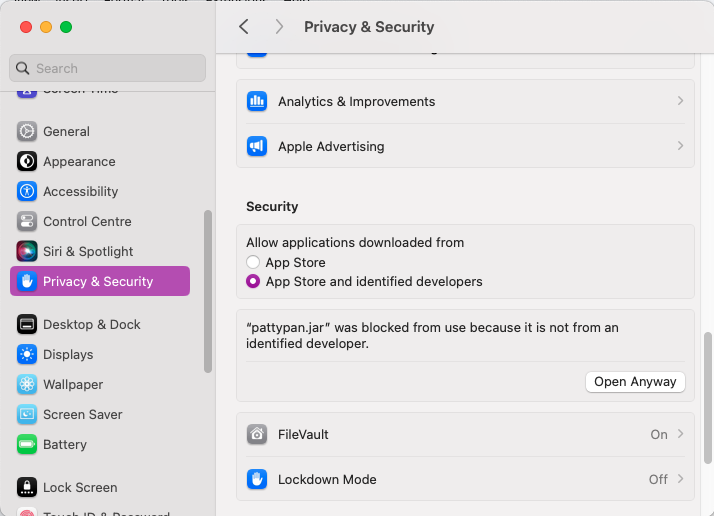
Open Pattypan by double clicking on the Pattypan.jar icon.
When asked whether you are sure you want to open the app, select ‘Open’.
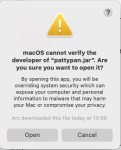
Allow Java to access your Downloads folder when prompted.
Using Finder, move Pattypan from your Downloads folder to Applications by dragging it from Downloads to Applications.
If successful, you should see the Pattypan launch screen.

If you see the Pattypan launch screen you have installed it successfully.
Proceed to Checklist 2.
Tip: As a reminder, if using your personal Wikipedia account to upload content on behalf of an organisation, please add a note explaining this to your User page. Under the Wikimedia Conflict of Interest guidelines, any affiliations must be disclosed by users.
Getting Organised: Images and Metadata
Overview
Checklist 2 provides a guide to preparing your images and editing the image metadata to remove copyright claims or personal data. It includes instructions for the following steps:
Step 6. Organise images into one folder
Step 7. Clean image file names using a standard naming convention
Step 8. Create a Metadata Template using Adobe Bridge
Step 9. Name the Adobe Metadata Template and populate your core fields
Step 10. Locate the image folder and select the Metadata Template to apply to all image files
Step 11. Review the image metadata
Checklist 3 provides a guide to checking whether your organisation has a QID on Wikimedia, creating a Category page for your organisation, and using the GLAM-E Lab Sandbox Template to organise the image’s descriptive metadata.
Step 12. Verify if your organisation has a Wikidata entry
Step 13. Verify if your organisation has a Category page
Step 14. Save a local version of the Sandbox Template
Step 15. Organise descriptive metadata in the Sandbox Template
Tip: If you encounter issues with the Wikidata or Category page steps, reach out to Wikimedia UK, who can connect you with support from their staff and volunteer network: programmes@wikimedia.org.uk.
Checklist 2: Organising Images
Now you are ready to organise the images and embedded metadata.
Step 6
Organise images into one folder
Once you have selected the images for upload ensure that all images are saved in the same folder (e.g., ‘Pattypan images for upload, as shown on right). This folder is where Pattypan will draw from to create the auto-generated spreadsheet with all image file names and location to support their upload to Wikimedia Commons.
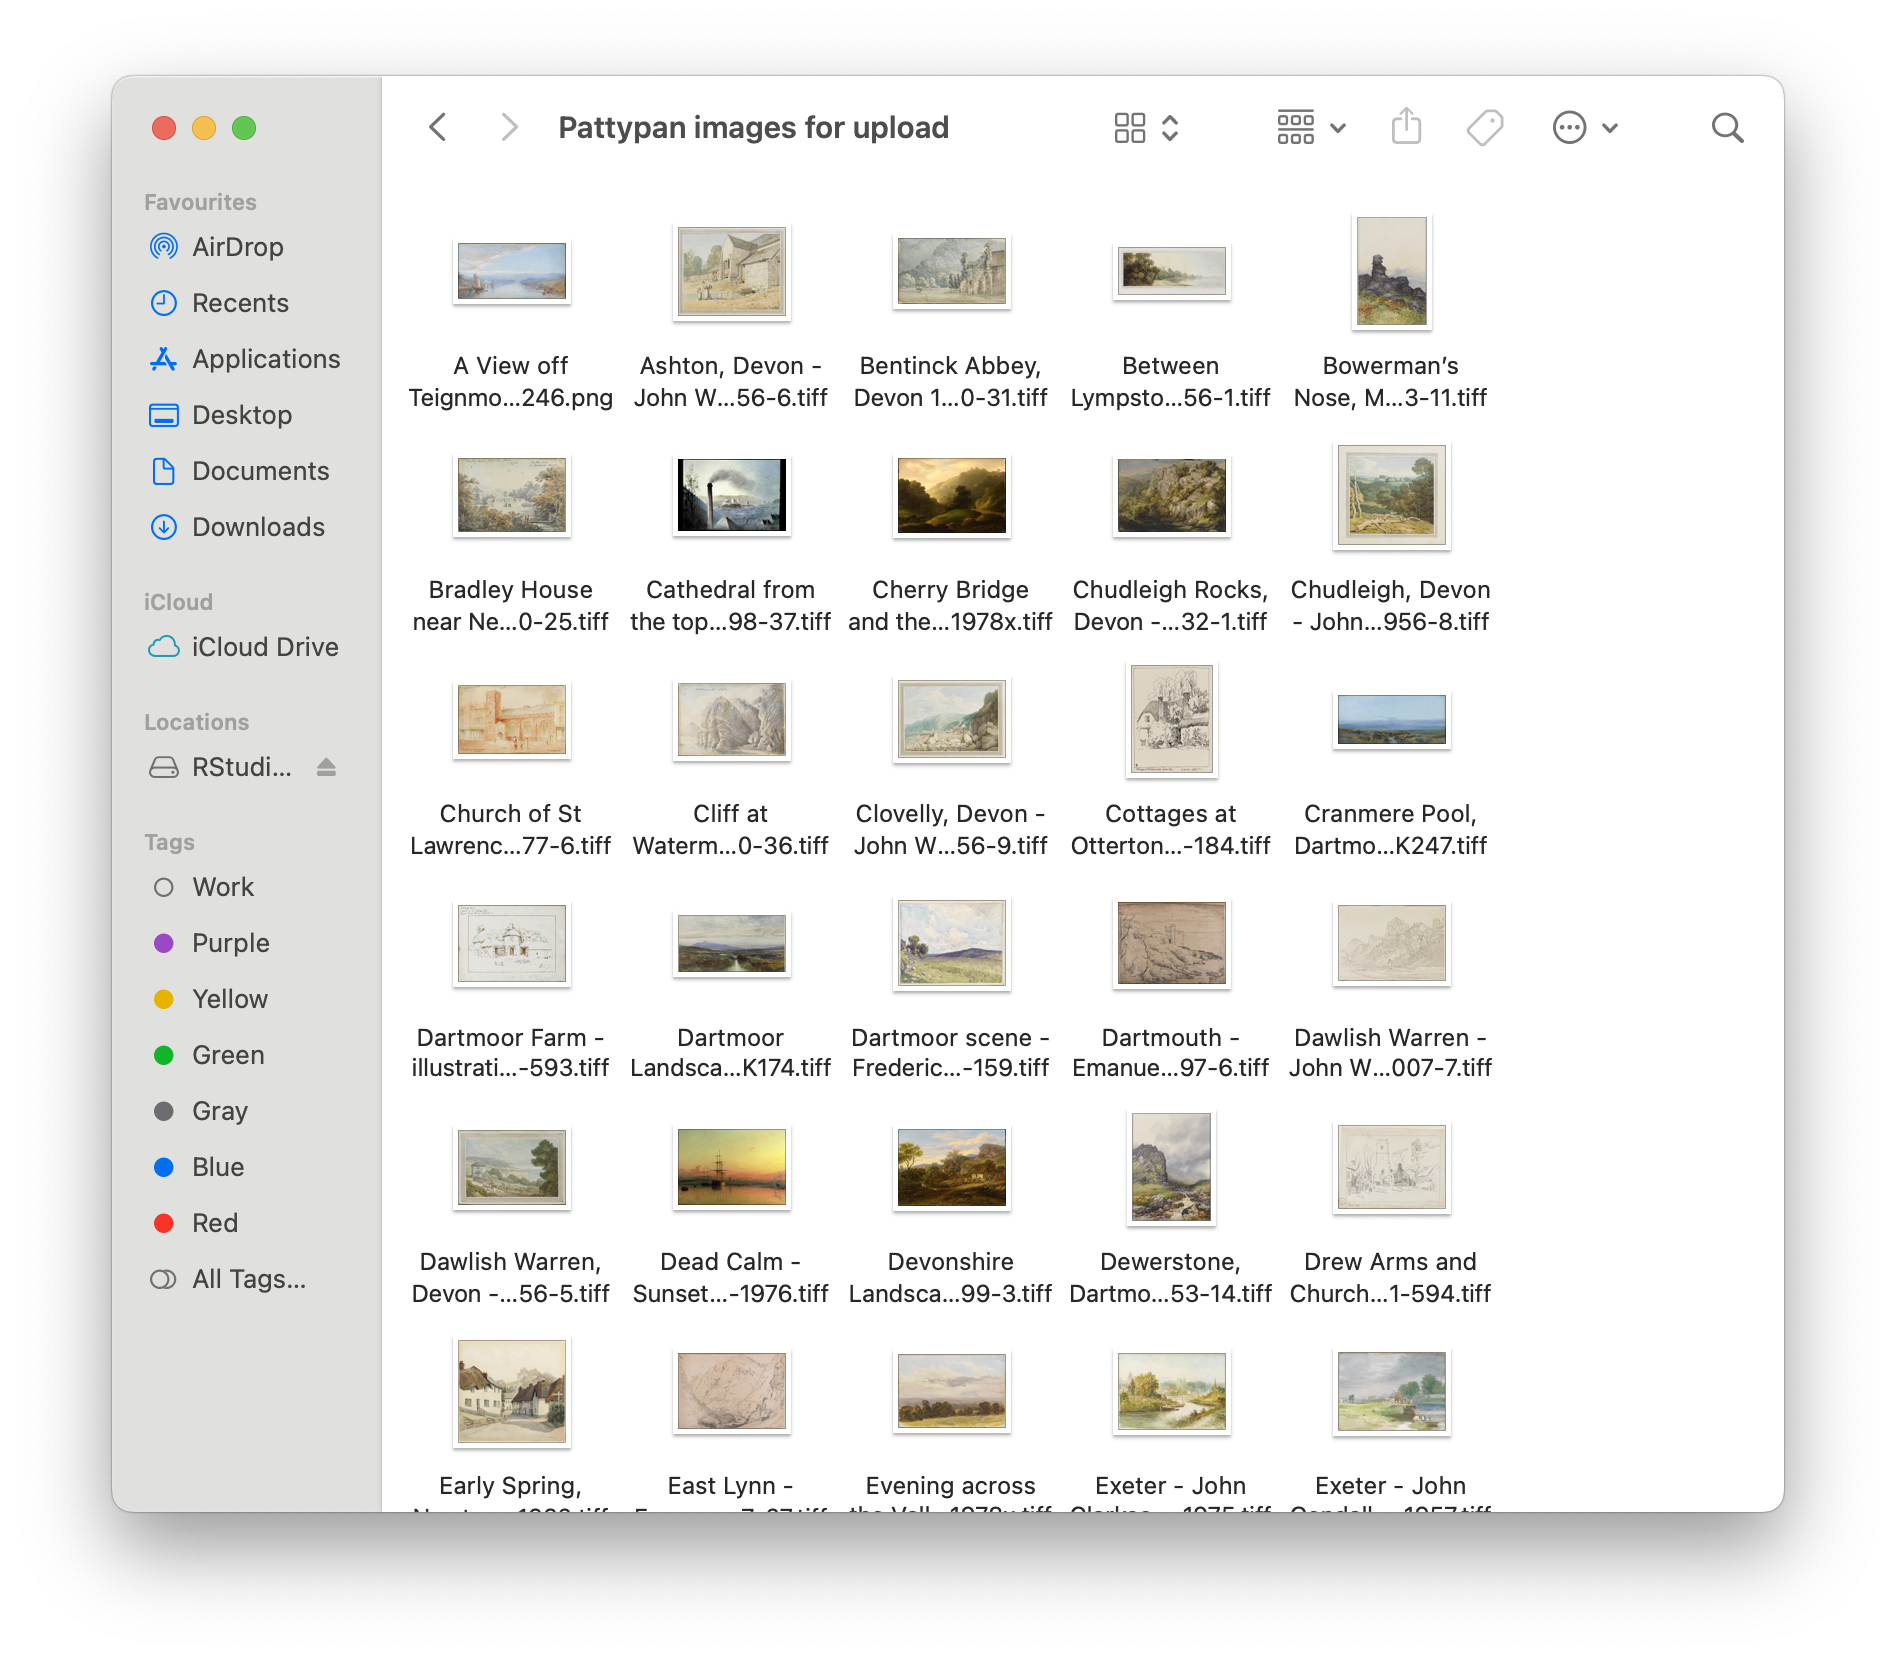
Organizing images in a local folder will make uploading much easier.
Step 7
Clean image file names using a standard naming convention
To ensure consistent image names on Wikimedia Commons, establish a standard naming convention for your images prior to your first upload, e.g., ‘Artwork name - Artist name - Accession number’.
Adding a unique ID to the file name, like the Accession number (e.g., 66-1962), is useful for finding and managing uploaded content. It will also help reduce the risk of file name replication, which causes uploads to fail.
Avoid using square or curly brackets (regular brackets like these are fine), colons, and slashes.

An example of good naming convention practices.
If you plan to skip using Adobe Bridge to add standard metadata to your images in bulk, proceed to Checklist 3.
Step 8
Create a Metadata Template using Adobe Bridge
Adobe Bridge allows you to add or edit the metadata embedded in your image (e.g. XMP, IPTC or EXIF data), including adding standard metadata to images in bulk.
If you do not have Adobe Bridge, download and install the free application.
Create a Metadata Template by selecting from the menu Tools > Create Metadata Template > to open a new window.
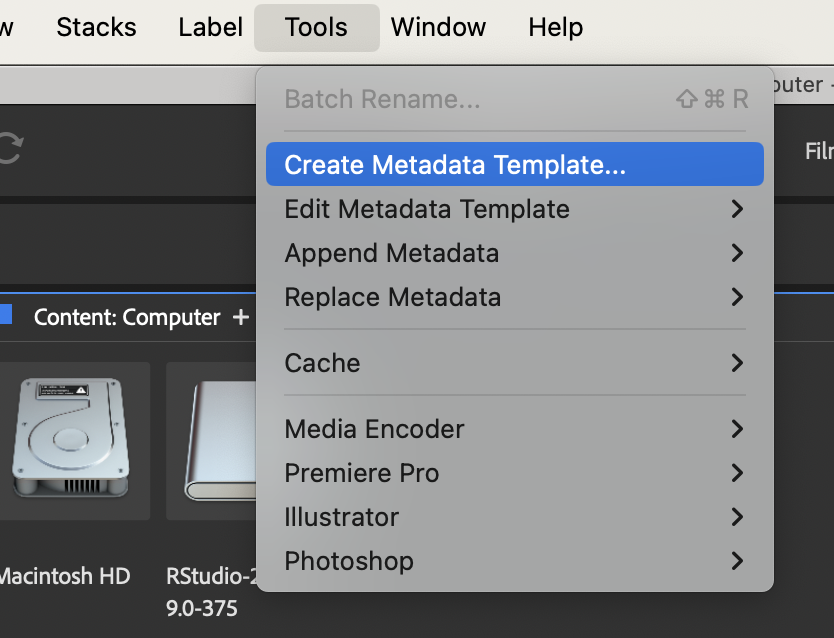
Create metadata template from the Tools menu in Adobe Bridge.
Step 9
Name the Adobe Metadata Template and populate your core fields
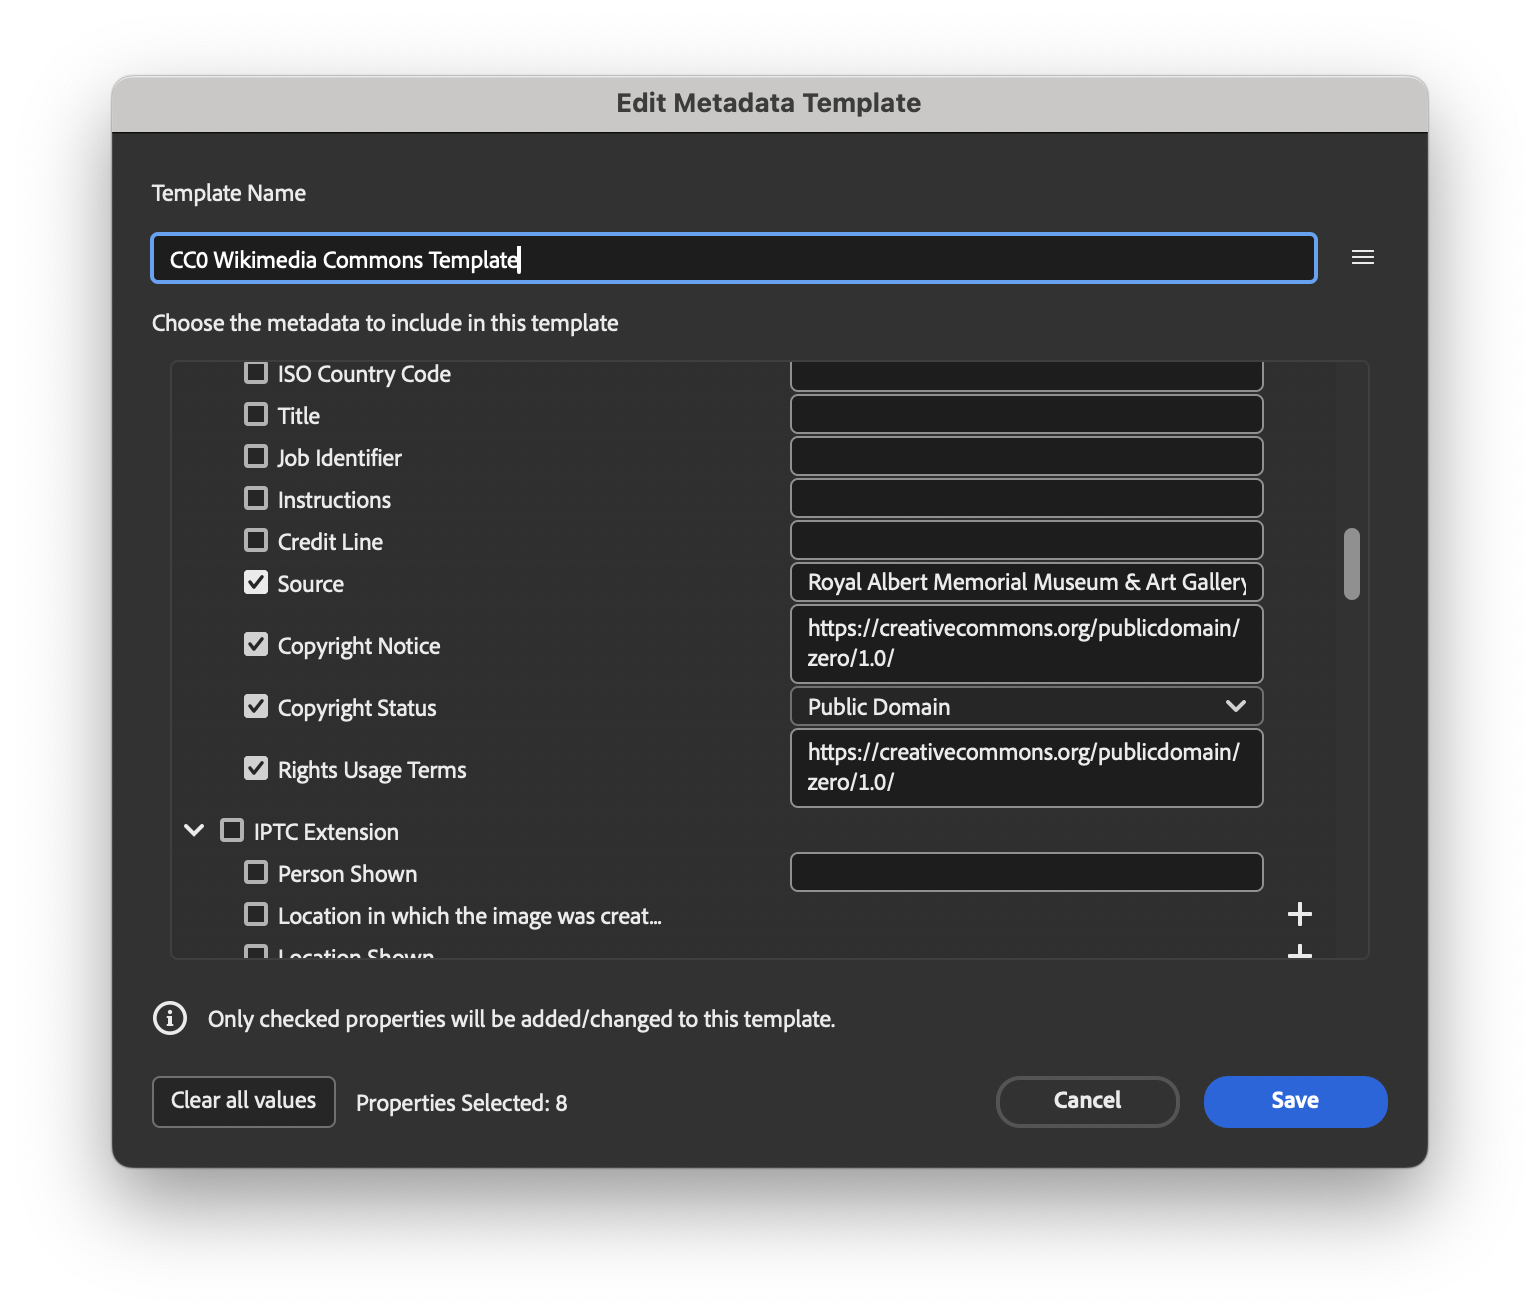
Edit metadata template menu from Adobe Bridge
Name the Metadata Template (e.g., CC0 Wikimedia Commons Template) and complete the core fields that should be applied to all images.
In IPTC Core: Copyright Status select ‘Public Domain’ from the dropdown.
In IPTC Core: Copyright Notice enter N/A or a similar phrase. This will overwrite any existing copyright information in this field.
In IPTC Core: Rights Usage copy and paste the relevant link: (e.g., https://creativecommons.org/publicdomain/zero/1.0/)
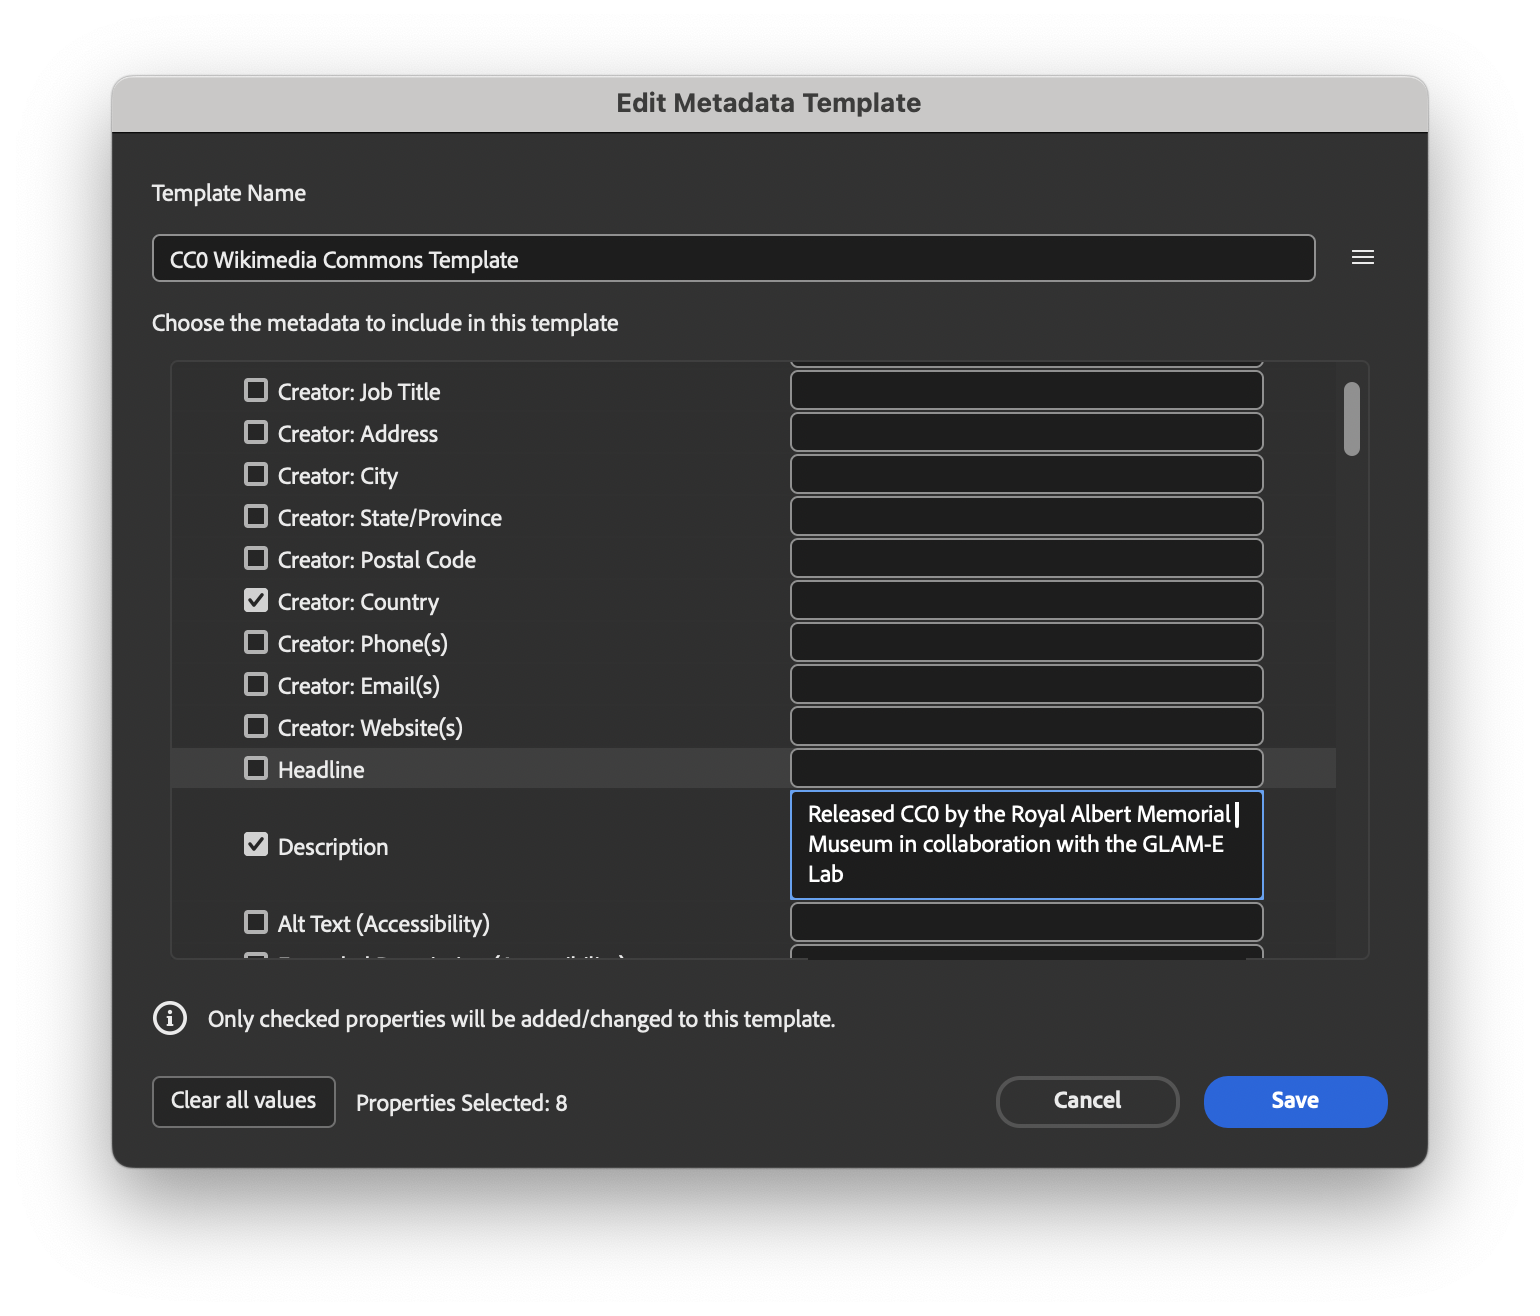
Screenshot of edit metadata field
You can also add in information on the image itself under the ‘Description’ field, e.g., ‘Released CC0 in collaboration with the GLAM-E Lab’ and your organisation name under the ‘Source’ field.
Adobe Bridge has other metadata fields and schema. Complete any additional fields that you think could be relevant to all works in your collection or the specific batch of images you are uploading..
When finished, click ‘Save’.
Step 10
Locate the image folder and select the Metadata Template to apply to all image files
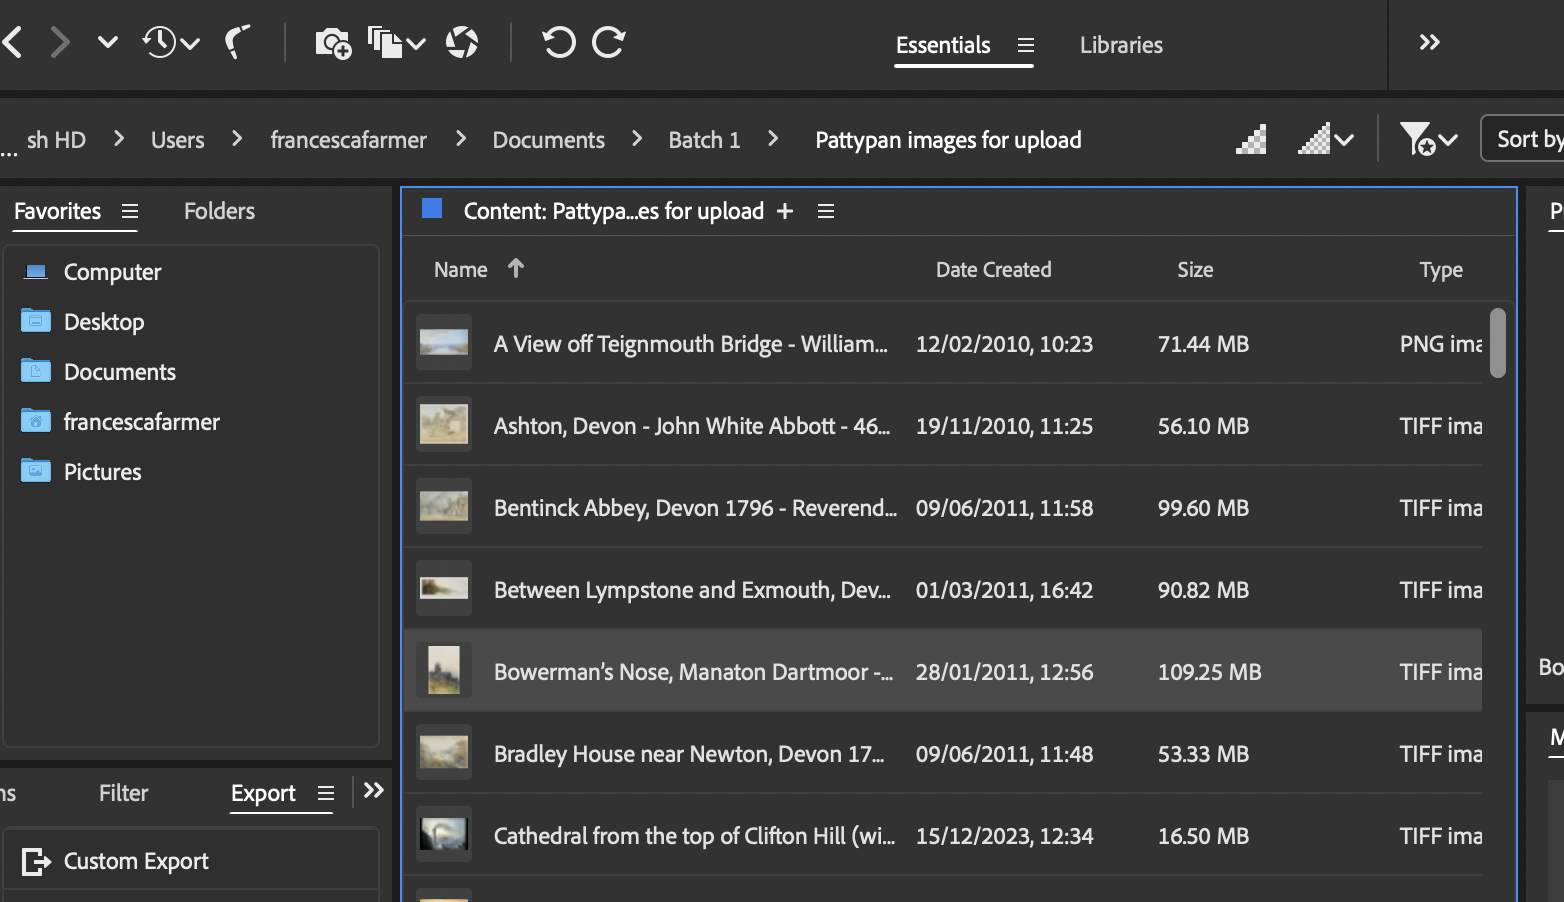
In the sidebar, locate the image folder on your local drive and select the folder. You will then need to select all of the images you would like to have the metadata template applied to.
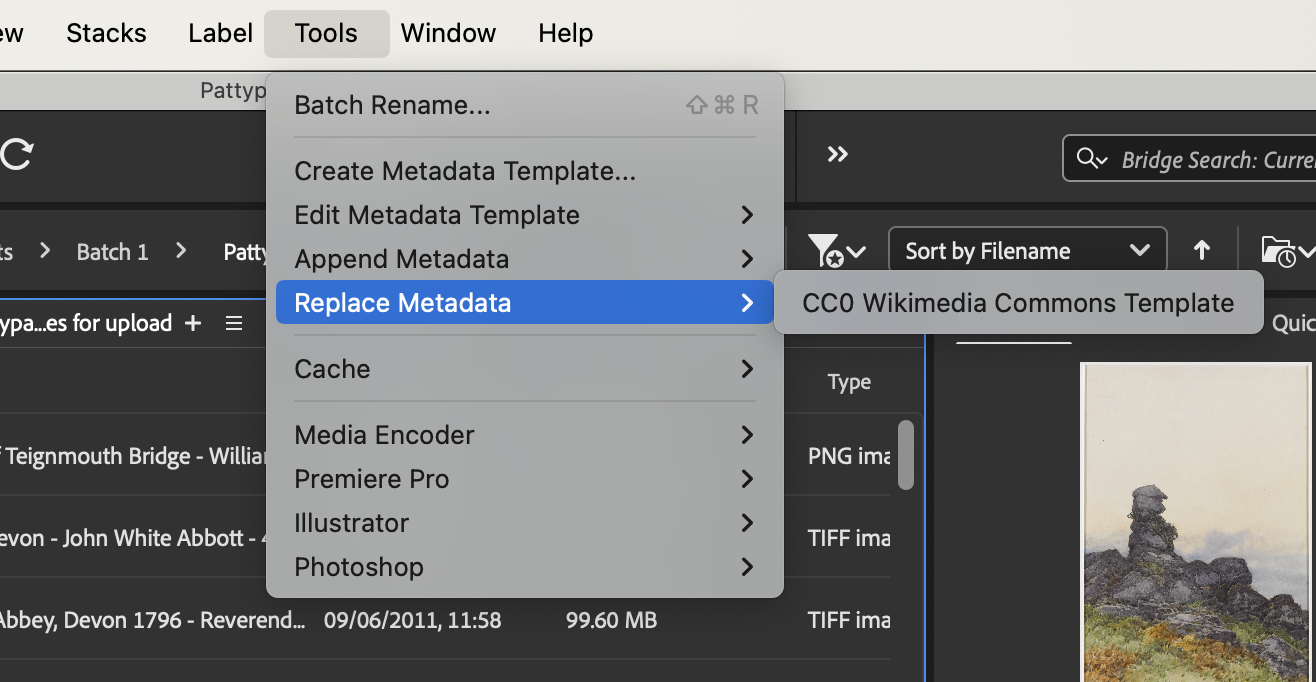
Once selected, go to Tools > Replace Metadata and select your CC0 Wikimedia Commons Metadata Template.
Step 11
Review the image metadata
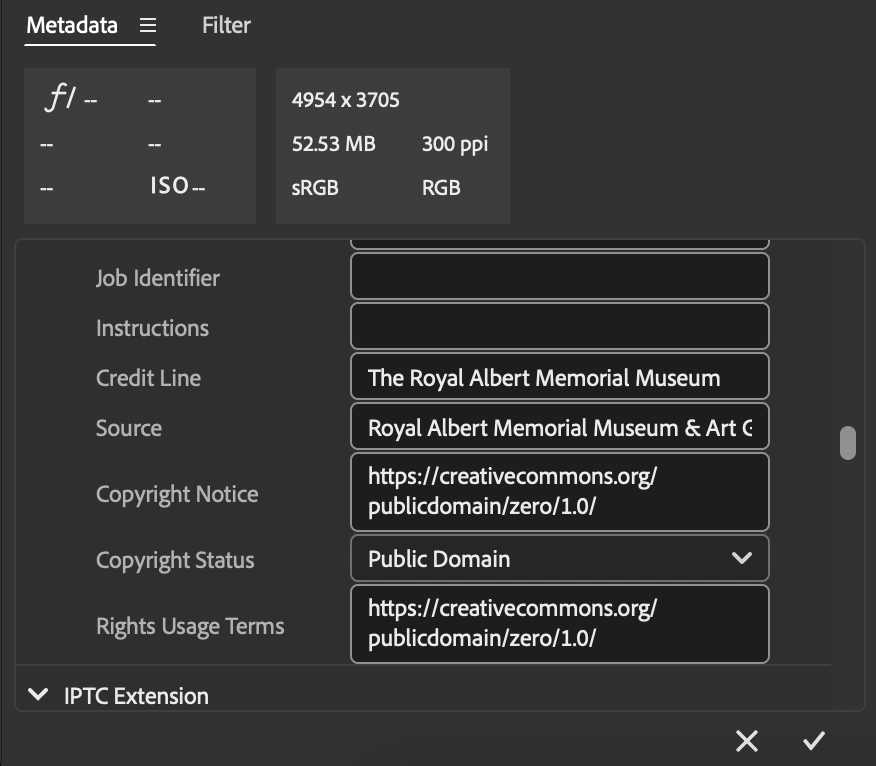
Check that the batch Metadata Template application was successful and review other metadata fields for accuracy.
If you find other rights statements or conflicting information you can edit it individually for each file
Proceed to Checklist 3.
Checklist 3: Wikidata, Wikimedia Commons Category creation and Sandbox Template for Wikimedia Commons Metadata Management
Before you organise the descriptive metadata for the individual images, you will need to:
Verify whether your organisation has a Wikidata entry
Create a Category page for your organisation
Tip: Categories are hierarchical. Each Category should itself be added to a more general Category page. For example, if you are an organisation in the UK, you could add your organisation’s category page to the GLAM In the UK Category.
After the Wikidata and Category page are in place, use the Sandbox Template to organise the descriptive metadata for your images. Afterwards, you will use Pattypan to generate the official Artwork Template spreadsheet into which you will copy and paste the metadata from your Sandbox Template. Pattypan uses the Artwork Template to attach all your metadata to Wikimedia Commons image file pages during upload.
At the end of this document, you will find guidance on how to use the Sandbox Template. Note that the guidance is also included in the first tab of the Sandbox Template.
Step 12
Verify if your organisation has a Wikidata entry
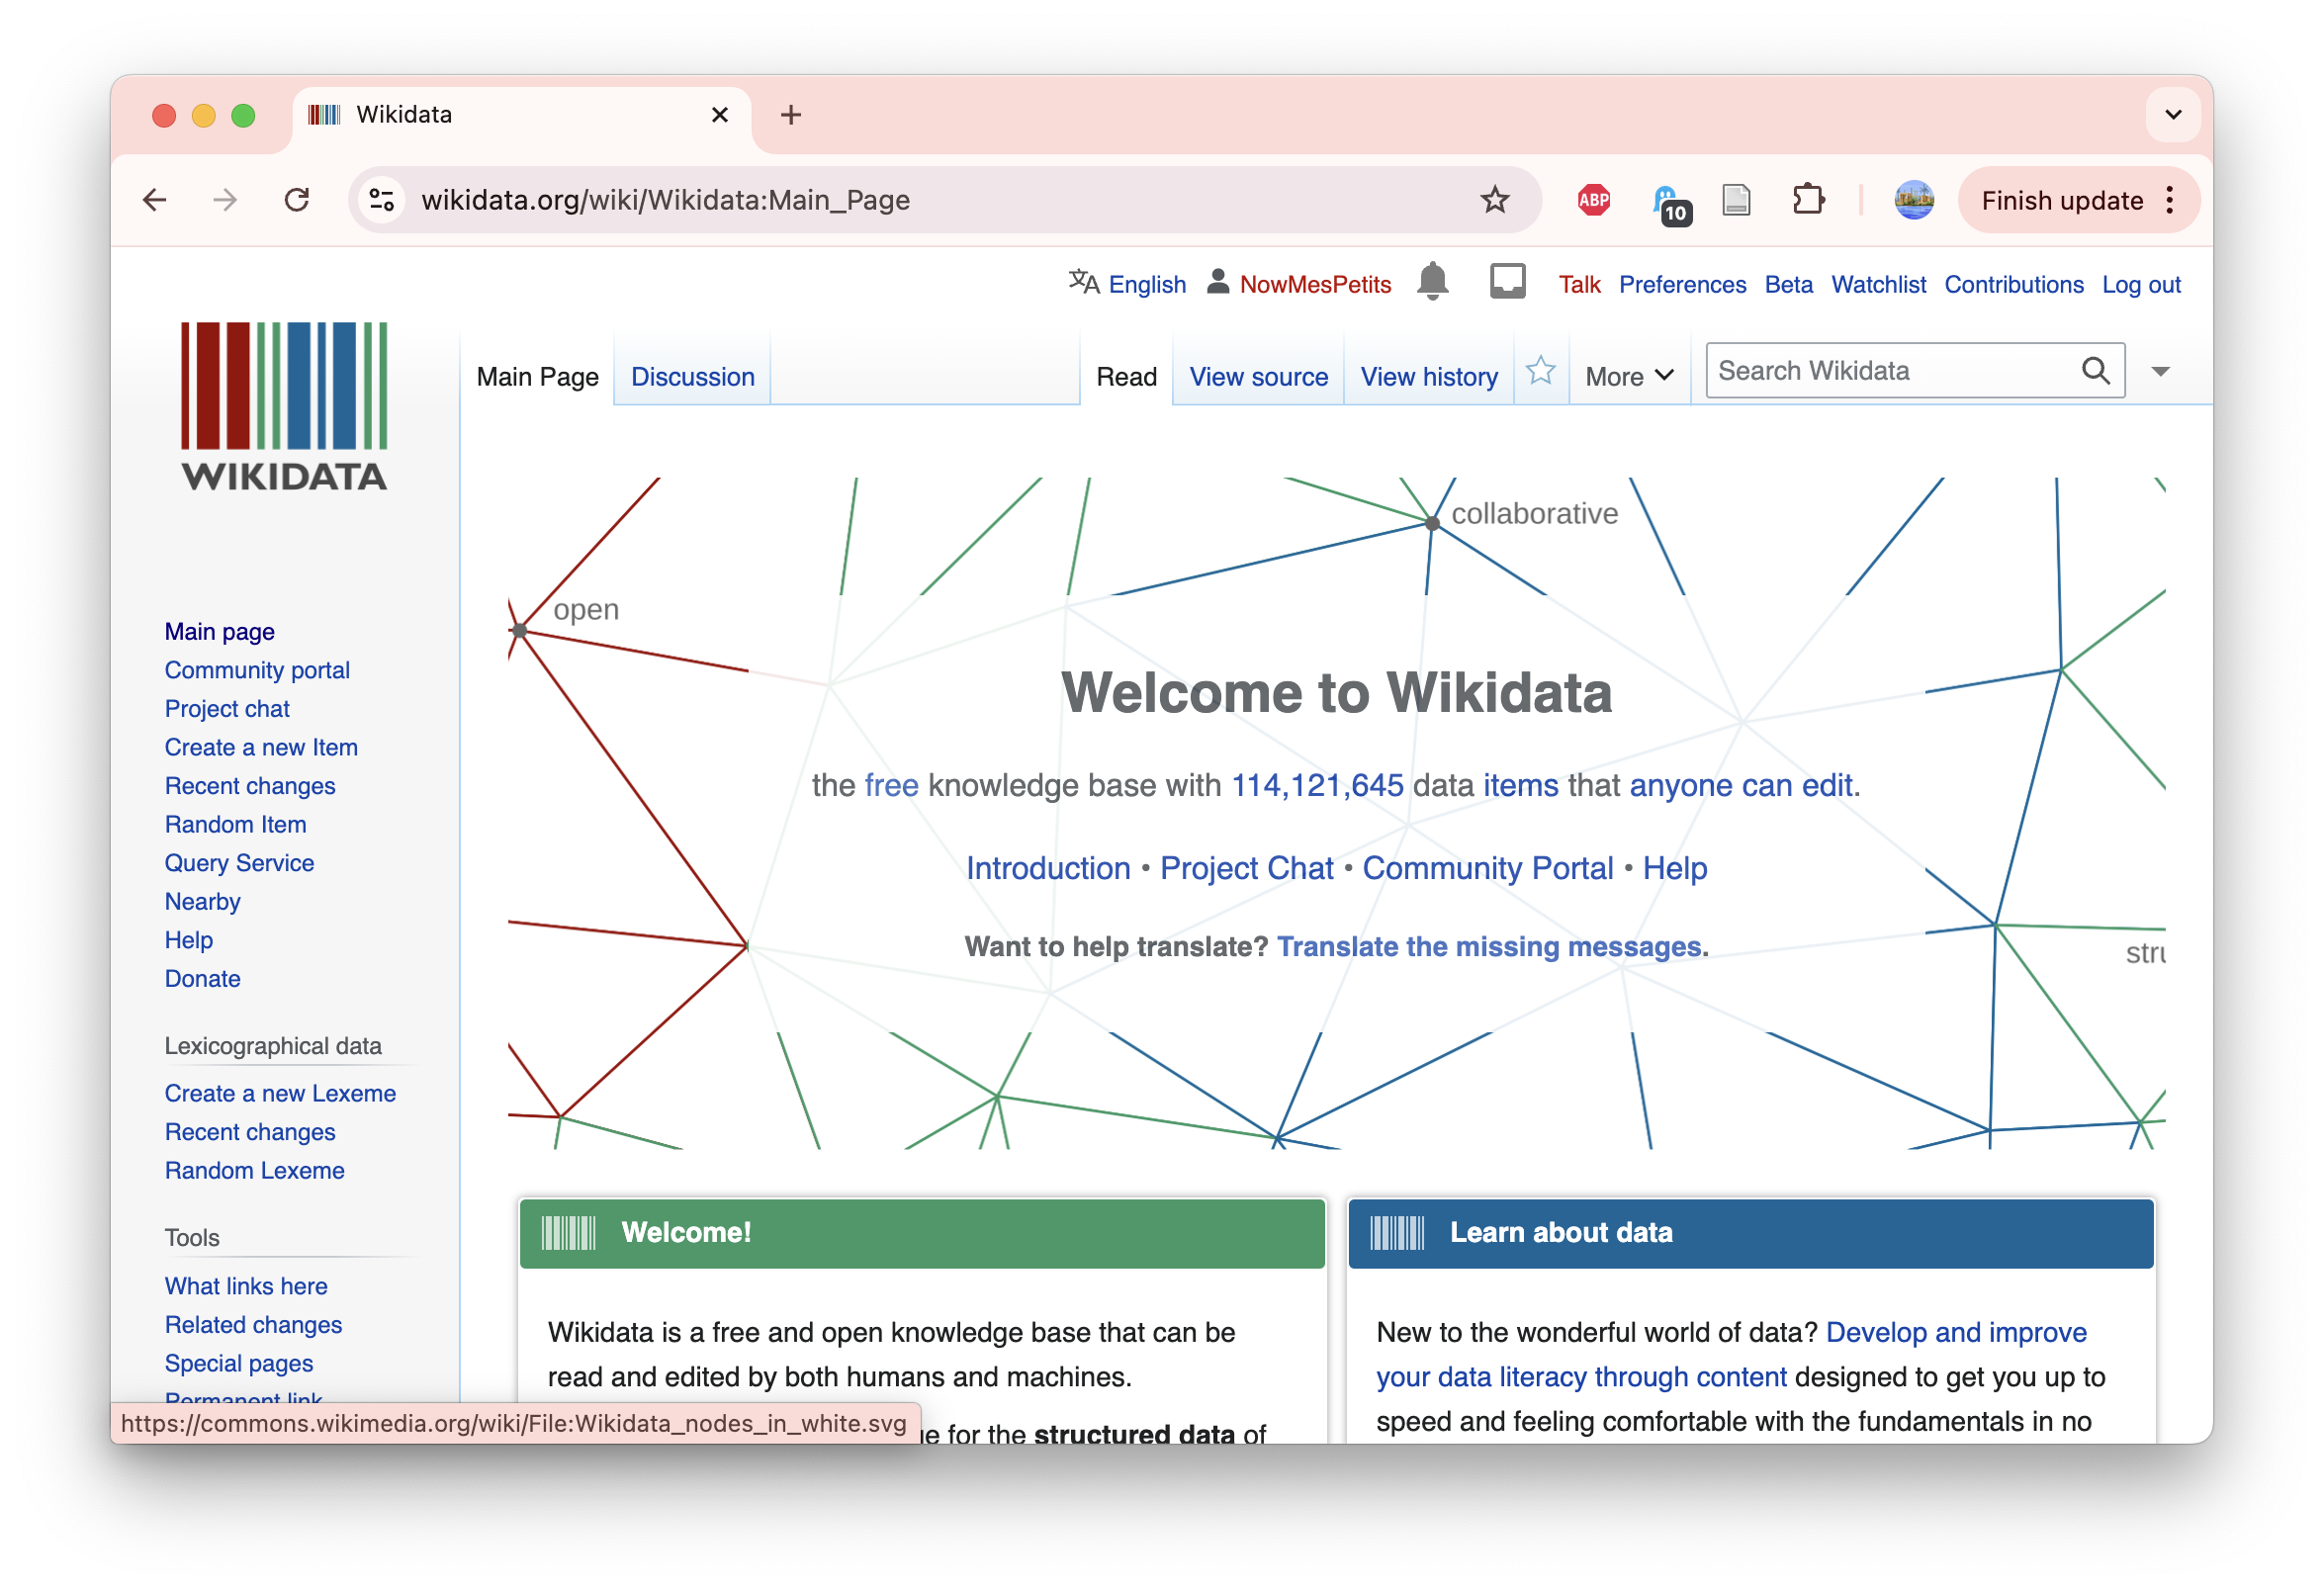
To check whether your organisation has a Wikidata entry, go to https://www.wikidata.org/ and log in to your account.
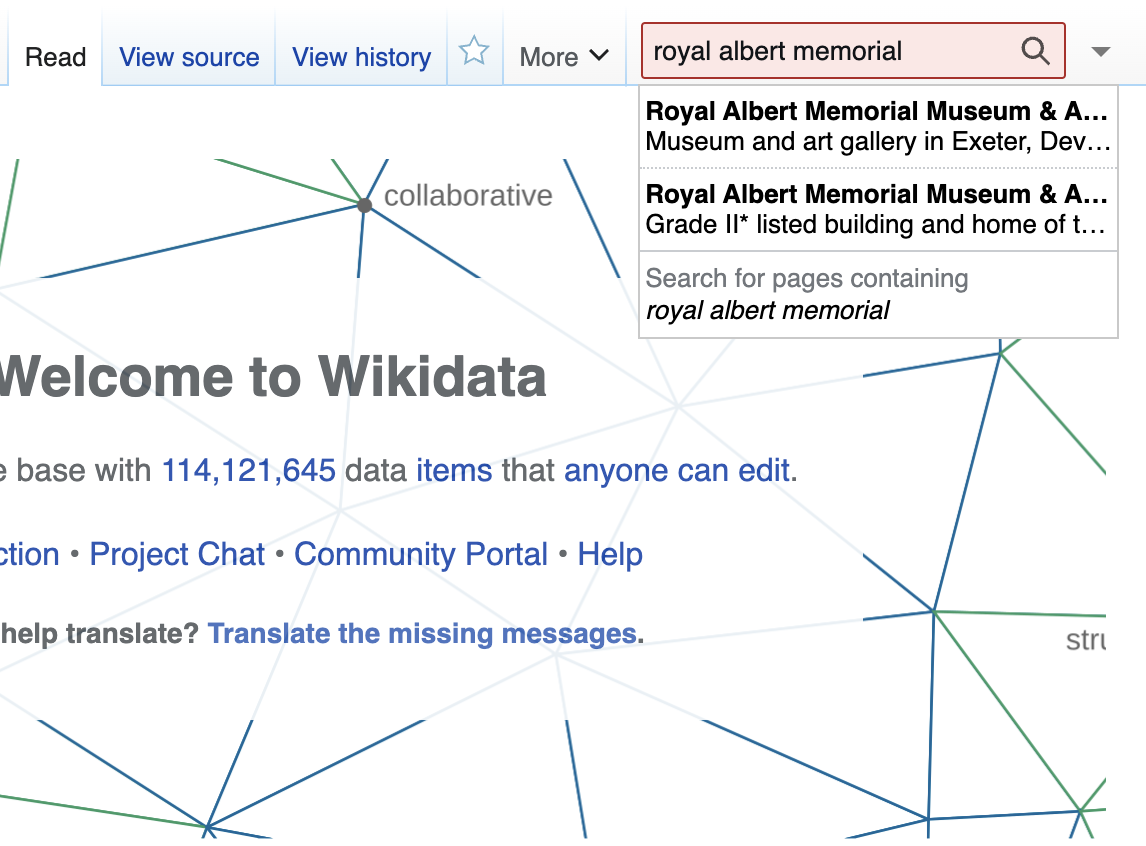
In the top right corner, use the Search bar to look for your organisation.
If your organisation appears, click on the name.
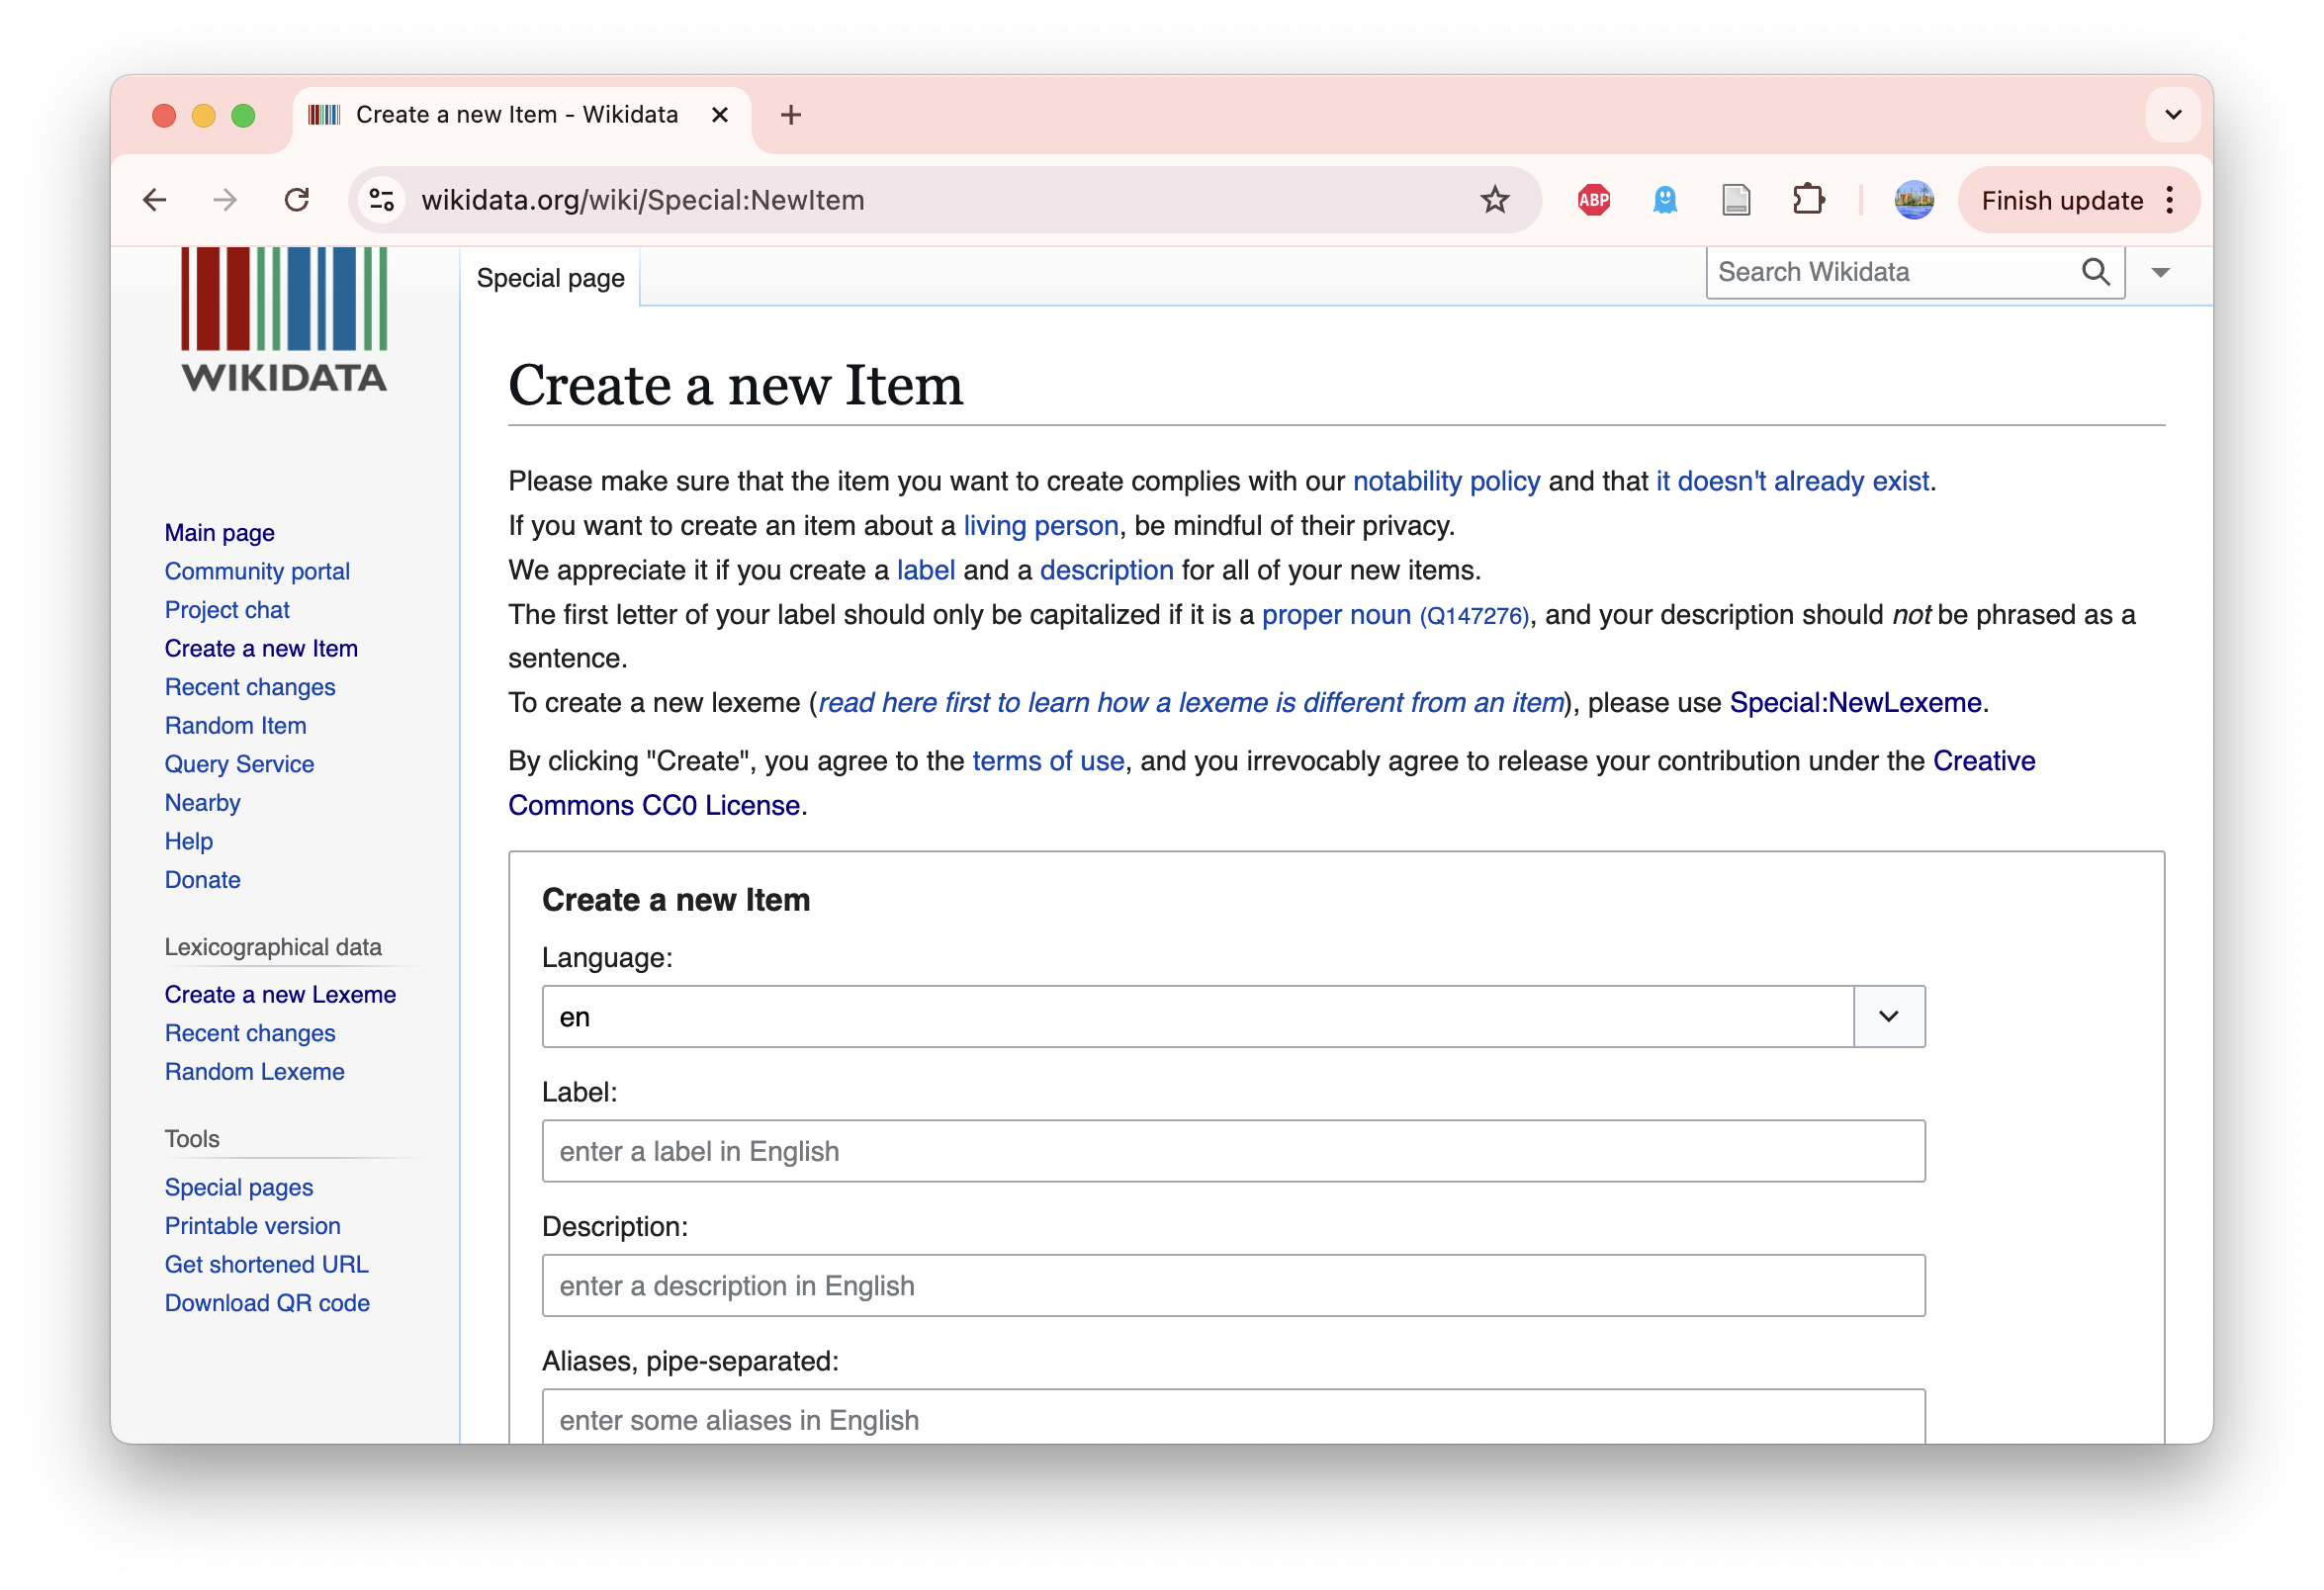
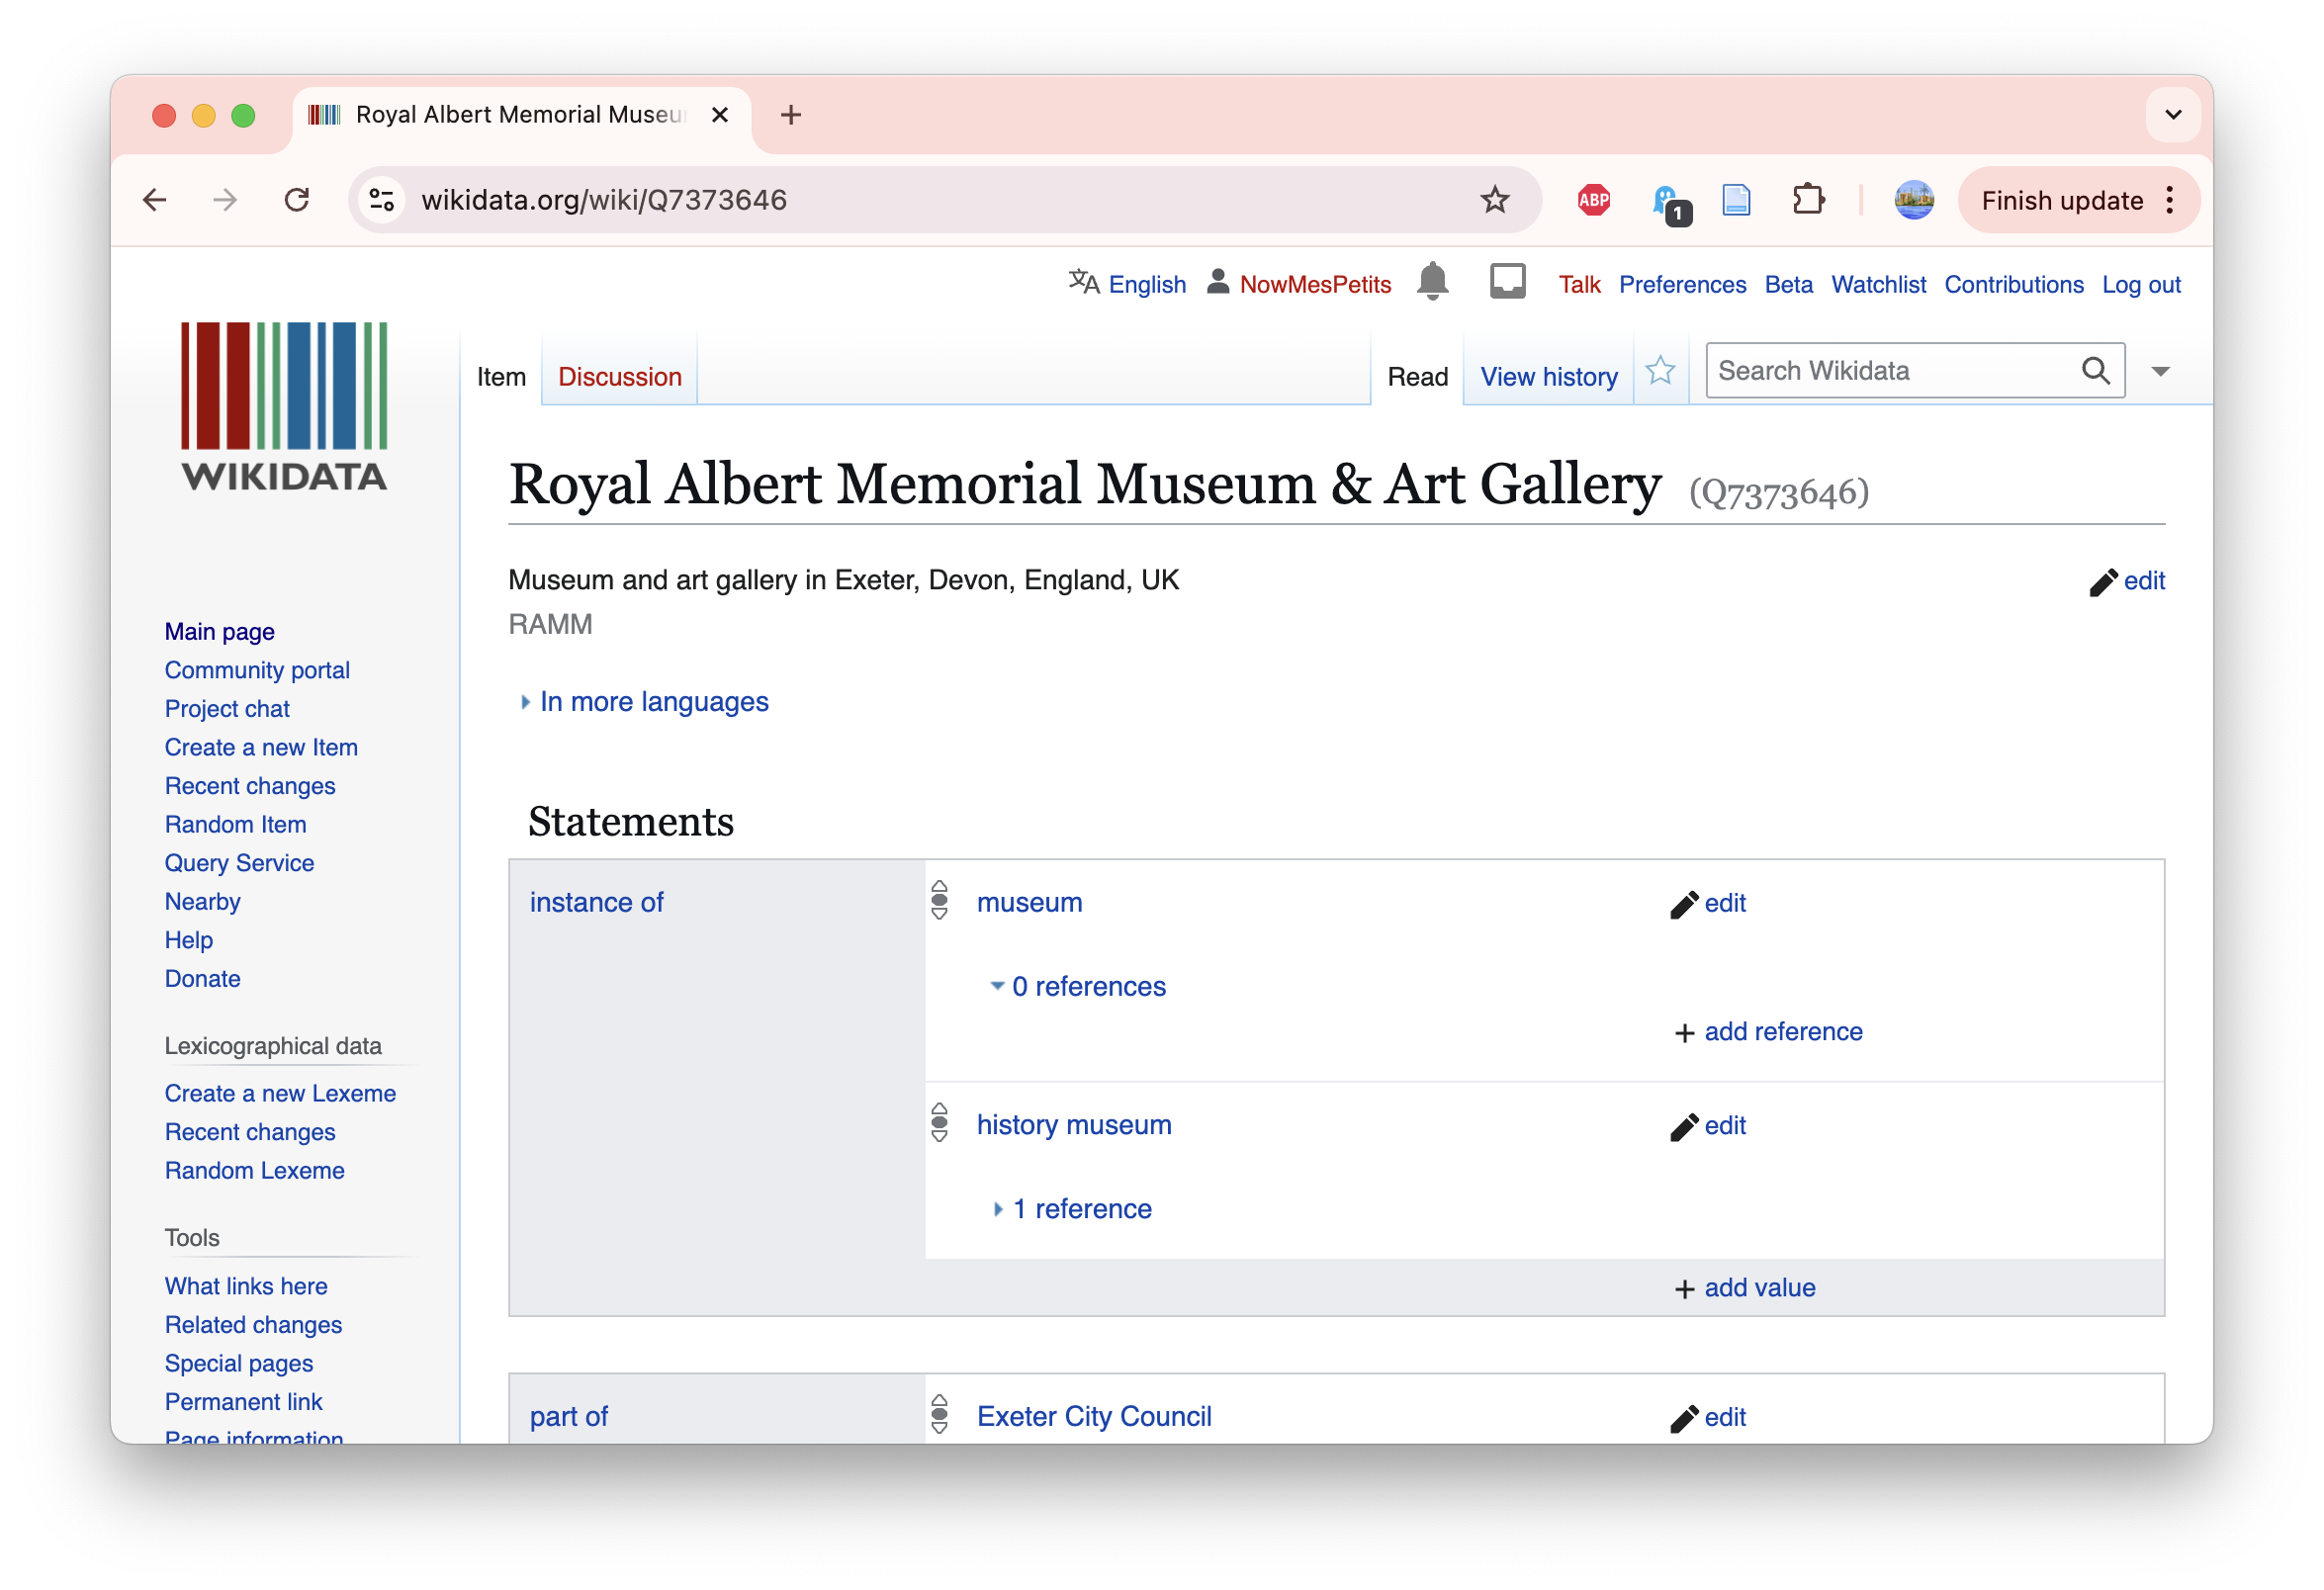
Take note of the QID in brackets (e.g., Q7373646) and proceed to Step 13.
If your organisation does not have a Wikidata entry, you can create one.
Optional step
Enrich your organisation’s Wikidata entry
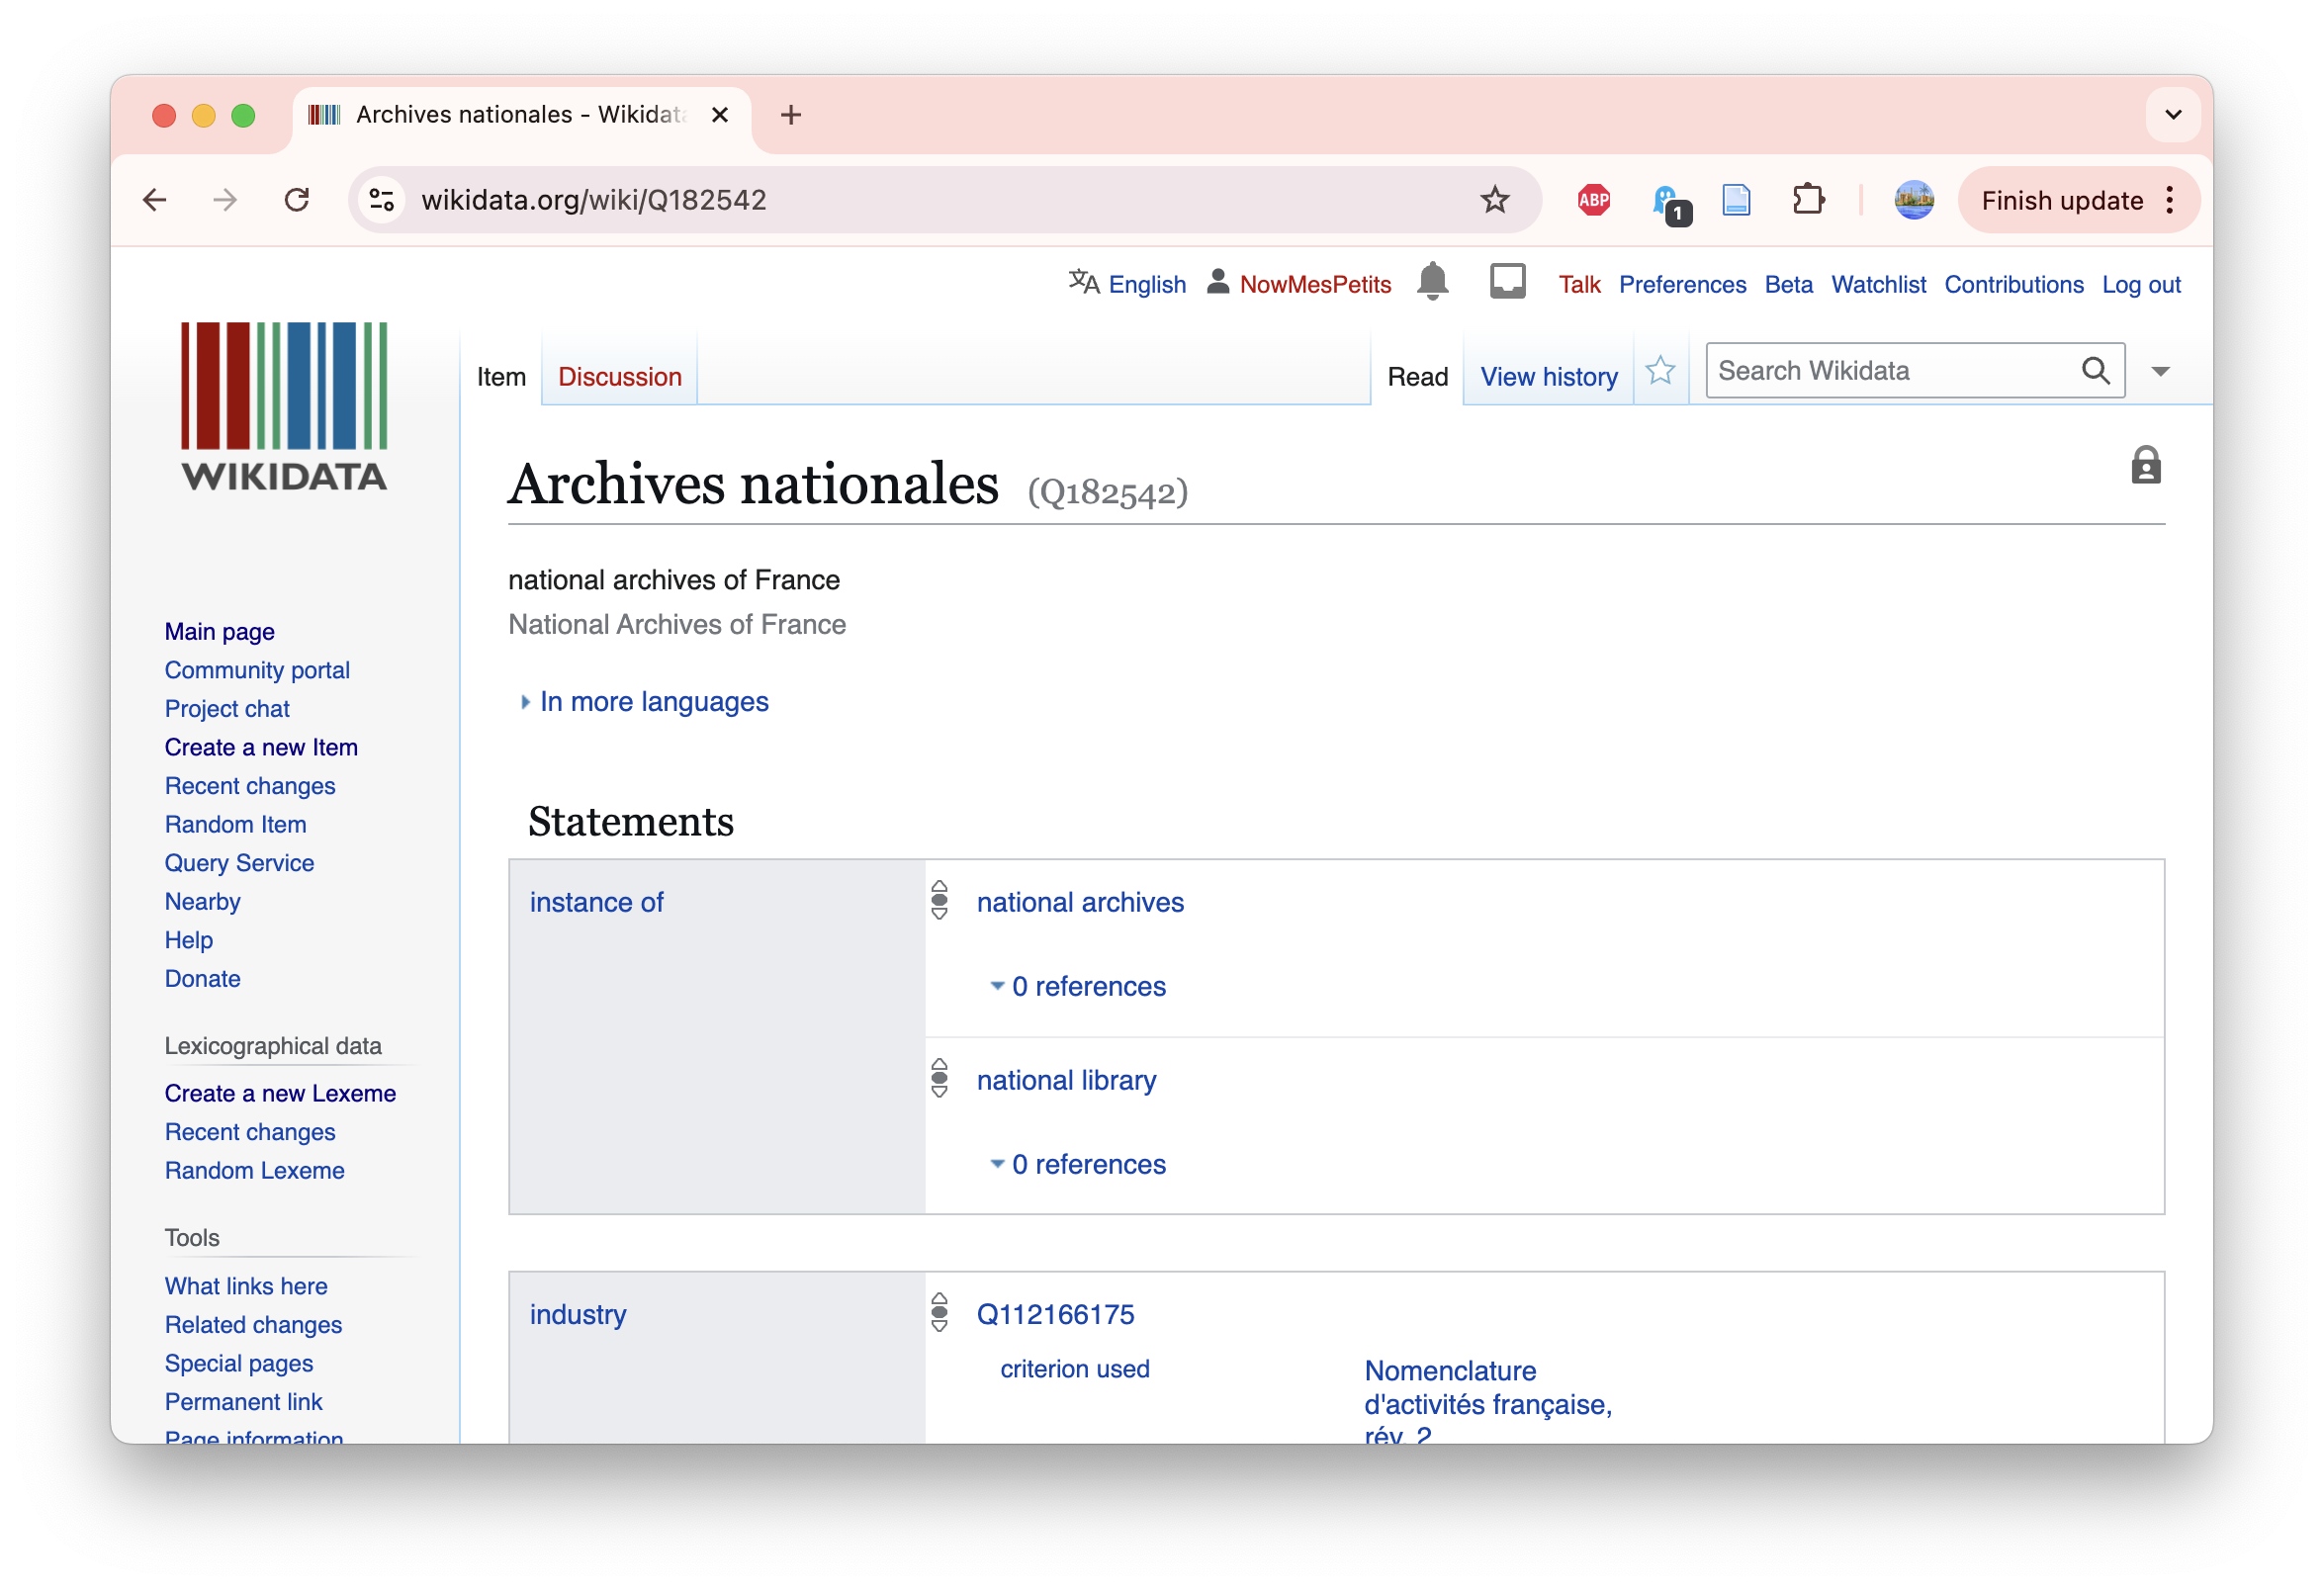
At any point, you can enrich the data about your organisation by adding information.
Under the ‘Statements’ heading, you can add values to categories of data. For example:
Instance of. Click ‘+ add value’ and search for your organisation type, like ‘museum.’ You can add multiple values, like ‘art gallery’ to add more detail.
Inception. Click ‘+add value’ and enter the year your organisation was created.
In addition, under the ‘Identifiers’ heading, add information such as country, short name and any other relevant fields.
For inspiration, look to entries for similar organisations. Good examples include the Feminist Library and the Archives nationales.
Step 13
Verify if your organisation has a Category page
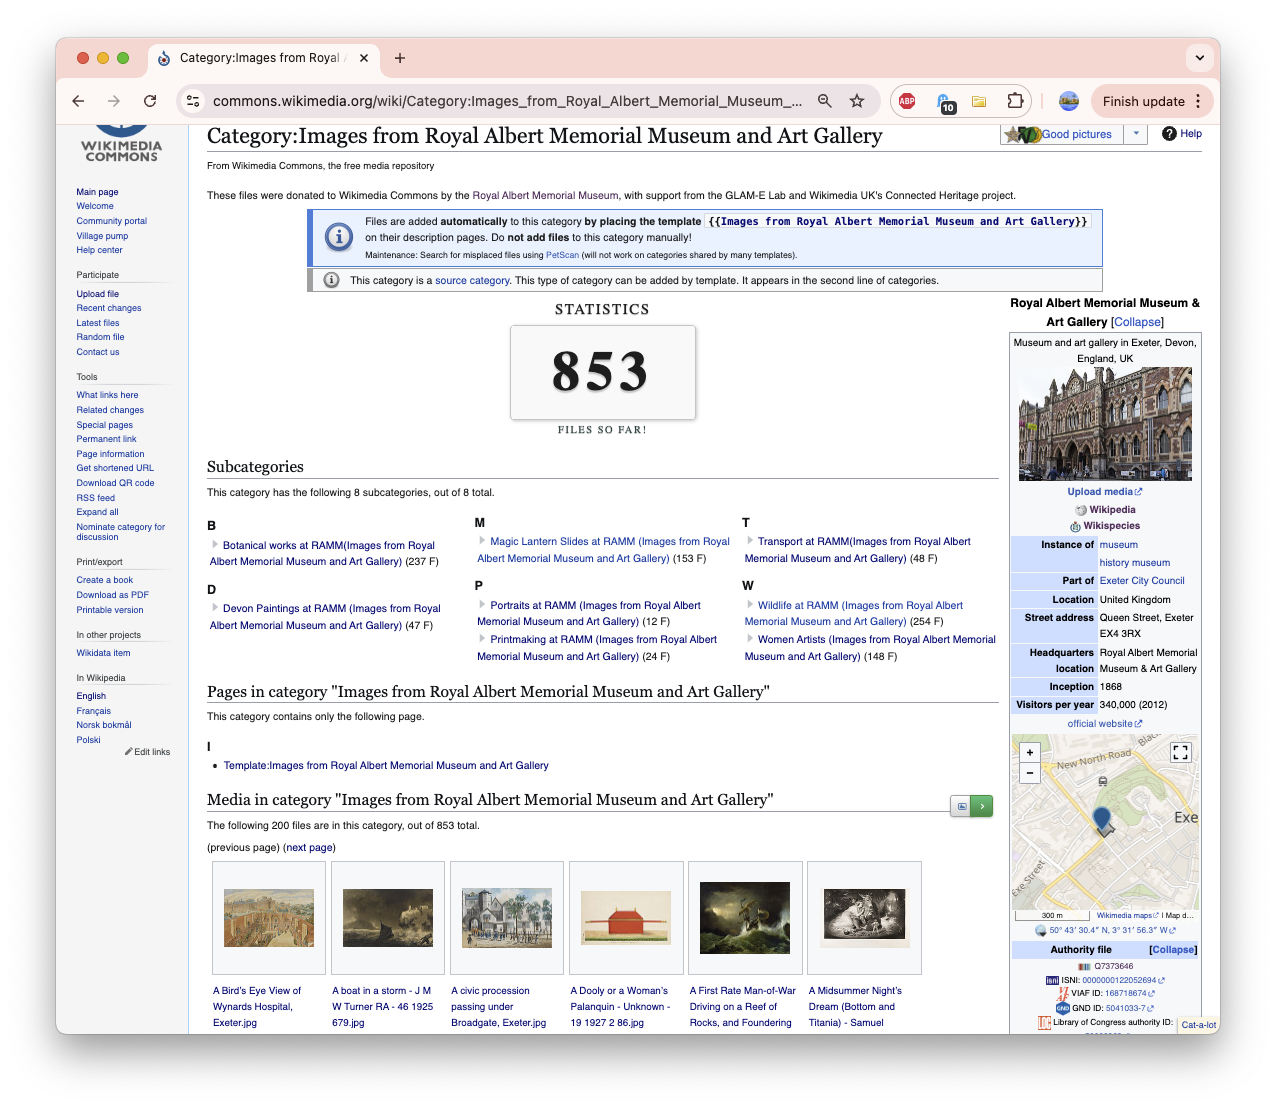
Because anyone can edit Wikipedia and Wikimedia Commons, an editor may have already created a Category page for your organisation. In some cases, that editor may have worked for your organisation. In others, that editor may be a third party who has uploaded their own images of your materials or building to Wikipedia through a Category page.
One benefit of creating an ‘authorised’ Category page is that you can use it to track engagement with the images that you upload (e.g., RAMM Category page on the right).
We recommend creating an authorised Category page if you do not already have one. This means you should not upload images to a Category page that was created by a non-affiliated Wikipedia editor, as this will impact your ability to track engagement with your newly published collections.
To see if a Category page for your organisation already exists go to https://en.wikipedia.org/wiki/Wikipedia:Contents/Categories and search for your organisation’s name.
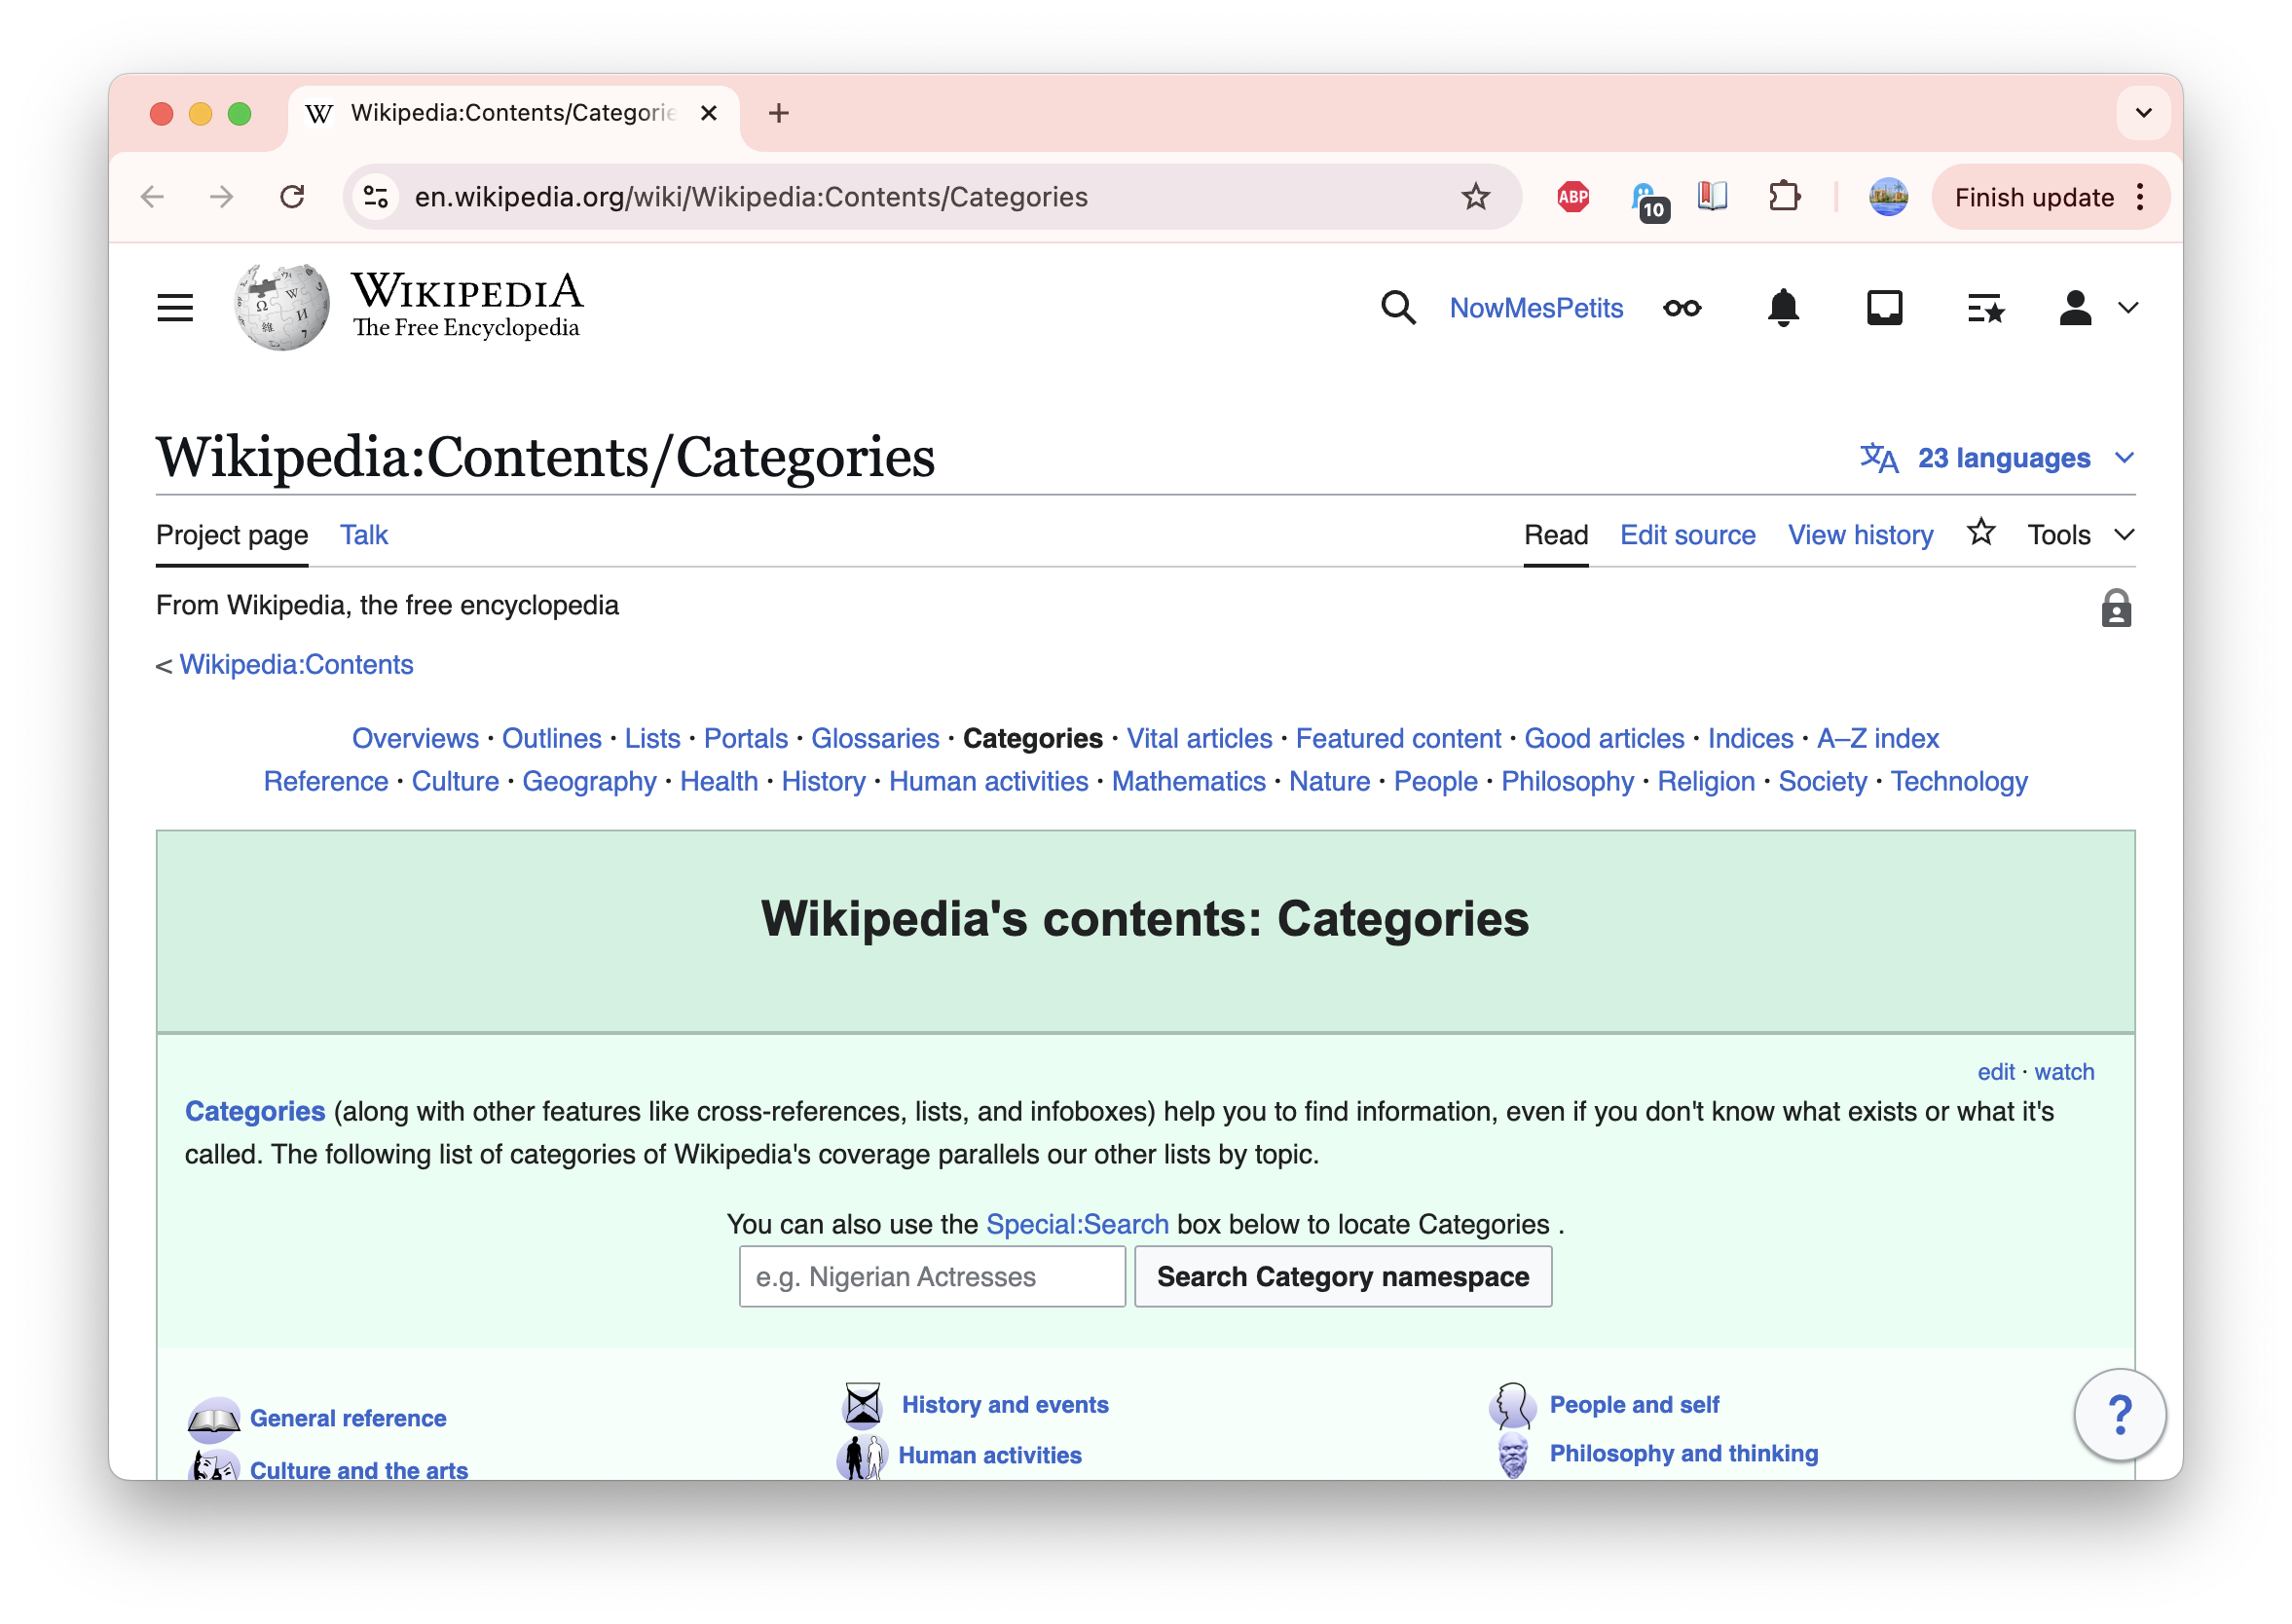
If a Category page exists, review the content to determine whether it was created by your organisation or a third party editor. For example, an indication that it was created by your organisation is if the images are good quality and the file names or metadata includes the accession numbers. If it was created by your organisation you can use this Category page. If not, create a new Category using the instructions below.

If no Category page exists, copy and paste the incomplete URL below into your address bar and do not press enter:
https://commons.wikimedia.org/wiki/Category:
Next, complete the URL by typing in your preferred Category name. We recommend adding “Images from” to the beginning, for example:
https://commons.wikimedia.org/wiki/Category:Images from Royal Albert Memorial Museum & Art Gallery
You do not need to use underscores or add dashes for spaces when typing in the Category name: Wiki will do this automatically.
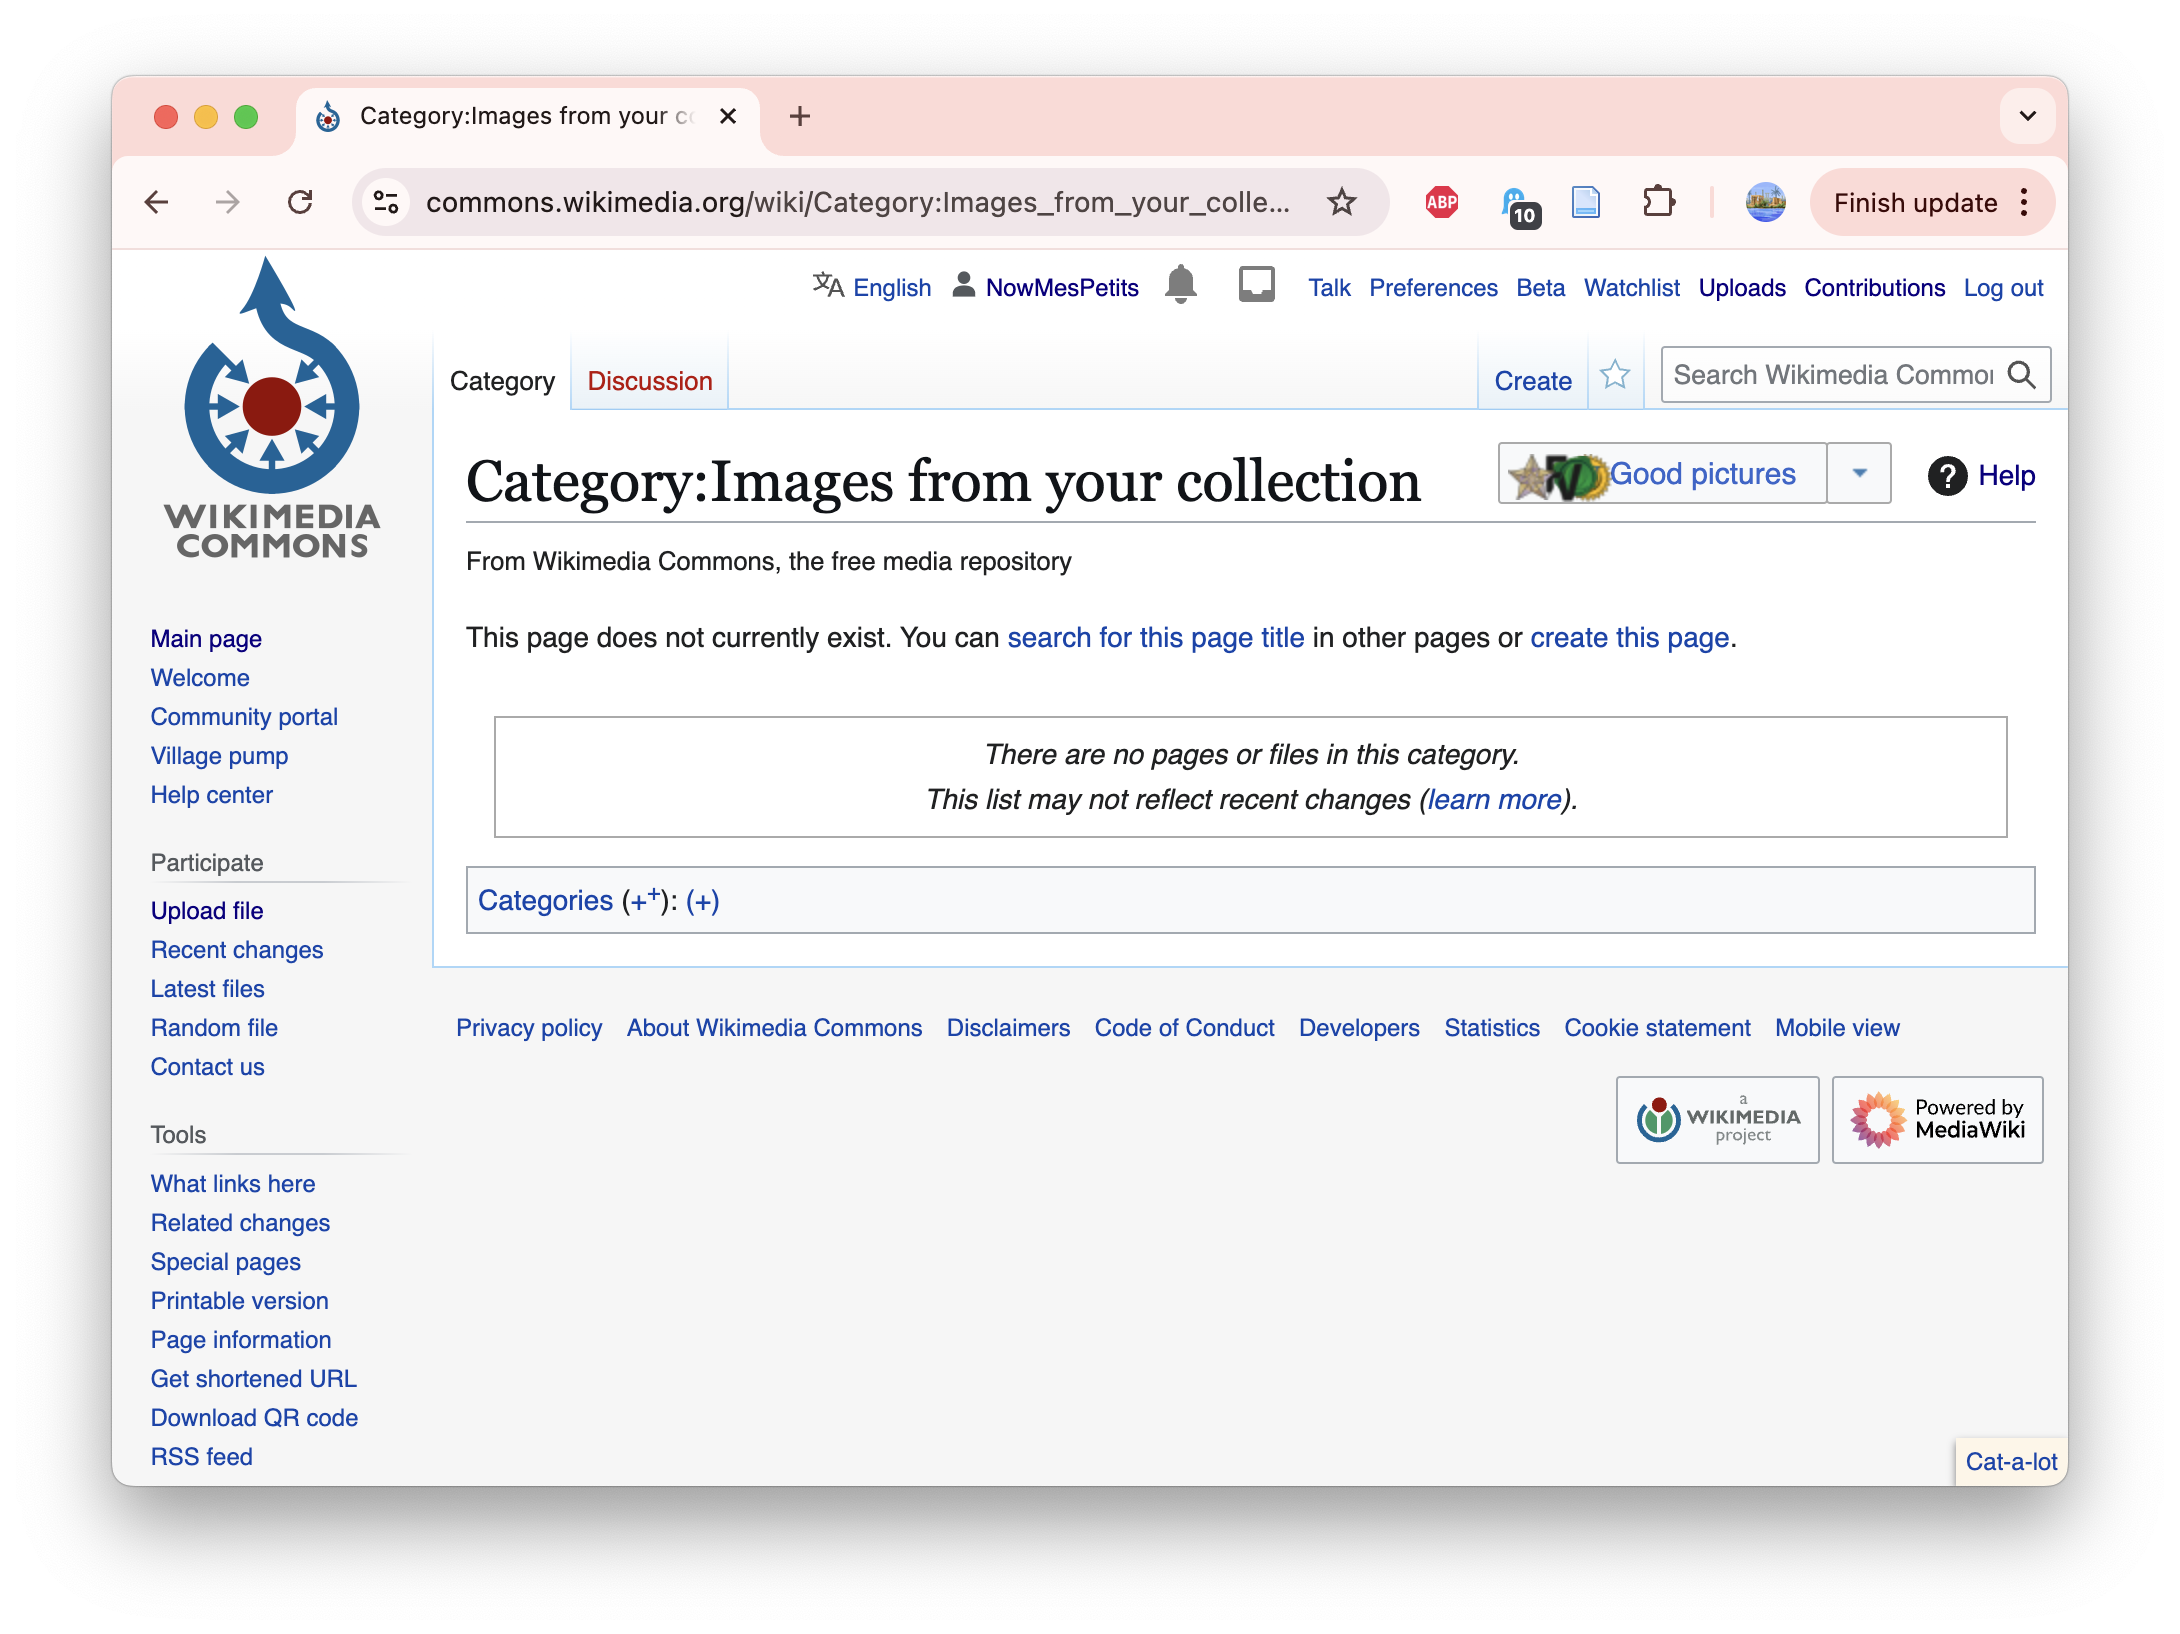
Hit Enter/Return and you will be taken to a page with your organisation’s name that states: ‘This page does not currently exist’.
Now, simply create your Category page by clicking on ‘create this page’.
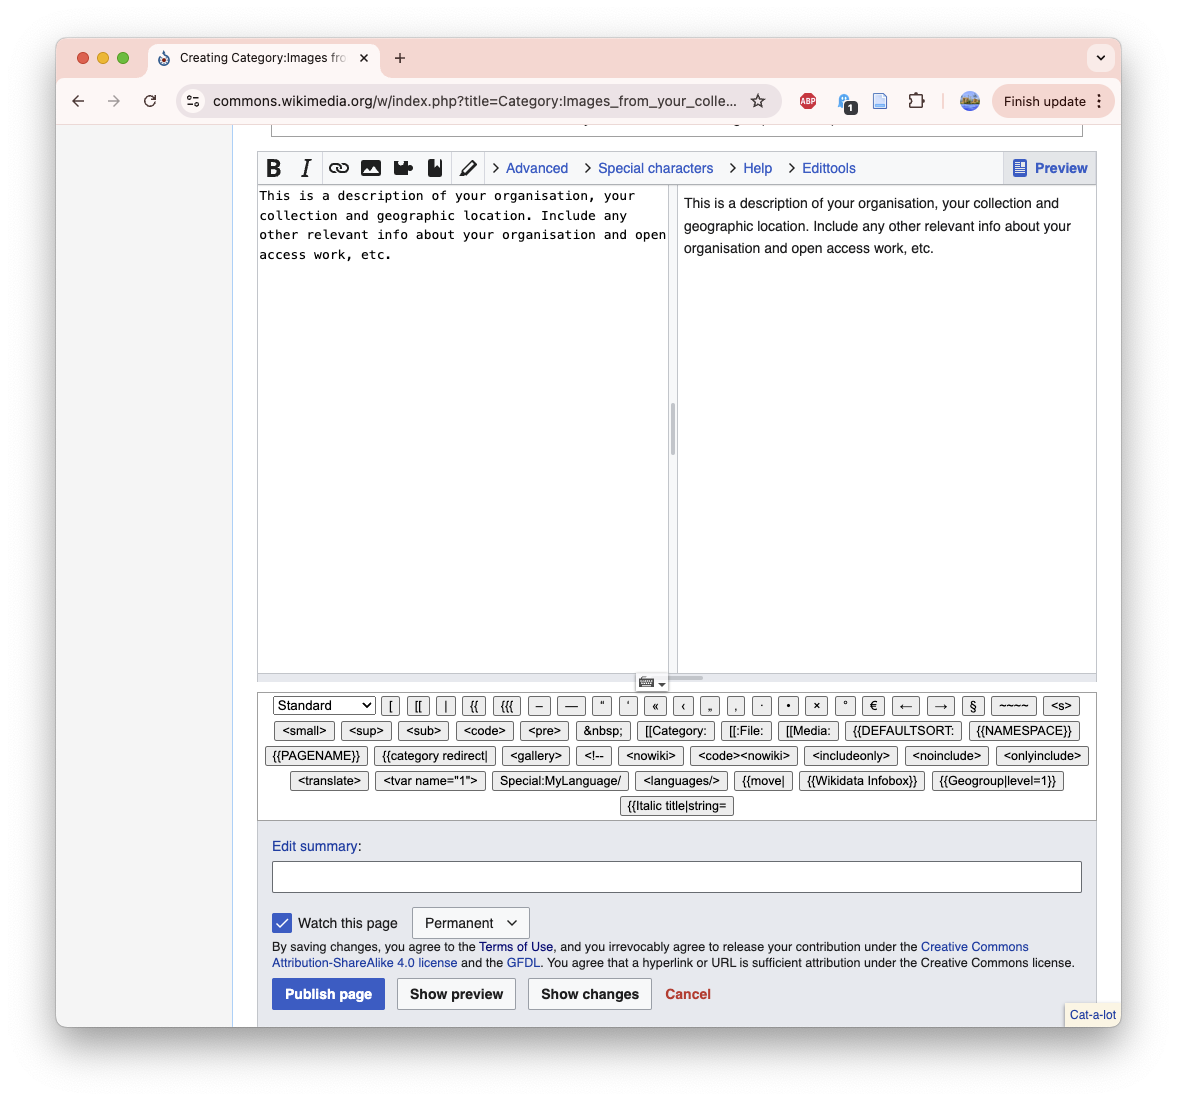
This will take you to the editing view where you can include some descriptive information about your organisation.
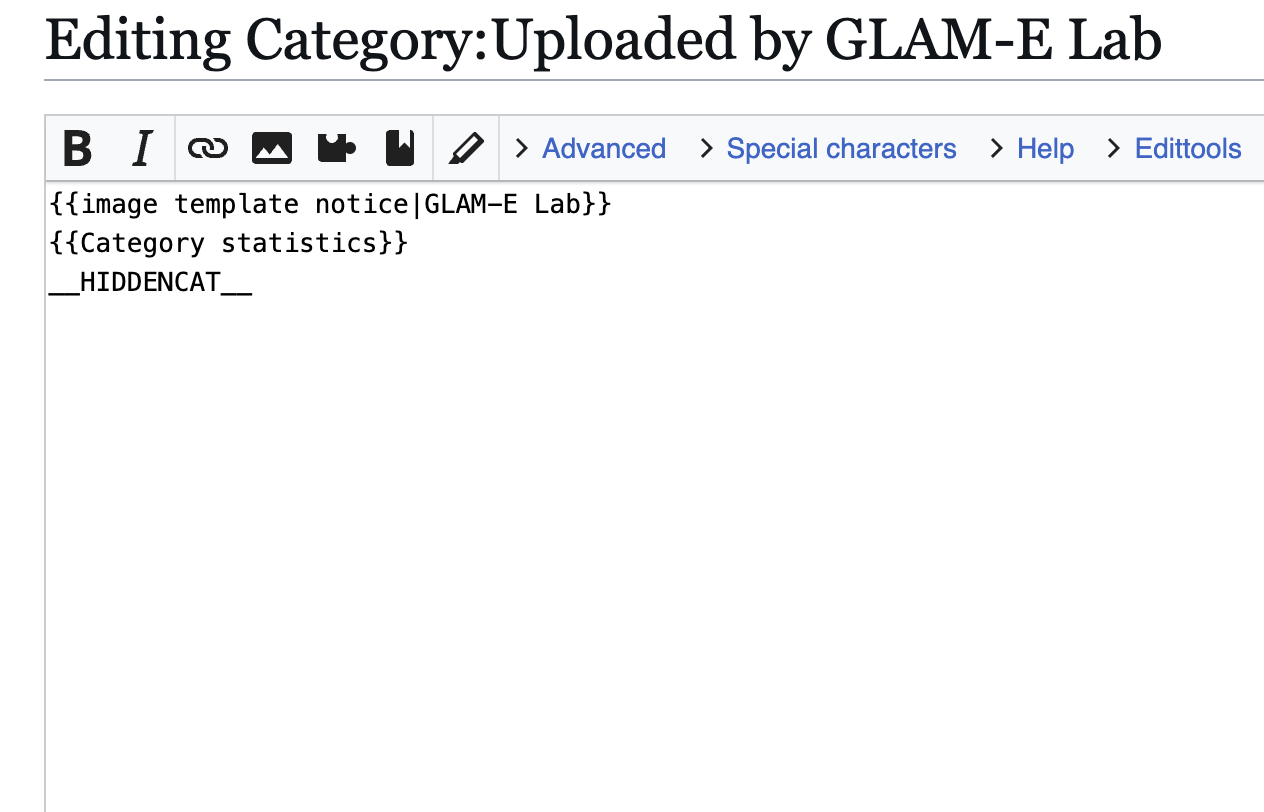
You should also make sure you have added your Category to another Category page, e.g., GLAMs in the UK. To do this insert [[Category:Category name goes here]] in the editing view(e.g., image on right).
When finished, click ‘Publish page’ on the bottom left. This will create the Category page!
Now you are ready to begin organising your descriptive metadata. Proceed to Step 14.
Step 14
Save a local version of the Sandbox Template
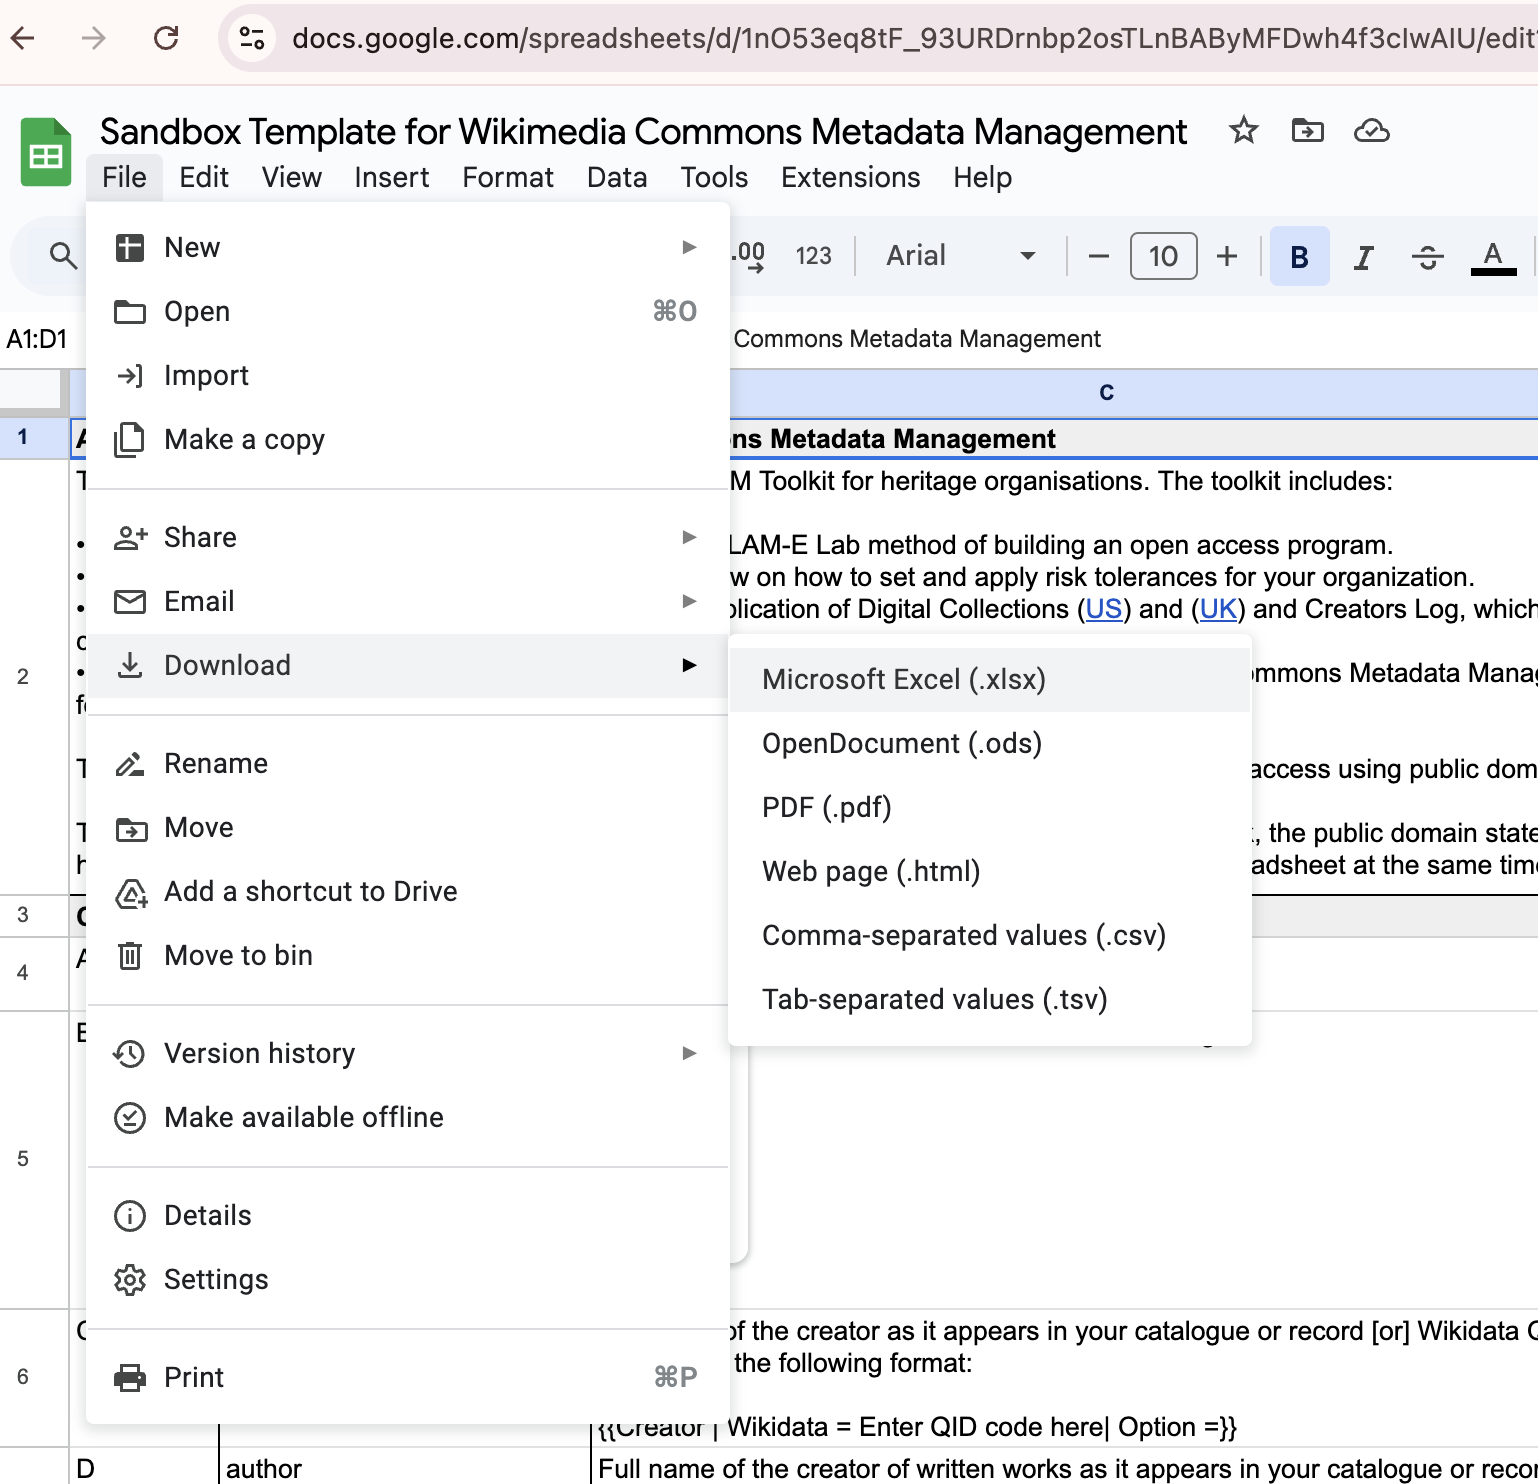
Save a version of the Sandbox Template to your Google Drive by making a copy, or to your local drive by downloading an Excel version of the spreadsheet.
Rename the spreadsheet to describe the batch of images or upload date.
Step 15
Organise descriptive metadata in the Sandbox Template
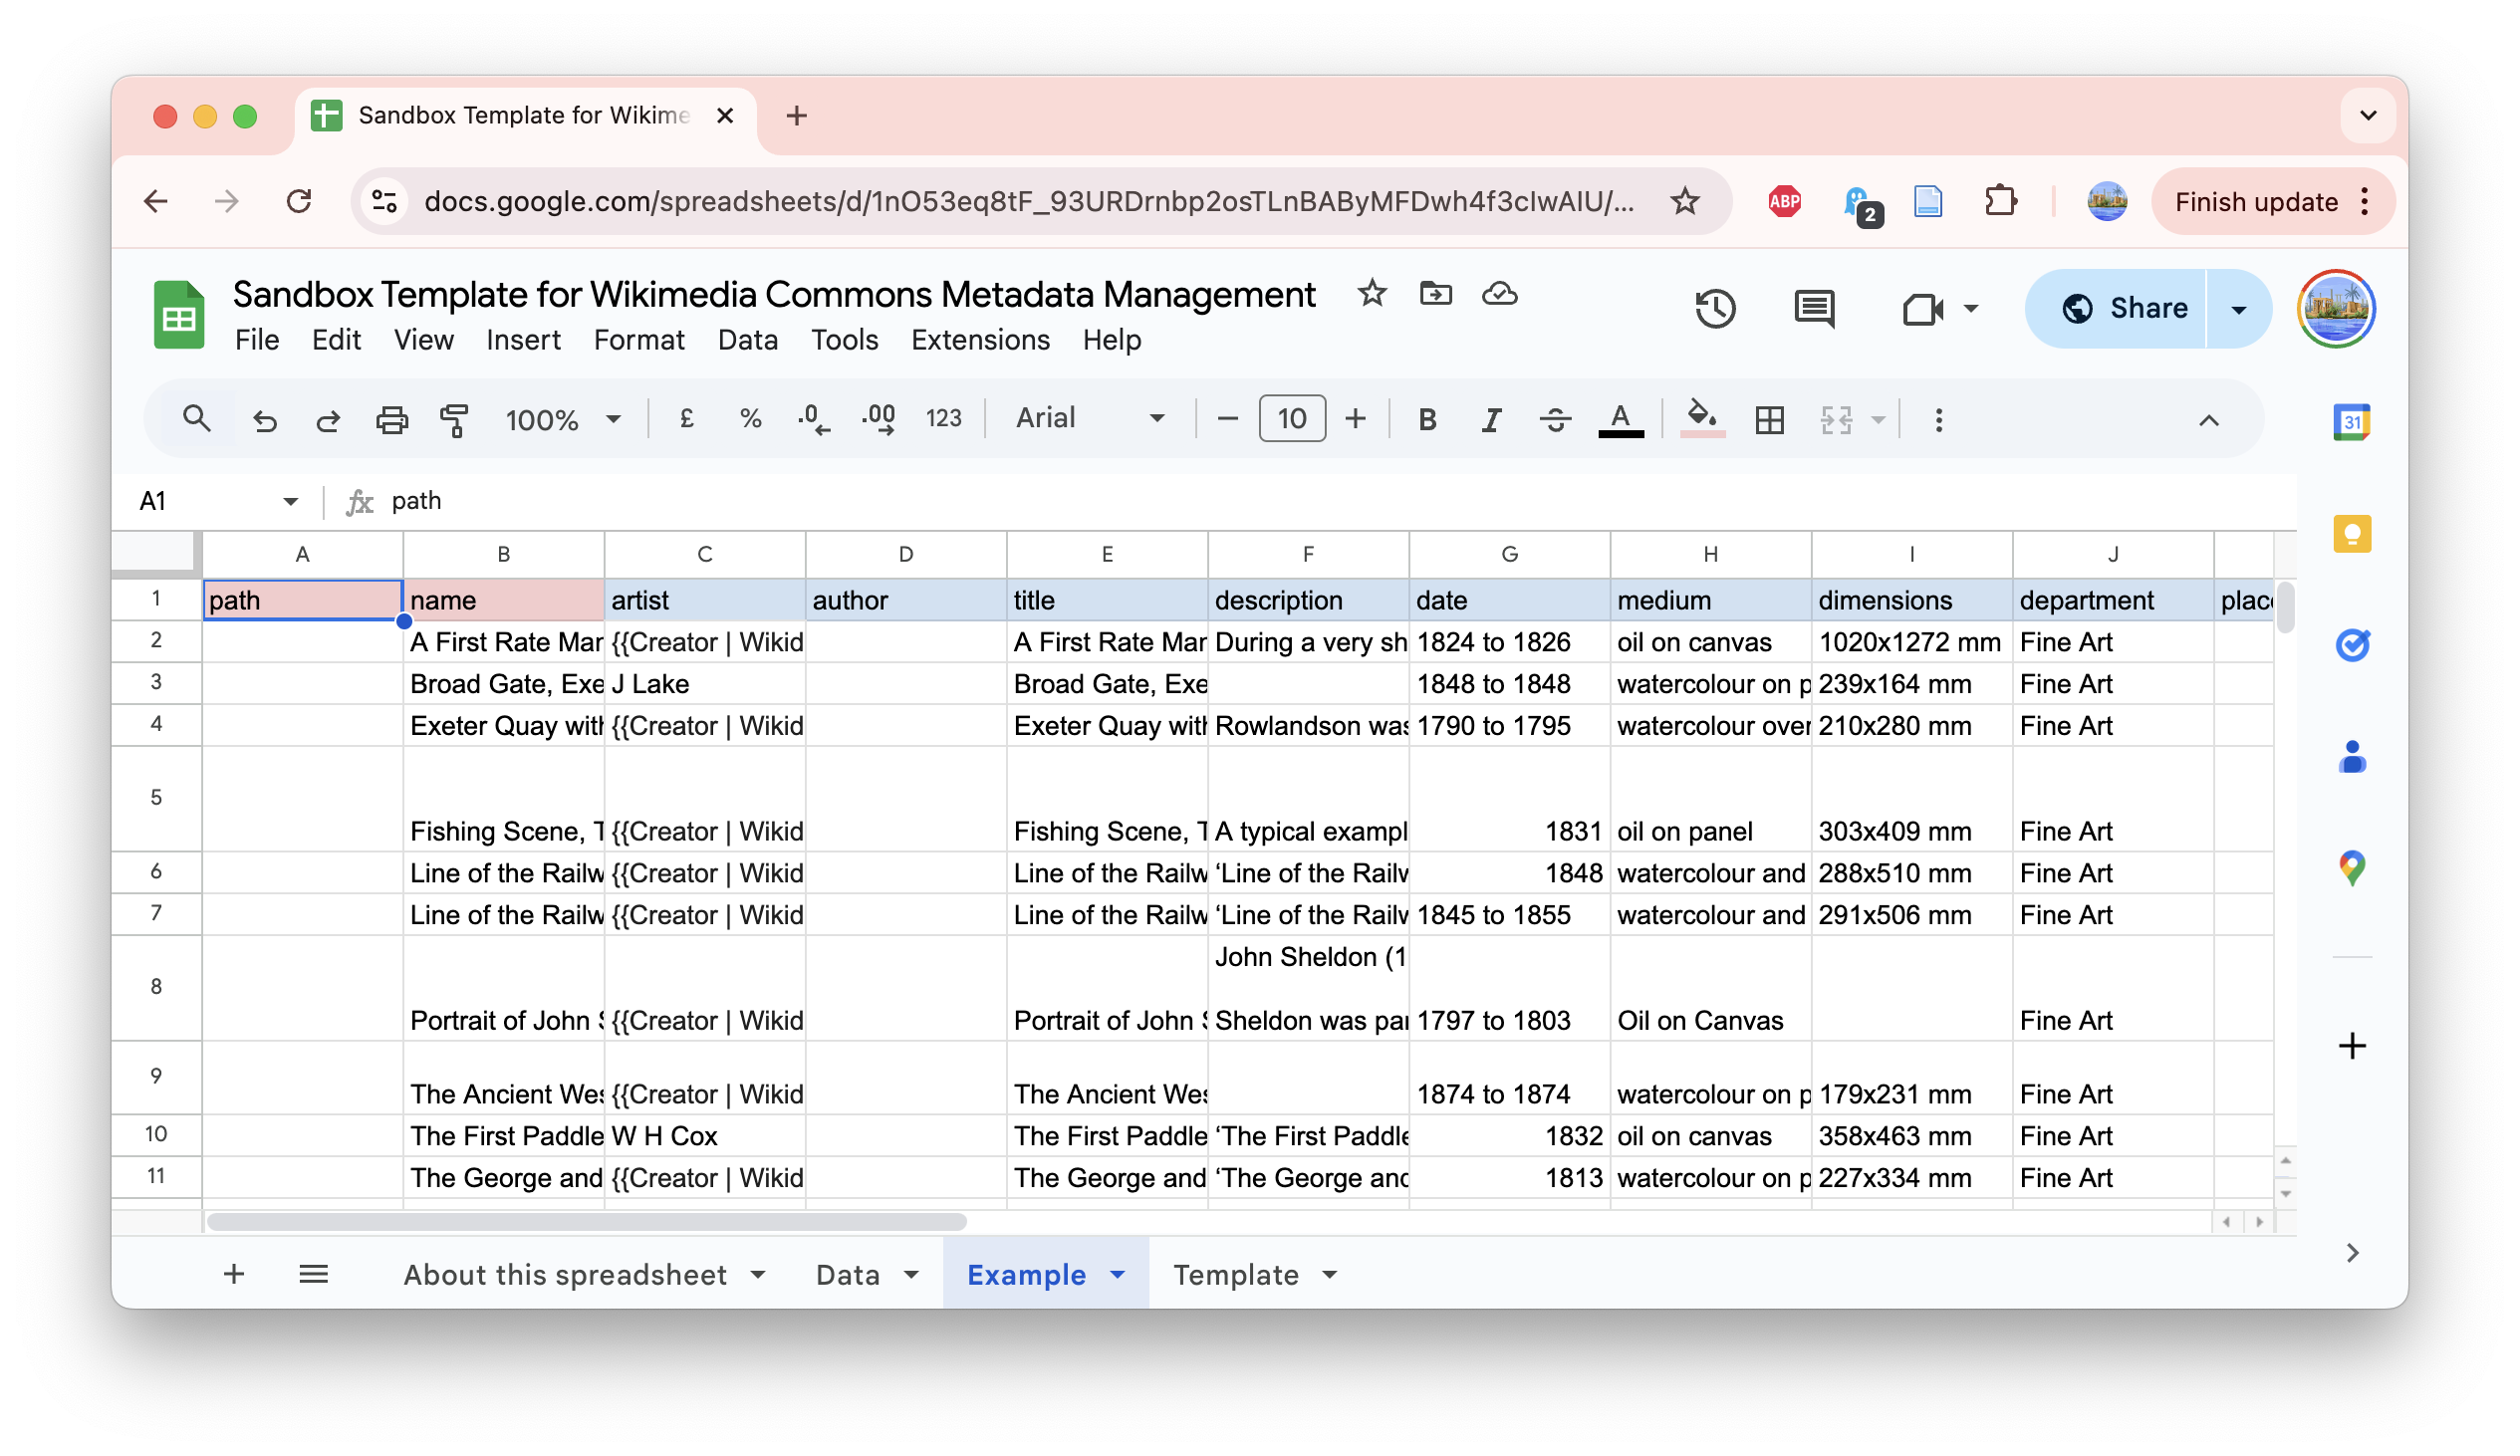
Now you are ready to organise the metadata as in the example screenshot on the right.
Use the Sandbox Template Key at the end of this resource to complete the information for each column.
For an example of a completed spreadsheet, see the “Example” tab in the Sandbox Template.
Proceed to Checklist 4.
Tip: We recommend that you copy and paste the file names of your images into the ‘Name’ column. This will allow you sort the spreadsheet data alphabetically before transferring the metadata over to the Pattypan Artwork Template.
Getting Online: Uploading Images to Wikimedia Commons Using Pattypan
Overview
Checklist 4 provides guidance on generating the Artwork Template spreadsheet using Pattypan. This spreadsheet will include the metadata for all of the images you are going to add to Wikimedia Commons. The Pattypan generated Artwork Template spreadsheet should be used when uploading images to Wikimedia Commons as it includes an additional tab that consists of a script that Pattypan uses to link to the images when uploading.
The Pattypan generated Artwork Template spreadsheet will automatically populate the path and name fields based on the folder location and image file names.
Step 16. Open Pattypan to generate your spreadsheet
Step 17. Locate the folder where your images are saved
Step 18. Generate the ‘Artwork Template’
Step 19. Copy the metadata from the Sandbox Template into the Artwork Template
Checklist 5 provides guidance on uploading the images and metadata to Wikimedia Commons. As a first attempt, upload a small amount of images as a test.
Step 20. Select ‘Validate & Upload’
Step 21. Locate the Pattypan Artwork Template spreadsheet
Step 22. Validate the data in the spreadsheet
Step 23. Review the images and metadata in Pattypan
Step 24. Log in to your Wikipedia account in Pattypan
Step 25. Click ‘Upload’
Tip: When using Pattypan, if the buttons disappear try adjusting or maximising the window size and they should reappear.
Checklist 4: Generating Spreadsheet from Pattypan
Once your descriptive metadata is ready, you will need to transfer it from the Sandbox Template to the Pattypan Artwork Template spreadsheet.
Pattypan uses spreadsheets in XLS format, which is an older Excel format that is usually converted to XLSX upon opening the file. You can edit the spreadsheet using Microsoft Excel or Google Sheets. However, only licensed desktop versions of Microsoft Excel can save a version of the spreadsheet back to XLS format. This is important, because Pattypan requires a spreadsheet to be in XLS format for uploads.
Fear not. Once your spreadsheet is ready, you can convert the file from XLSX to XLS using a free website. You will find lots of guidance on this online.
Step 16
Open Pattypan to generate your spreadsheet
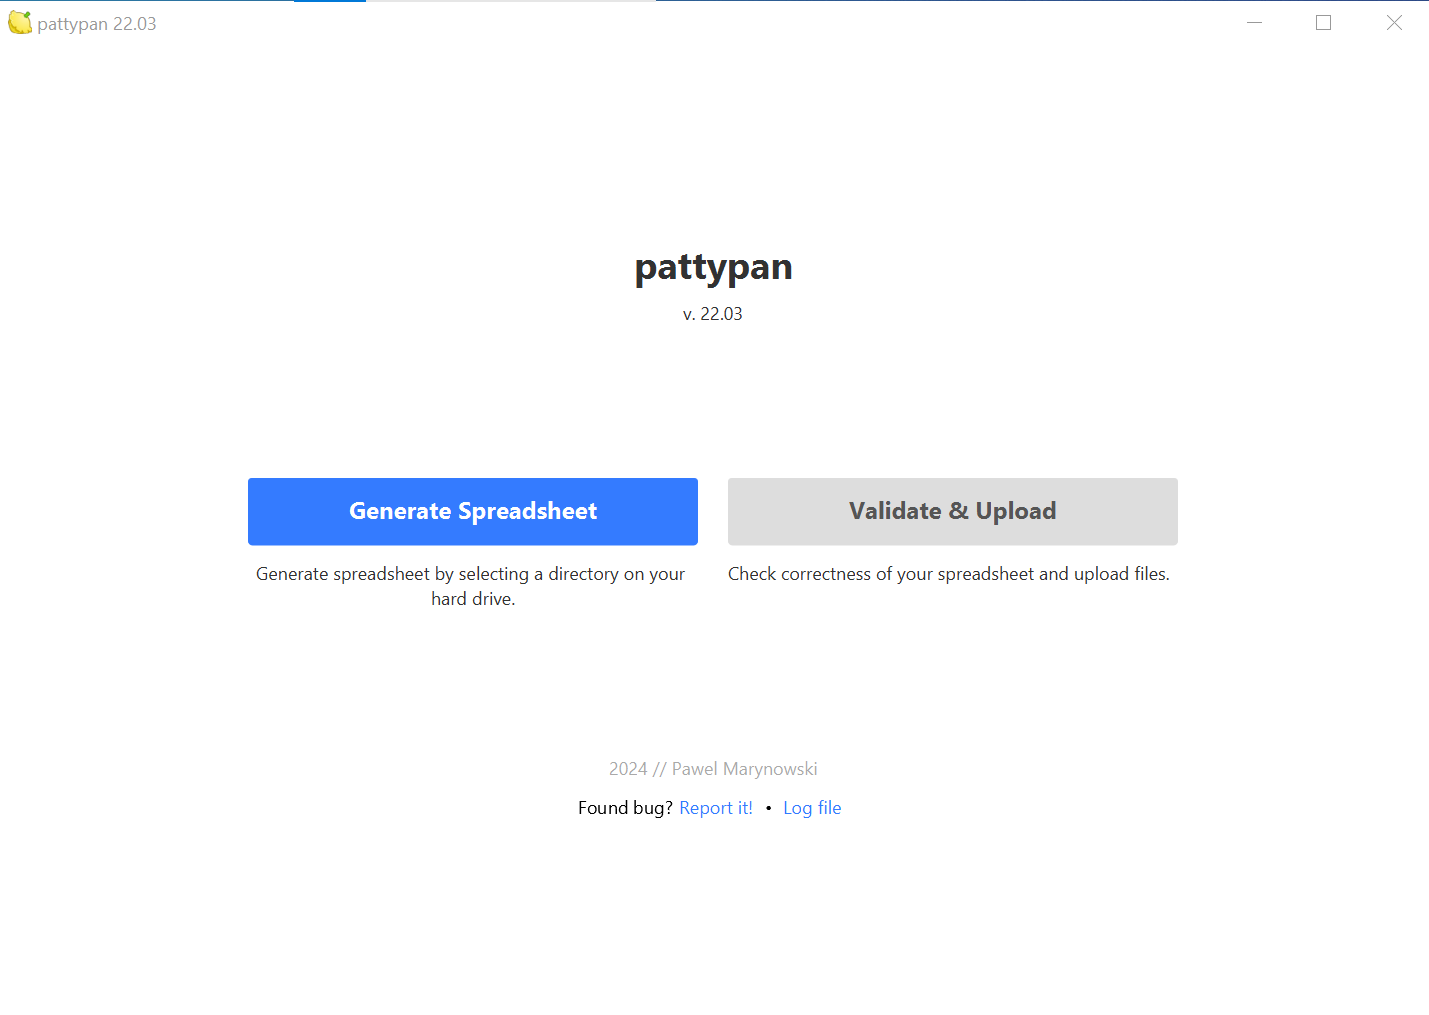
Click ‘Generate Spreadsheet’.
Step 17
Locate the folder where your images are saved (Step 6)
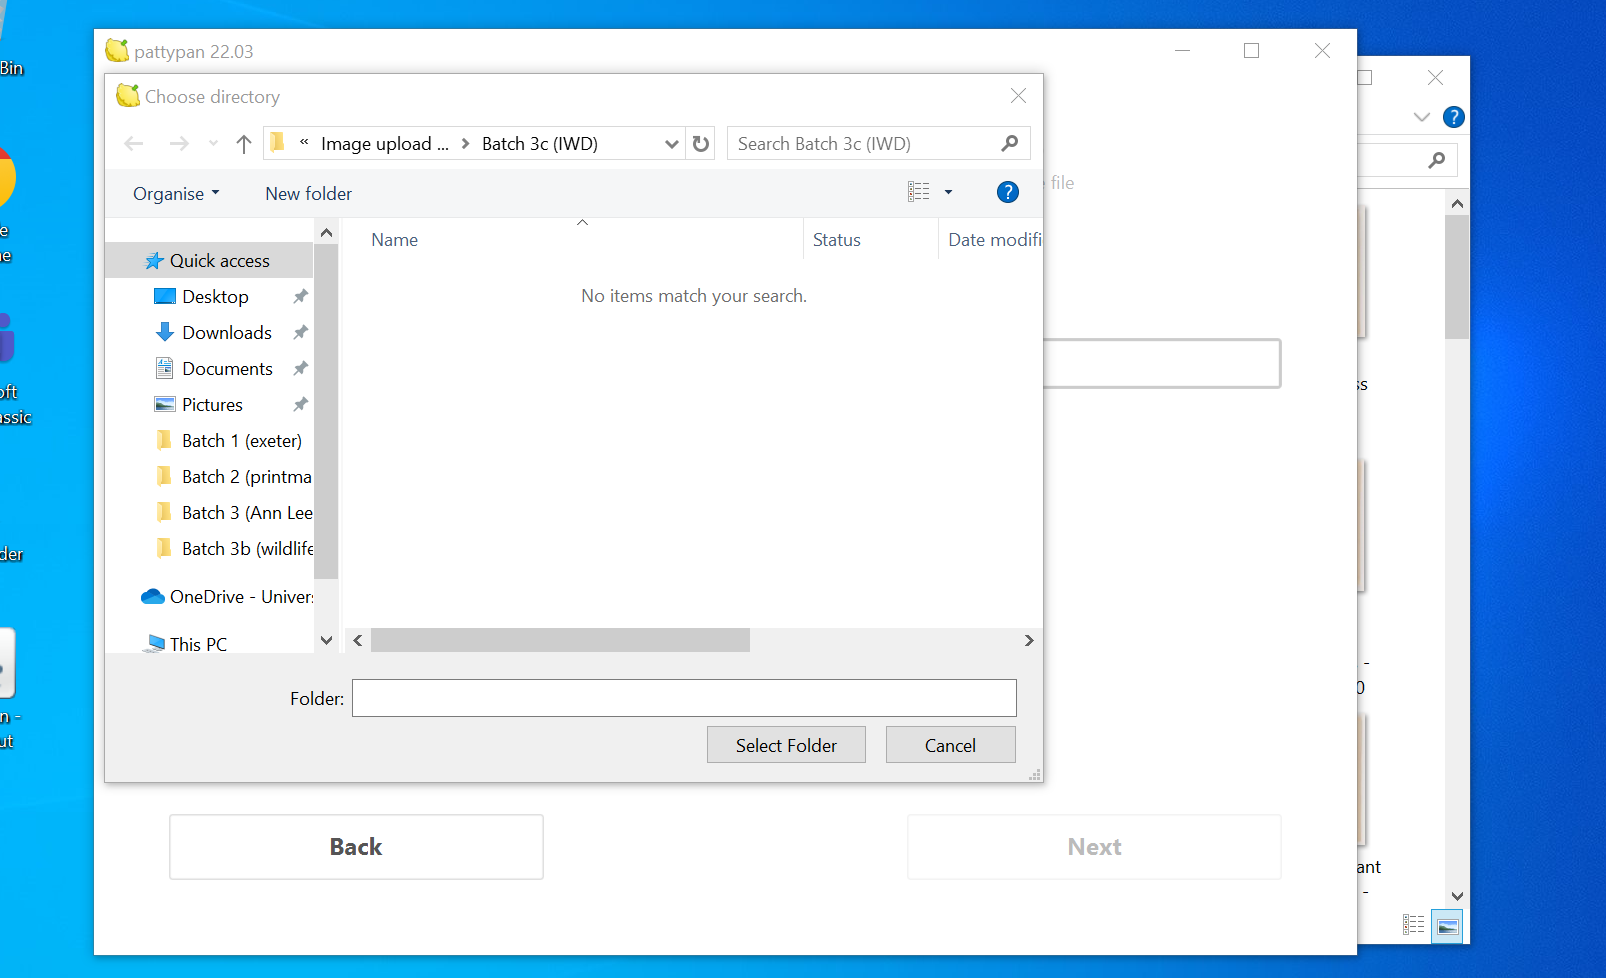
Click ‘Browse’ to locate the image folder on your computer.
Select the folder and click ‘Select Folder’.
Step 18
Generate the ‘Artwork Template’
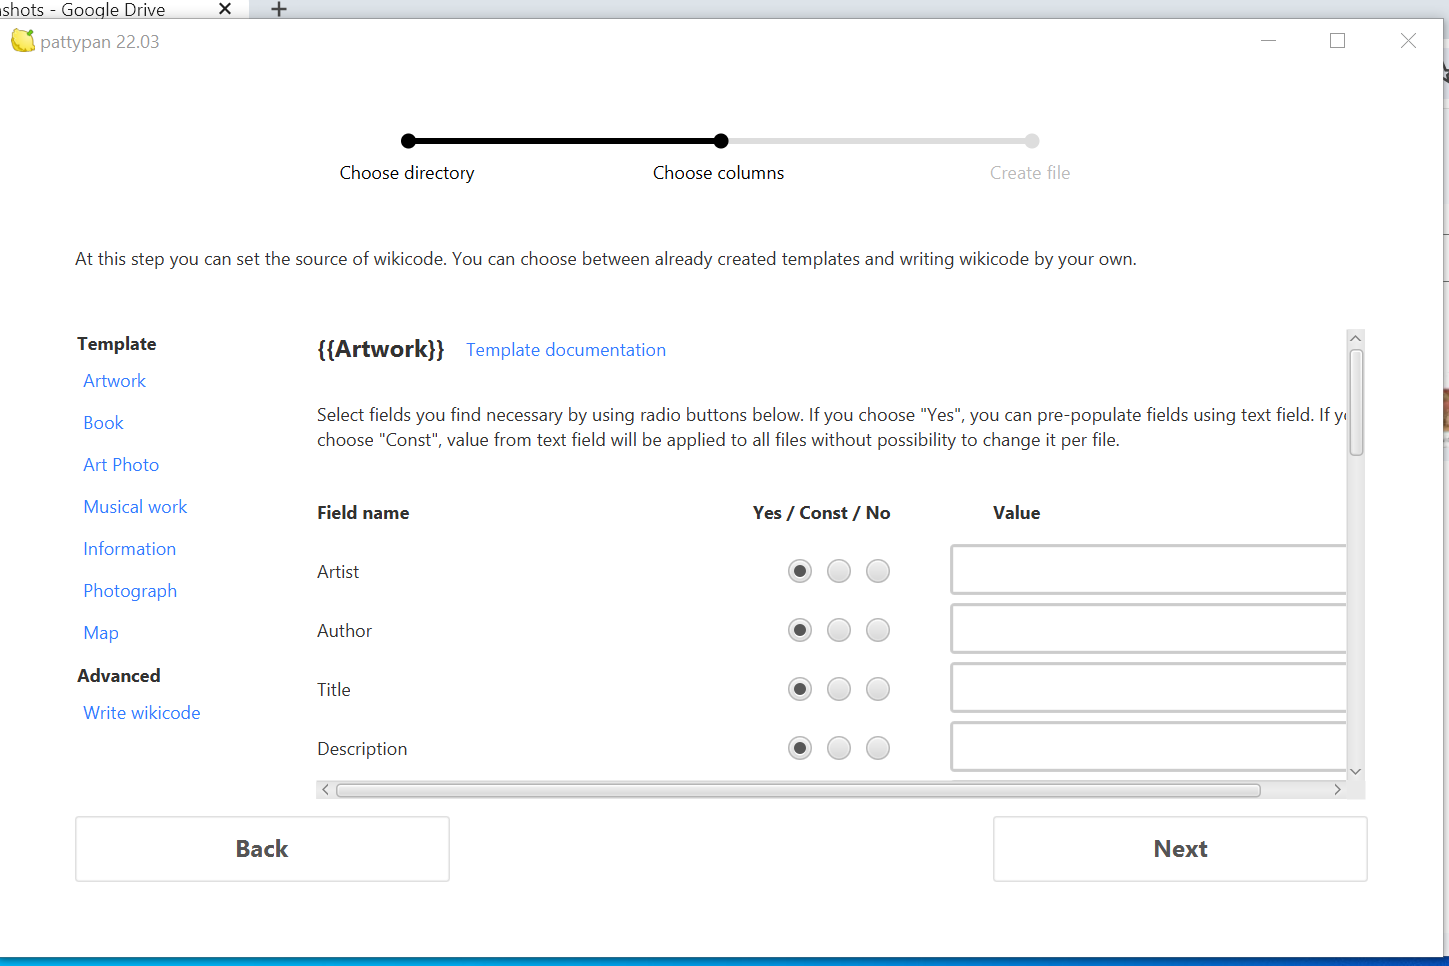
Pattypan provides multiple template types for content uploads. You will use the ‘Artwork Template’.
Select ‘Artwork Template’ and click ‘Next’ without making any modifications to the fields or options provided.
This generates your Pattypan spreadsheet and saves it to your image folder.
Step 19
Copy the metadata from the Sandbox Template into the Artwork Template
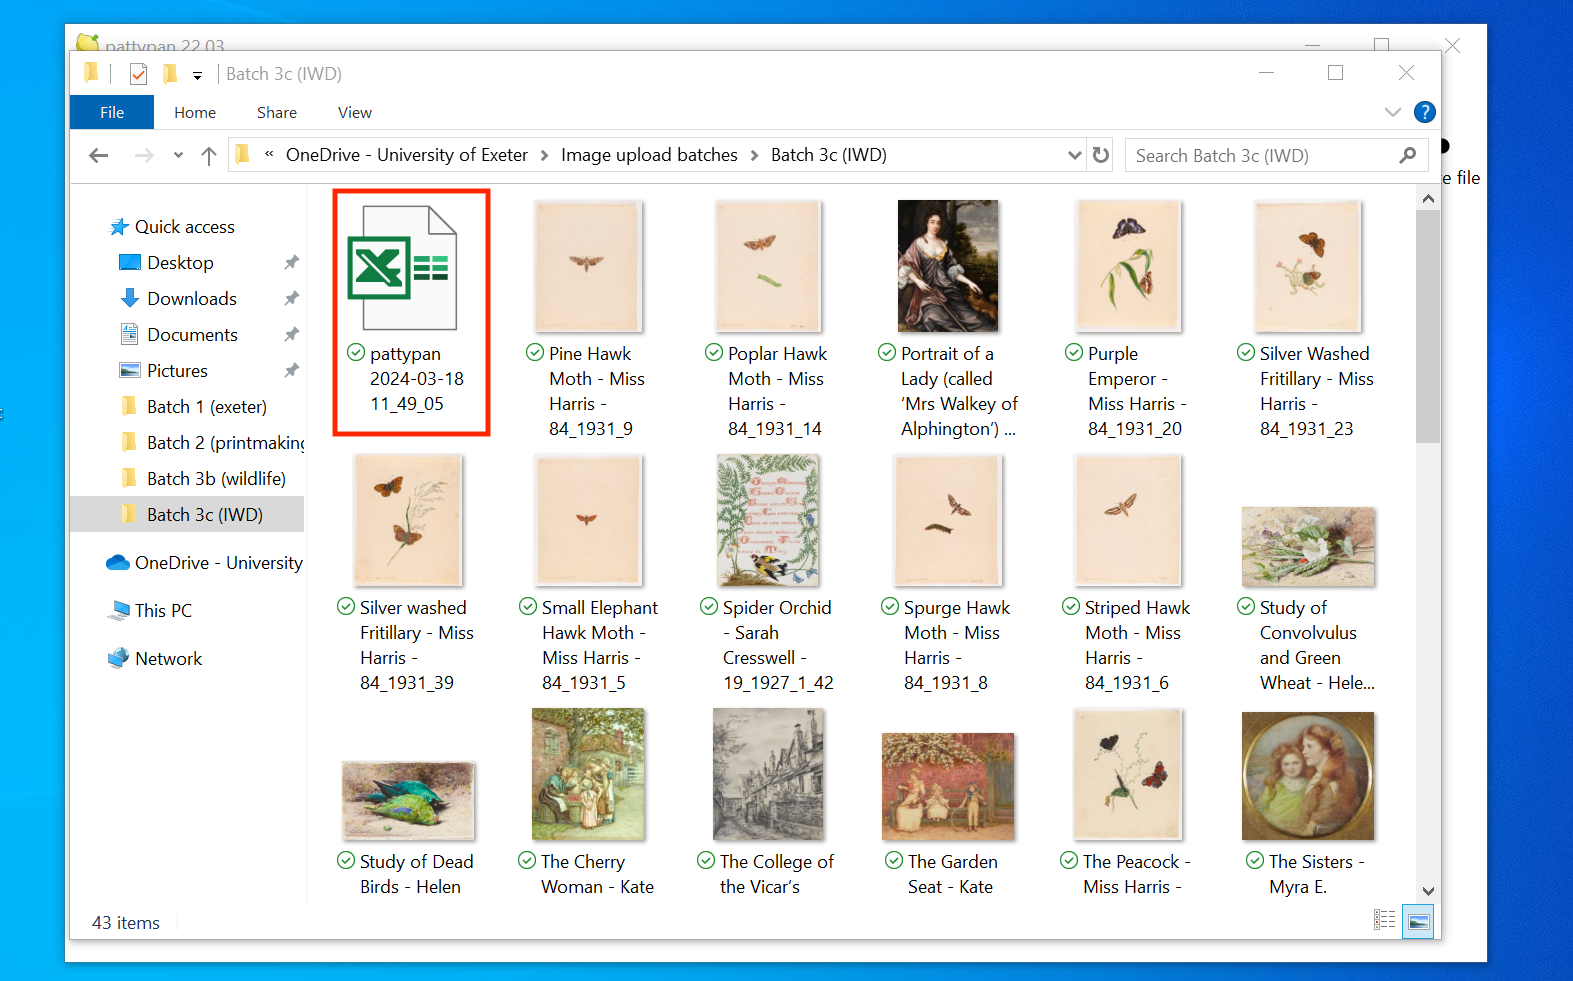
Before copying over the metadata, sort the data in the Sandbox Template alphabetically using the ‘Name’ column, i.e., the name of the image file that you copied and pasted from the image folder.
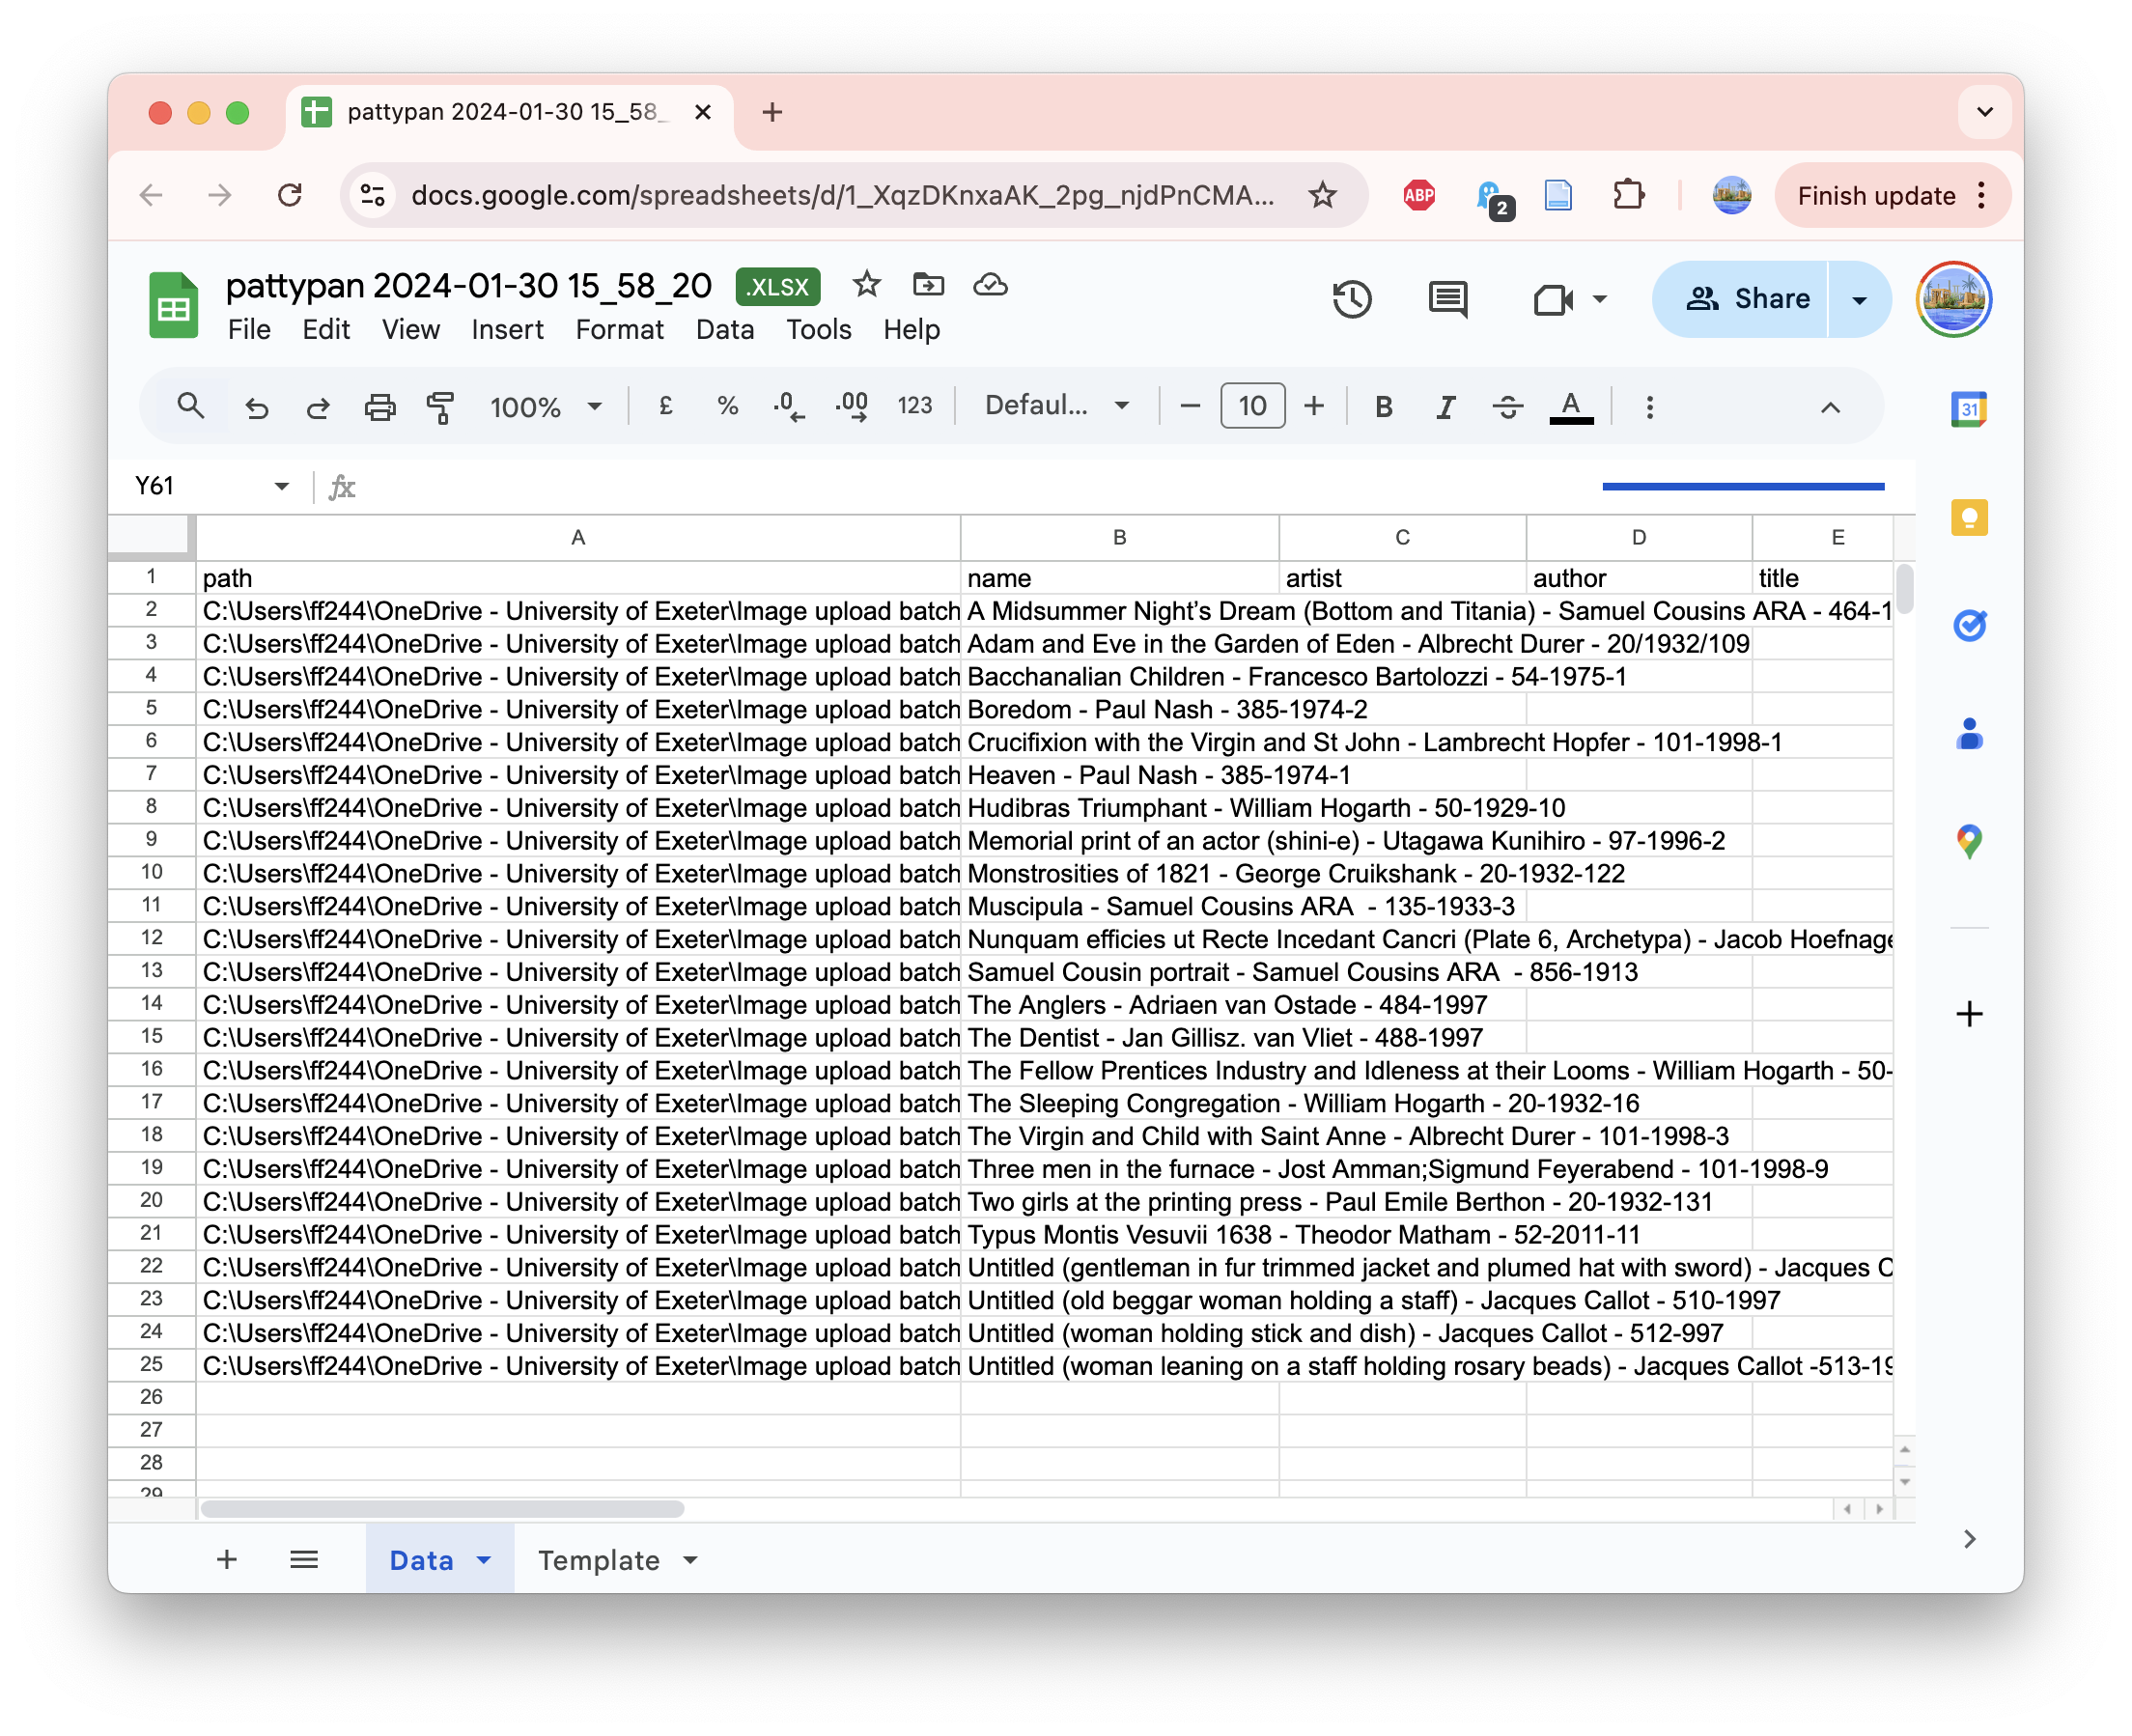
When generating the Artwork Template, Pattypan completes the information in this column using the file names in the image folder.
You should compare the Name column in the Pattypan Artwork Template to your Sandbox Template before copying over the metadata. This helps you ensure that the information you copy over corresponds to the right image file.
Checklist 5: Bulk Upload Images
Now you are ready to upload the images and metadata to Wikimedia Commons!
Before upload, double check your work and review the Pattypan Checklist to make sure you've not missed out any steps.
Step 20
Select ‘Validate & Upload’
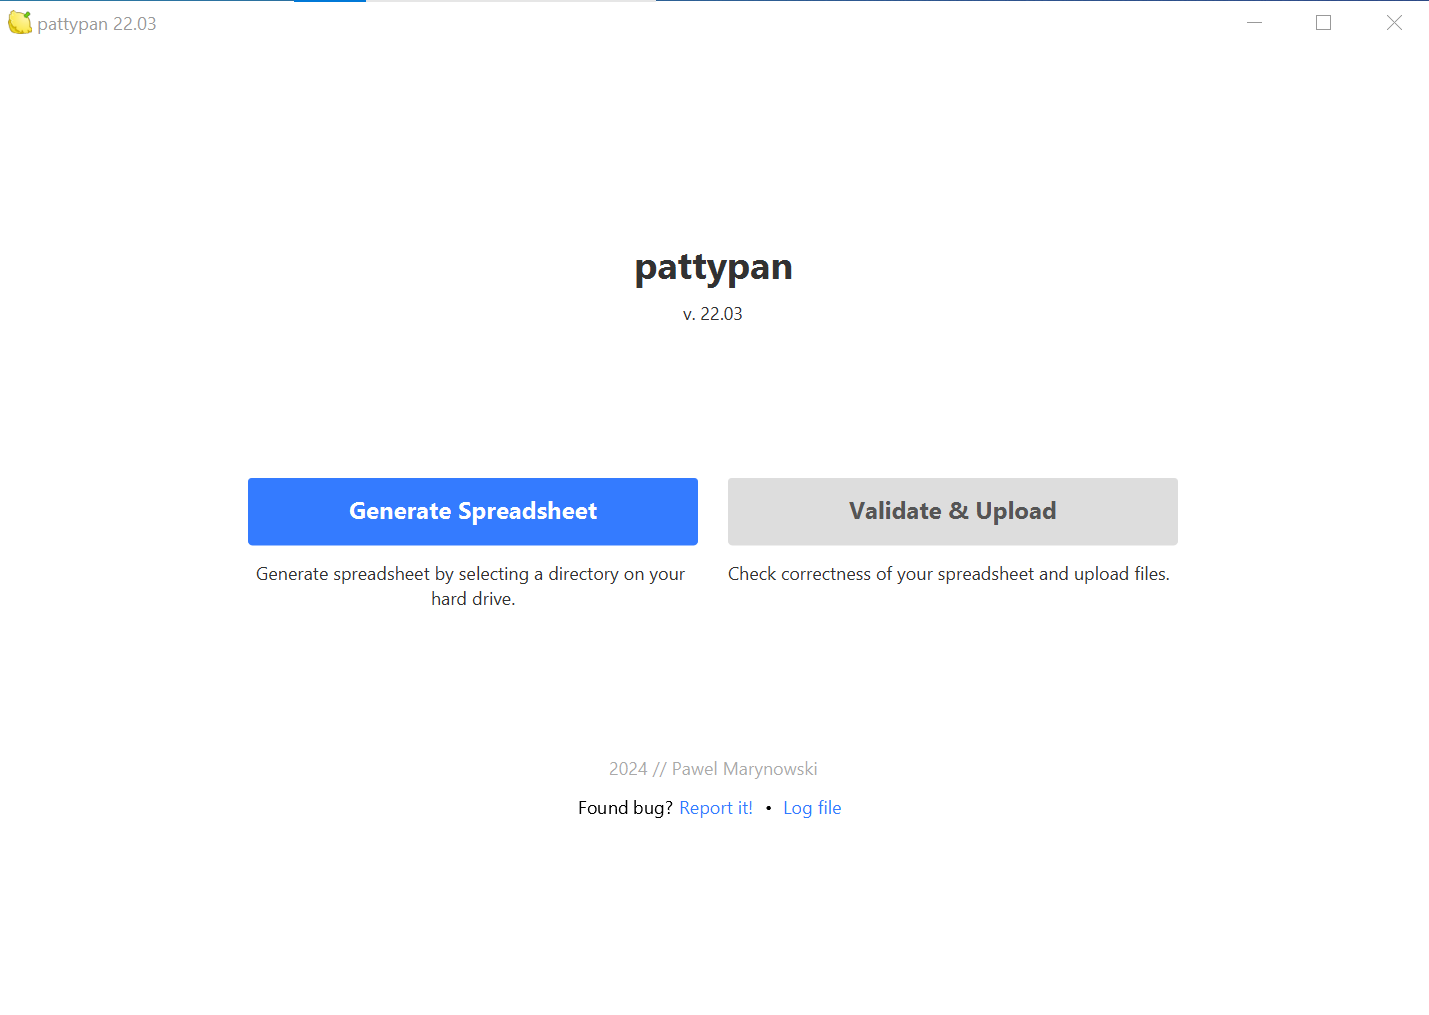
Open Pattypan and select ‘Validate & Upload’.
If this is your first time using Pattypan, test the ‘Validate & Upload’ process using a small batch of images. This allows you to confirm that the images and corresponding data are correct. Once you feel more confident with the process you can then start to upload larger batches.
Step 21
Open the Pattypan Artwork Template spreadsheet
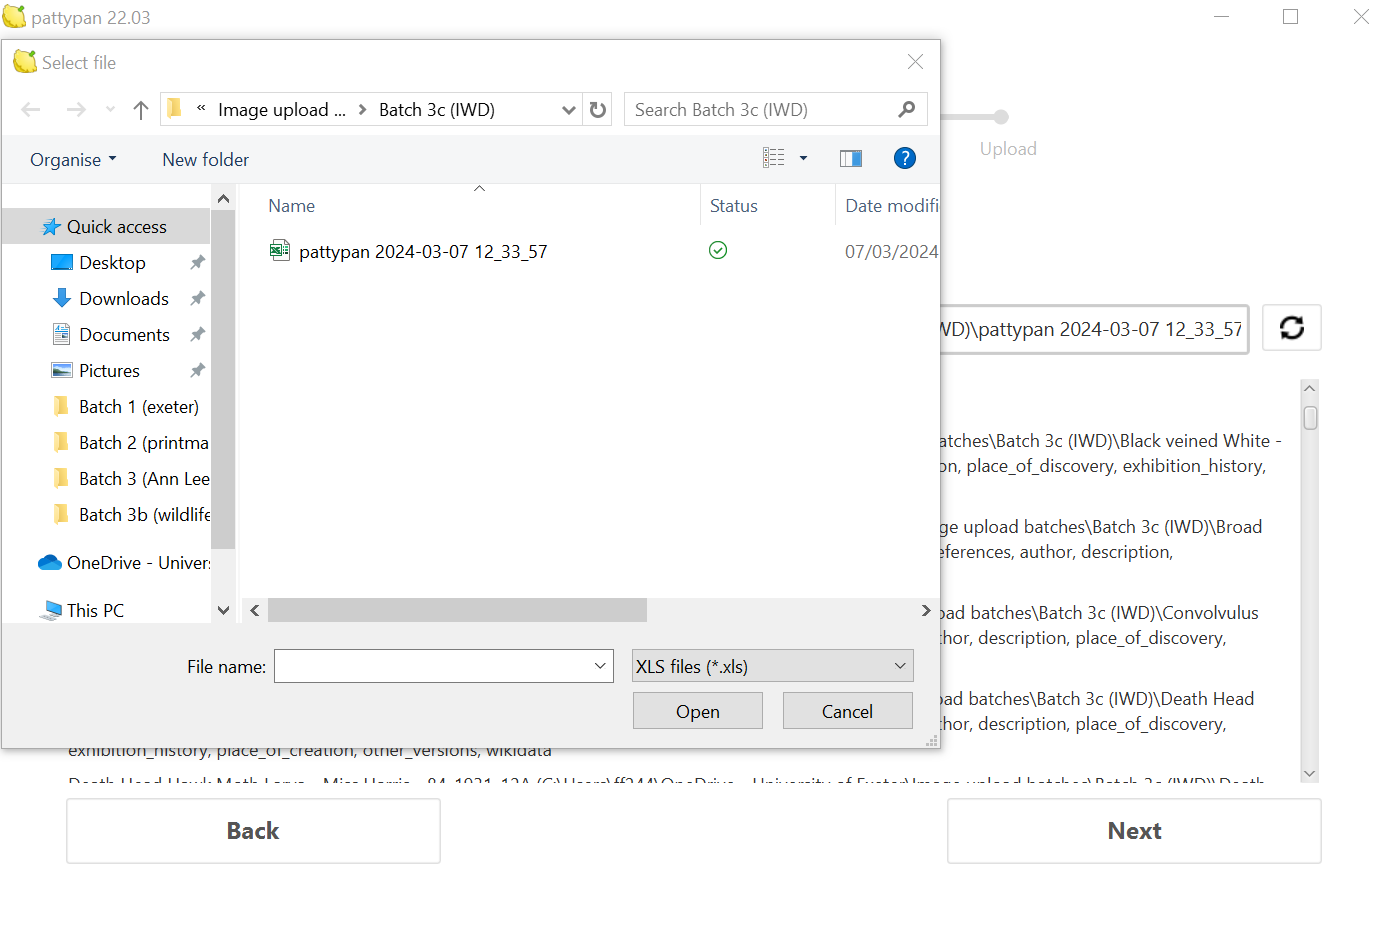
By default, Pattypan saves the Pattypan Artwork Template spreadsheet in the same folder as your images. Locate the folder and open the Pattypan Artwork Template spreadsheet.
Note: as shown in the image on the right, Pattypan will only recognise an XLS spreadsheet. If no spreadsheet appears, go back to the folder and save the spreadsheet in XLS format.
Step 22
Validate the data in the spreadsheet
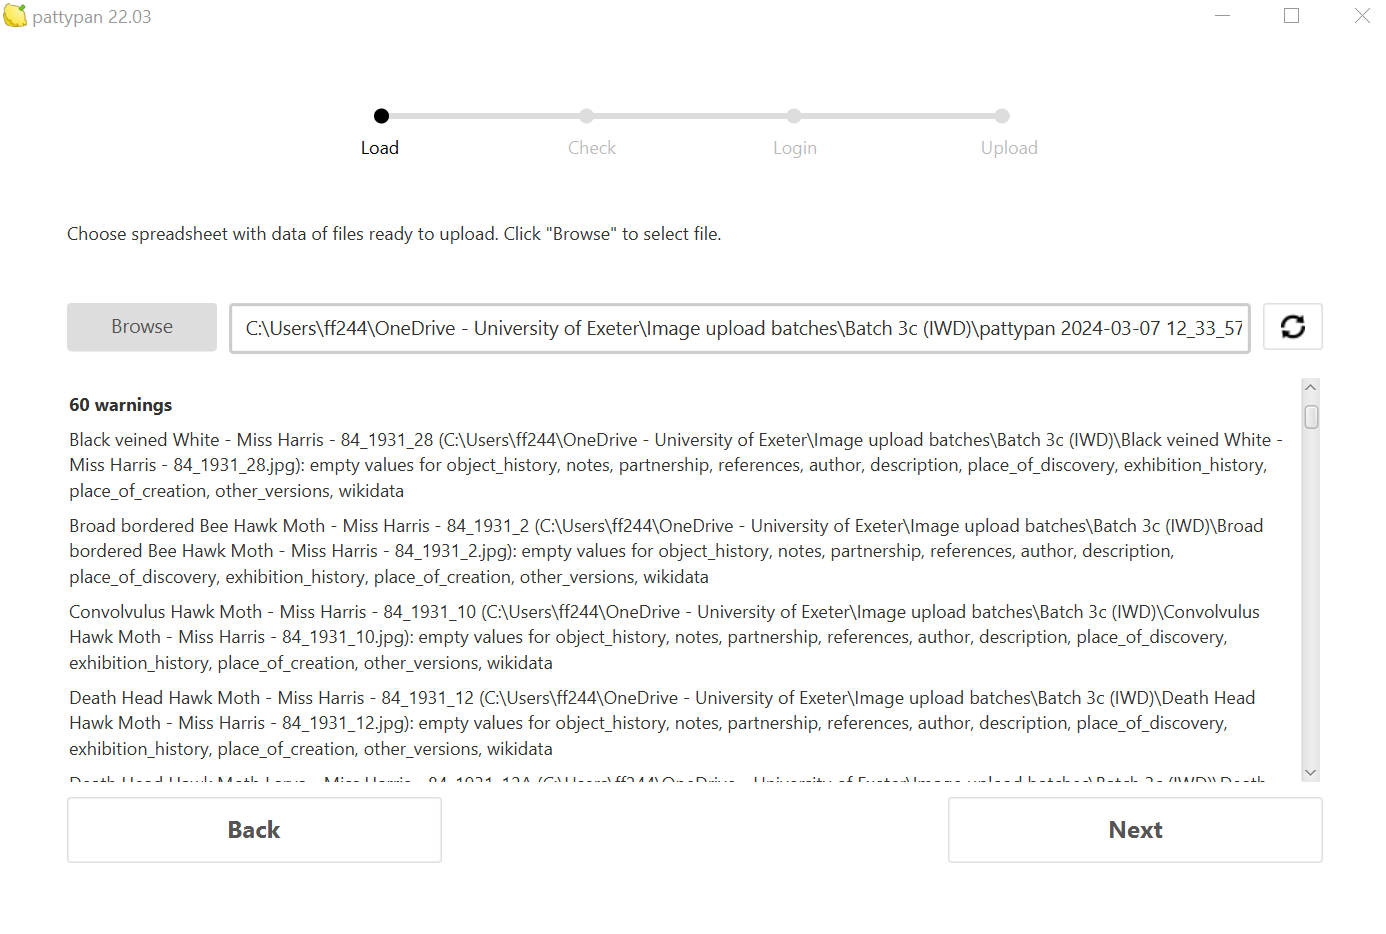
Pattypan will review the data and notify you of any errors or warnings.
You must fix any errors in the spreadsheet to proceed.
For warnings, review them and decide whether they require correction. Note that Pattypan warns you of any empty values in the spreadsheet. This is normal. You can ignore this and other warnings that are nominal.
Step 23
Review the images and metadata in Pattypan
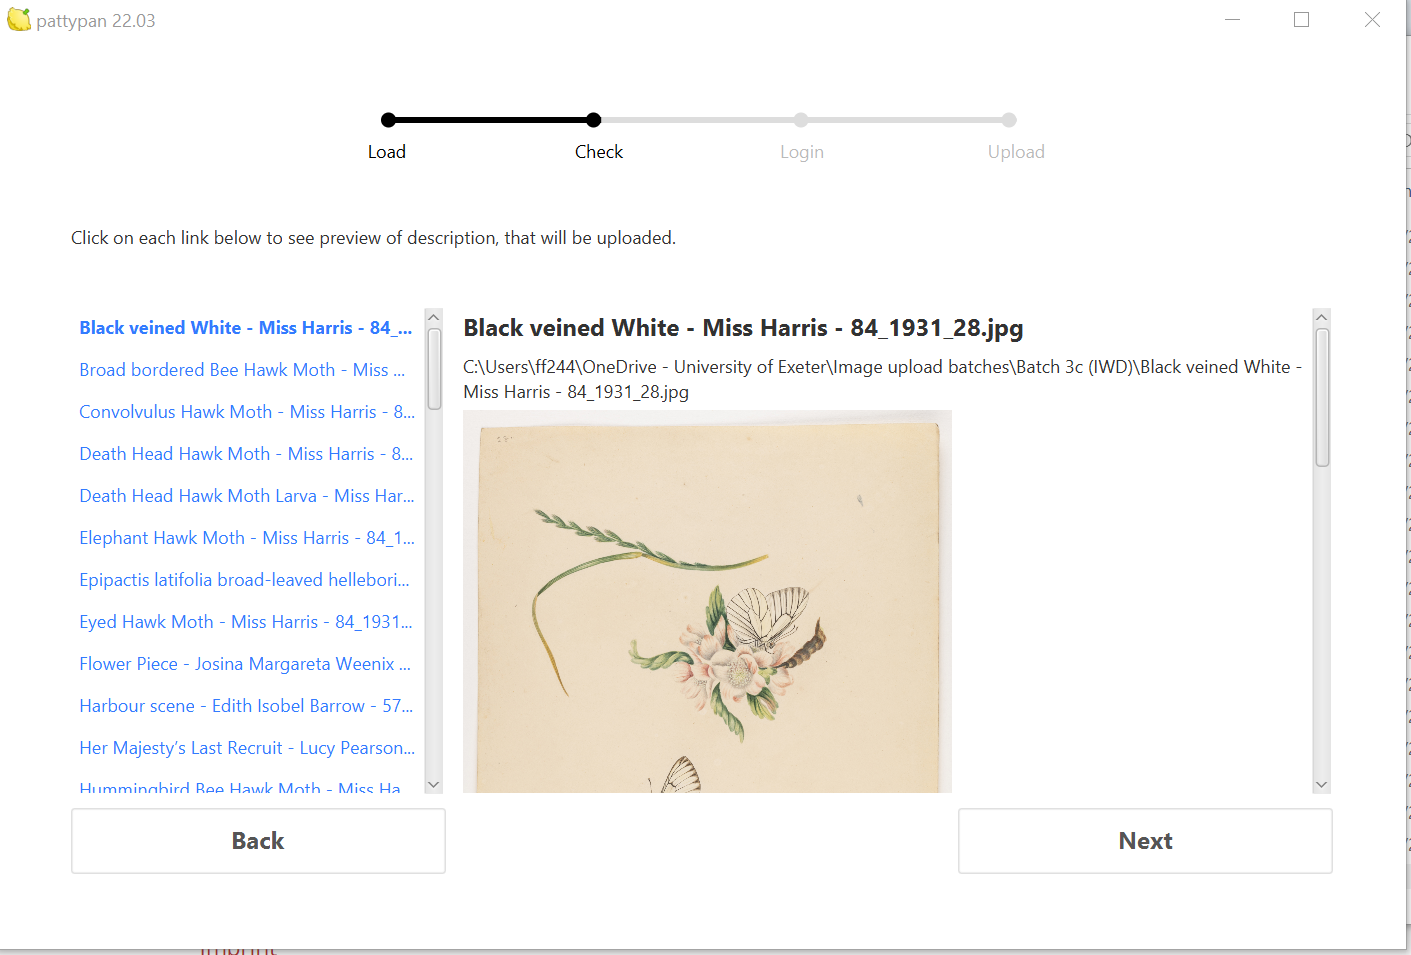
Pattypan provides previews for images and metadata.
Review these to ensure no final issues arise and that the images match the metadata.
Step 24
Log in to your Wikipedia account in Pattypan
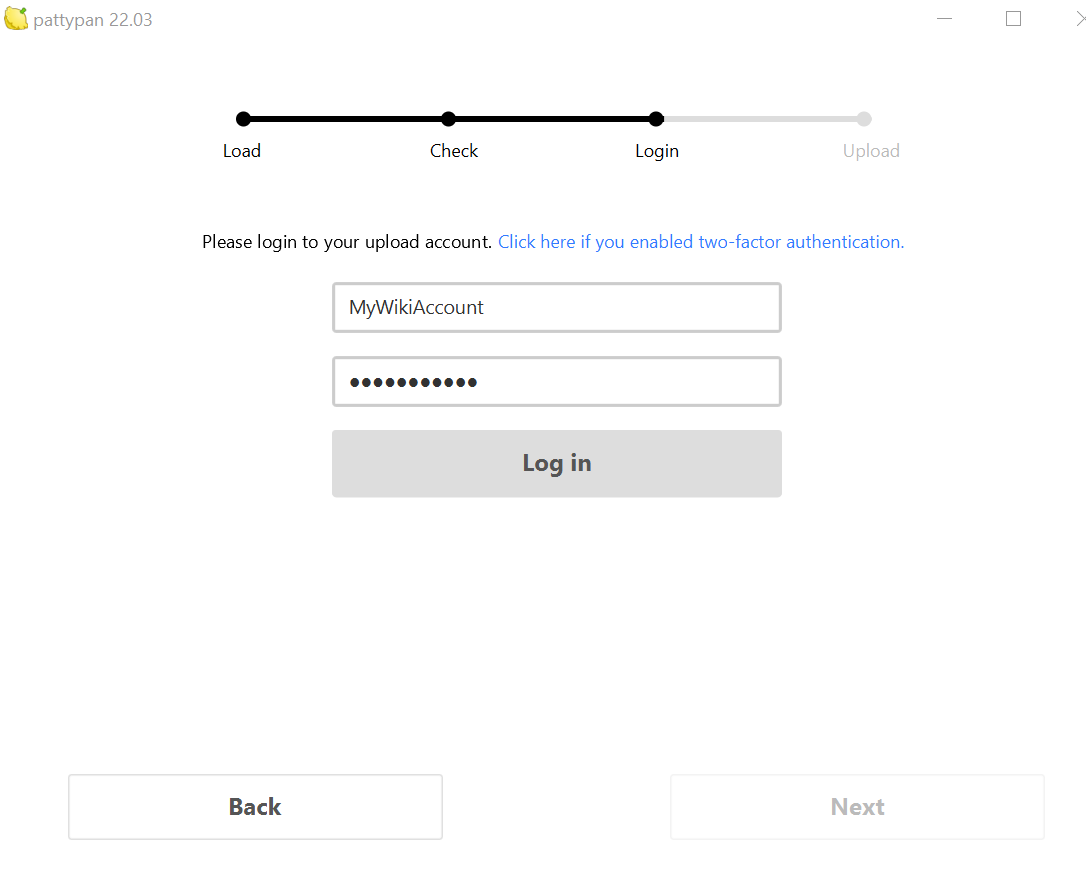
Enter your login information when prompted by Pattypan.
Before final upload in Step 25, review the Pattypan Checklist one last time.
Step 25
Click ‘Upload’
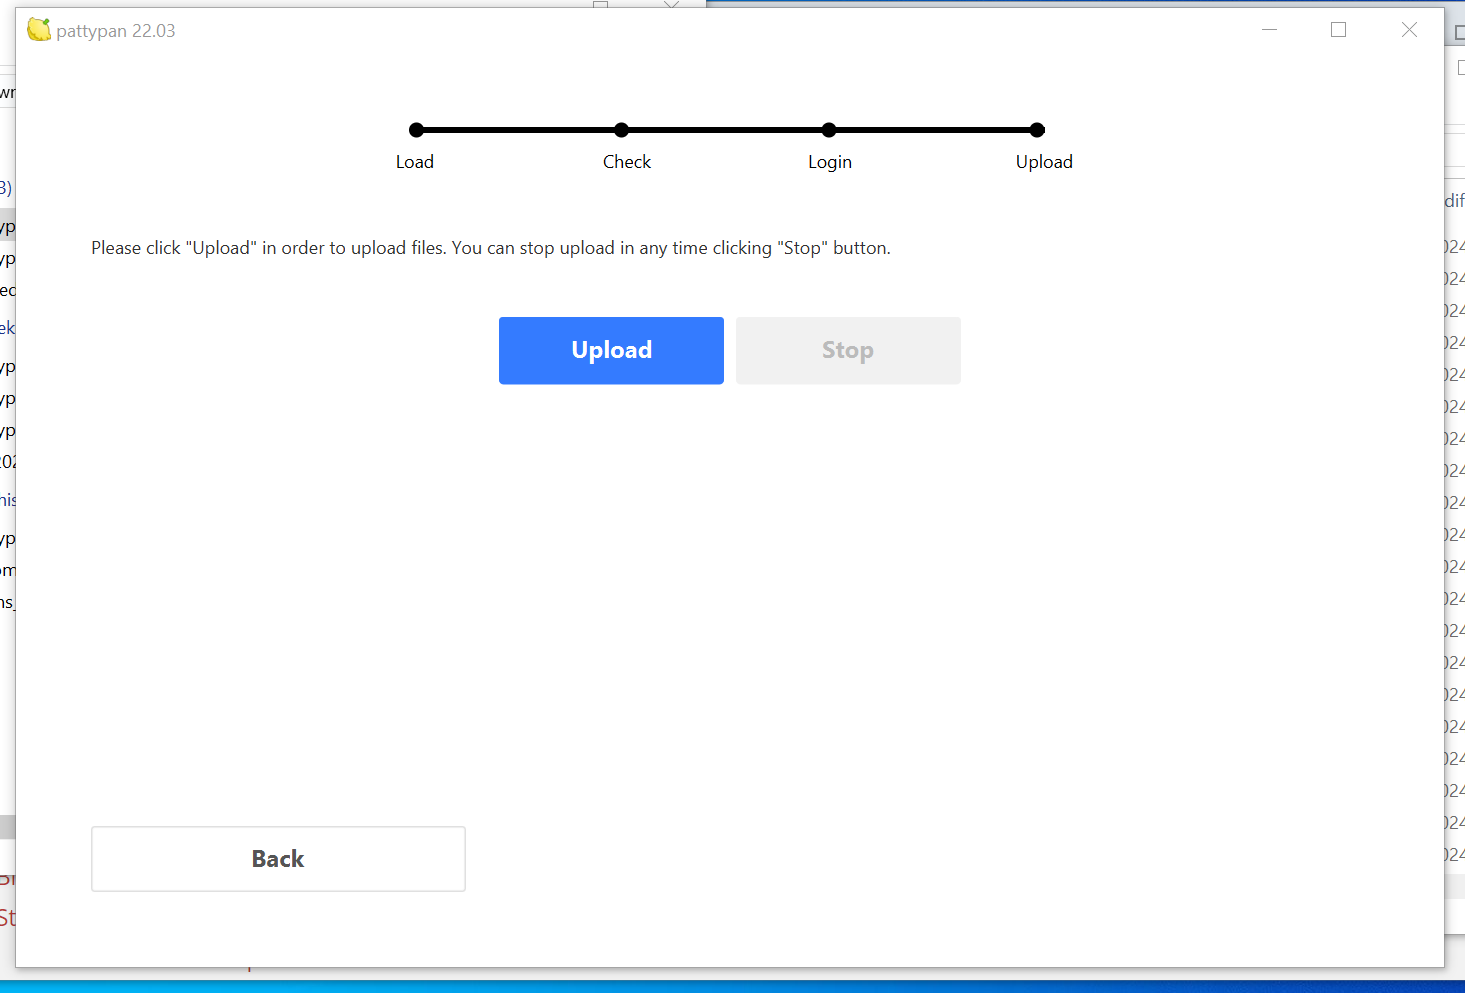
Click ‘Upload’ and sit back!
Pattypan displays uploads in real time.
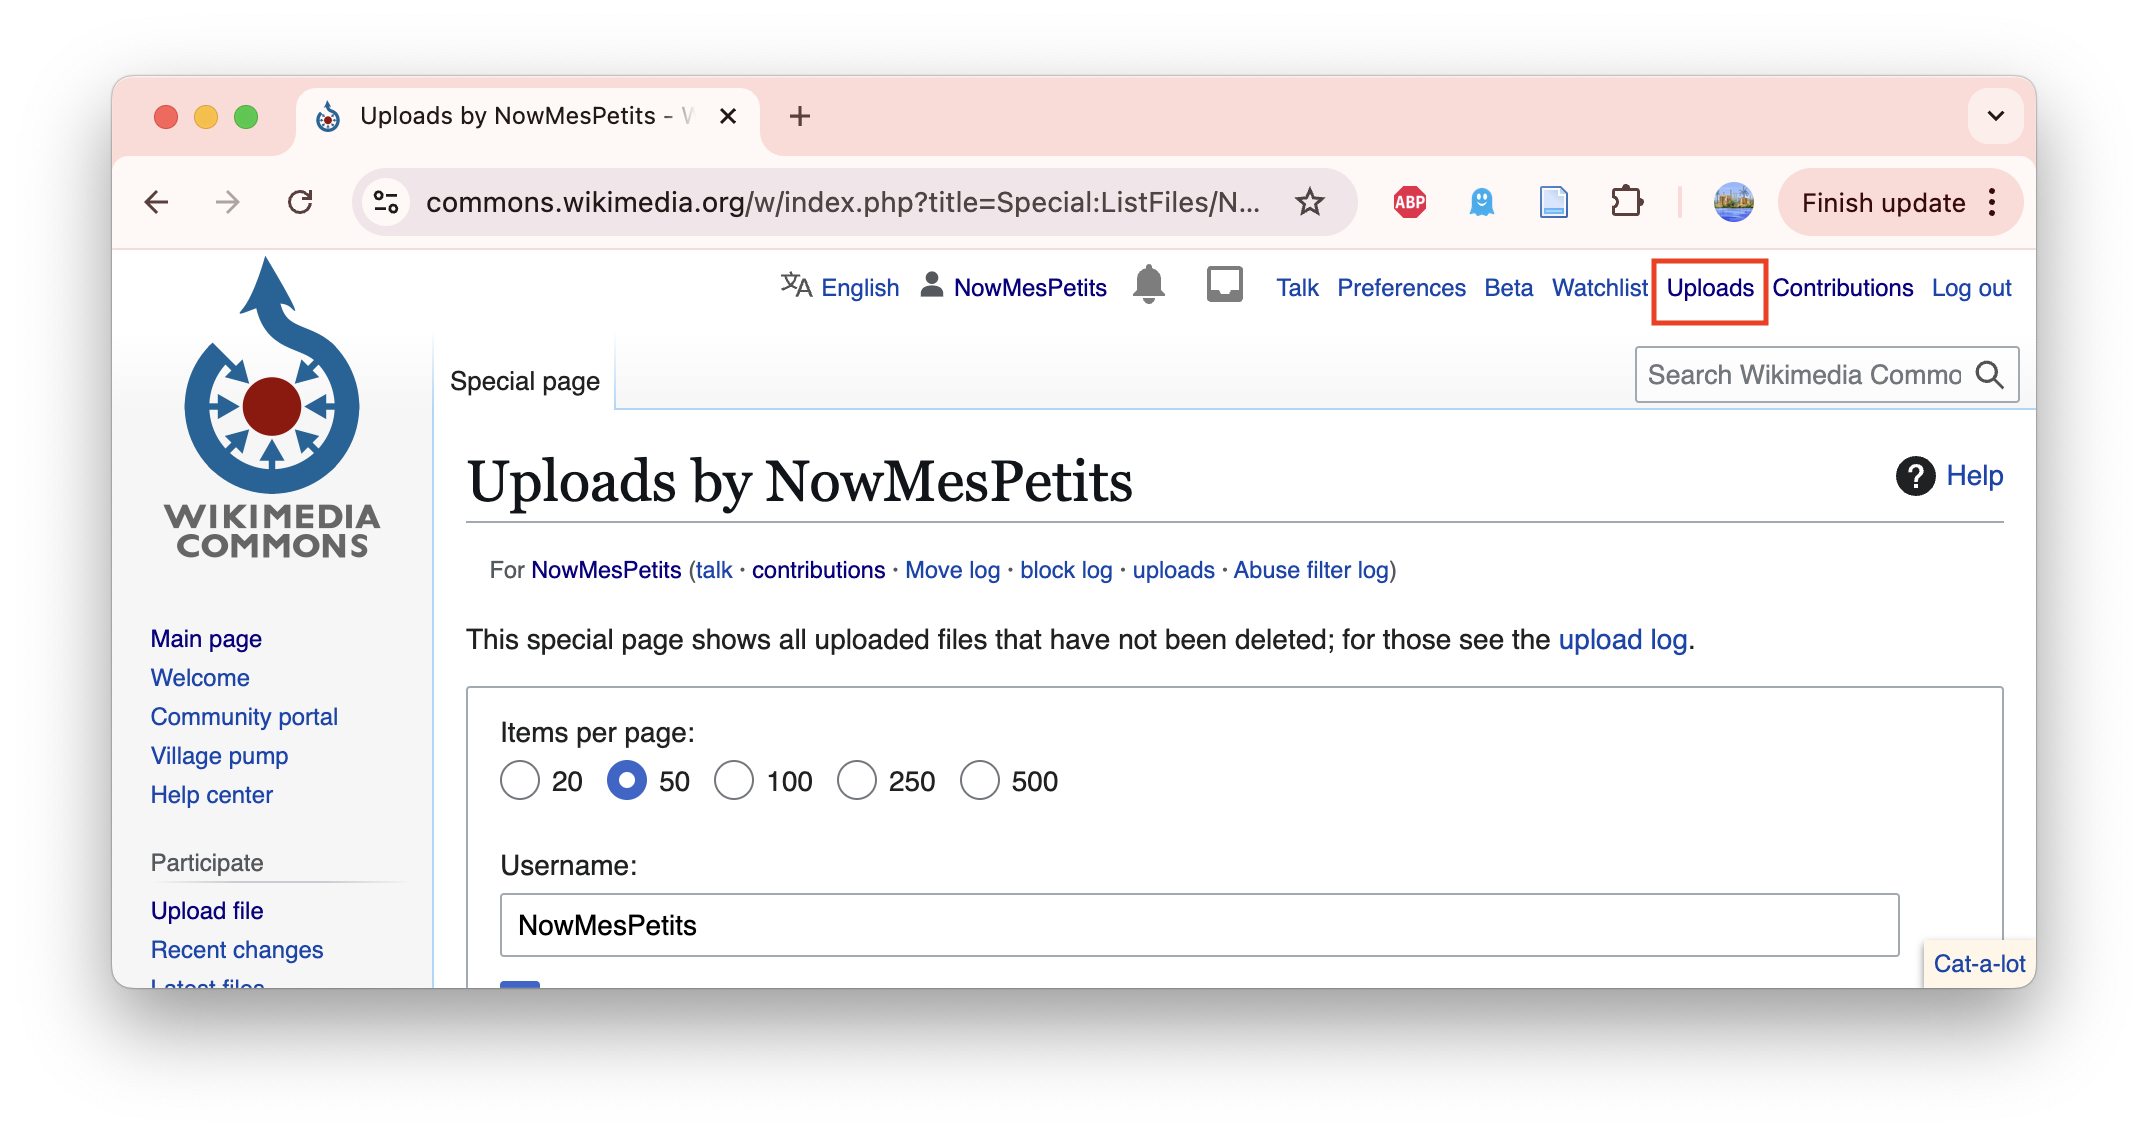
You can also review the uploads on Wikimedia Commons through your Wikipedia account. When logged in, select ‘Uploads” in the upper right hand corner (as shown in image on right).
If you notice any issues you can stop the upload at any time. Note that stopping the upload will not remove any images that have already been uploaded to Wikimedia Commons by Pattypan.
Tip: You can also edit information or media files rather than deleting them.
Replace an image in the ‘File history’ by selecting ‘Upload a new version of this file’.
Edit summary data for an image by clicking ‘Edit’ at the top-right of the File page for the image to edit the text directly.
Edit the File name by clicking the ‘More’ drop-down in the top-right of the File page for the image, then select ‘Move’. So long as you are the user who uploaded the image, you will be able to change the File name.
Pattypan Checklist
Before completing the final upload, use this checklist to make sure you’ve not missed out any steps:
Images are saved in one folder and under descriptive file names (Steps 6-7)
The embedded image metadata includes your organisation’s name, the URL to the public domain statement (e.g., https://creativecommons.org/publicdomain/zero/1.0/) and any other useful information (Steps 8-11)
Your organisation has a Category page (Step 13)
Your organisation’s Wikidata QID and Category page template tags are in the appropriate columns of the Sandbox Template (Columns Z and AA)
You have used Wiki-created template tags where appropriate and desired, and these template tags use US spelling (for more on template tags, see Section above and the first tip in the Sandbox Template Key)
You have generated the Pattypan Artwork Template (Steps 16-18)
The order of metadata in the Sandbox Template corresponds to the order of metadata in the Pattypan Artwork Template. Pattypan sorts the data from A-Z in Column B (name of image file). Make sure the metadata in the Sandbox Template, specifically the image names, is sorted alphabetically via Column B before moving the data over to the Pattypan Artwork Template.
The Pattypan Artwork Template spreadsheet is saved in XLS format (Checklist 4)
When validating and uploading the images and metadata, you have checked there are no errors and reviewed any warnings (Step 23)
Following the upload, log in to Wikimedia Commons, click on ‘Uploads’ in the right-hand corner and review the images and metadata (to make edits or deletion requests, see How to delete or replace files and metadata uploaded to Wikimedia Commons}
Now you can insert your images in Wikipedia articles and watch your engagement data grow!
Sandbox Template Key
The Sandbox Template Key can be used to complete fields in the Sandbox Template for Wikimedia Commons Metadata Management spreadsheet. Wikimedia Commons also provides guidance on what metadata to include.
Please note that all metadata contributed to Wikimedia Commons is published under the CC0 1.0 Public Domain Dedication.
Columns A-B
Leave all fields empty in Columns A-B. Information for these fields will be auto generated by Pattypan, as discussed in Table 4. The information below is for illustrative purposes only.
path (A)
description: The saved location of the image
additional clarification: The Pattypan spreadsheet will auto-generate this field from the folder location.
C:\Users\ff244\OneDrive - University of Exeter\Image upload batches\Batch 3c (IWD)\The Cherry Woman - Kate Greenaway - 62_1924_118.jpg
name (B)
description: The name the work is saved under in the file of images
additional clarification: The Pattypan spreadsheet will auto-generate this field from the name of the file. Use a standard naming convention (Step 7), as this will be the file name on Wikimedia Commons e.g., ‘Artwork name - Artist name - Accession number’. Pattypan will use this column to sort the spreadsheet by A-Z
The Cherry Woman - Kate Greenaway - 62-1924-118
Columns C-R
Complete Columns C-R with the descriptive information that should accompany the image on Wikimedia Commons.
If your organisation uses a collections management system or similar database, this information may be found or exported from your existing records. Not all fields in this section are necessary to complete.
Tip: Use the Sandbox Template to test and experiment with ‘Wiki-created template tags. These Wiki-created template tags will automatically apply certain templates to a Category or File page. This makes the images uploaded to Wikimedia Commons easier for users to find and insert on Wikipedia pages.
The format of Wiki-created templates is the name of the template enclosed in double curly brackets, e.g., {{template name}}. Wiki-created template tags use US spelling, so resist correcting the spelling to UK conventions or you will break the template link (e.g., do not change {{Technique | watercolor | card}} to {{Technique | watercolour | card}}.
artist (C)
description: Full name of the creator as it appears in your catalogue or record [or] Wikidata QID code using the following format: {{Creator | Wikidata =Enter QID code here| Option =}}
additional clarification: If the artist has a Wikidata page you can use their QID code. This will link the image to an artist’s Wikidata item and biography and makes the image more likely to be used in Wikipedia articles.
Kate Greenaway[or]{{Creator | Wikidata = Q204936| Option =}}
author (D)
description: Full name of the creator of written works as it appears in your catalogue or record [or] Wikidata QID code using the following format: {{Creator | Wikidata = Enter QID code here| Option =}}
additional clarification: Similar to the artist (c) field, use this field to link to a Wikidata page about the author. You will likely only use the artist field. An example where both fields will be used includes a page of a book that has an artistic illustration.
Charles Dickens[or]{{Creator | Wikidata = Q5686| Option =}}
title (E)
description: Title of the work
The Cherry Woman
description (F)
description: Description of the work, creator and/or subject.
additional clarification: This can include links where relevant. It is good practice to wrap descriptions in a language identifier, e.g., {{en|1=description here}}.
{{en|1= Kate Greenaway was a Victorian artist and writer known for her children’s book illustrations.
She was educated at home, and then attended several dame schools. When she was 12 she attended night classes at Finsbury School, a branch of the South Kensington School of Art. Night courses were open only to women and offered training in drawing, porcelain painting, lithography and wood engraving, and followed the National Course of Art Training in decorative arts. The course was based around copying geometrical and botanical designs. Its aim was to train future artisans in the areas of wallpaper, carpet and tile design.In 1864 she attended the Royal Female School of Art. For the first time she was able to draw the human figure. In Victorian society it was unacceptable for women to draw the naked figure. Instead women drew from plaster casts and models dressed in historical and ornamental costume. Kate Greenaway used these methods to study the human figure, but it did not compare with studying from life. She never managed fully to master human anatomy.
In 1871 she became a student at the Slade School of Art, under Sir Edward Poynter, the painter, designer and craftsman. He encouraged students to be expressive and creative. She continued to be frustrated in the way women were segregated from men in the life class.
Greenaway’s training coincided with an explosion of the card market that by the 1860s was at the height of its popularity. In 1871 Marcus Ward & Co, one of the main Victorian card printers, hired Kate Greenaway. Her designs were very popular and sold well.}}
date (G)
description: Date the work was created, such as a specific date, a period or ‘unknown’
additional clarification: The following formats are recognised:
YYYY
YYYY-MM
YYYY-MM-DD
MM-YYYY
DD-MM-YYYY
YYYY to YYYY
Go to Template Other Dates for more information on Wikimedia Commons date formats
1891
medium (H)
description: The technique and materials used [or] use the following format for Wiki templates. {{Technique| Enter technique here | Enter materials here }}
additional clarification: Learn more about the Wiki technique template.
watercolour on card[or]{{Technique | watercolor | card}}
dimension (I)
description: Dimension of the artwork (width x height) [or] use the following format for Wiki templates. {{Size |Unit= |height= |width= }}
additional clarification: Learn more about the Wiki size template.
223 x 195 mm[or]{{Size|Unit=mm |height=223 |width=195 }}
department (J)
description: Department or specific collection within the organisation
Fine Art; Drawings
place of discovery (K)
description: Place of discovery or location where an object was found, which might be different from place of origin
additional clarification: This field applies to archeological artefacts.
Exeter
object history (L)
description: Provenance (the history of a work’s ownership)
additional clarification: This might include:
‘commissioned by’
‘owned by’
‘significant event’
1519: acquired by Francis I of France from Leonardo da Vinci
exhibition history (M)
description: Exhibition history of the artwork
additional clarification: This could include the name of exhibitions, dates and where the work has been exhibited.
Included in ‘By Royal Appointment: Devon Lace Makers’ at the Royal Albert Memorial Museum & Art Gallery in Exeter, UK, in 2020
inscriptions (N)
description: Description of inscriptions, captions, coats of arm, etc
inscriptions: ‘K Greenaway, EXETER No 19, 30’
notes (O)
description: Any additional information about the artwork and its history
Depicted person: Клеопатра (Cleopatra)
accession number (P)
description: Accession number or some other inventory or identification number
additional clarification: This can be linked to the object’s page on your collections website. This could result in increased web traffic to your website. If you link the accession number to your website, use a stable URL and wrap both the link and accession number in square brackets.
62/1924/118[or][https://rammcollections.org.uk/collections/21a90176-01f4-3b8e-aff4-ebefe25b9a01/62/1924/118]
place of creation (Q)
description: Place where the artwork was created
additional clarification: QIDs can be used here to make this field link out to the location’s Wikipedia page.
London
references (R)
description: Books and websites with information about the artwork
https://www.english-heritage.org.uk/visit/blue-plaques/kate-greenaway/
Columns S-V
Complete Columns S-V with descriptive information about your organisation. This informs users where the original artworks are held and whether the images were uploaded as part of a partnership.
institution (S)
description: Name of your organisation [or] using the following format for the Institution template:
{{Institution:Enter Institution name here}}
You can also use your organisation’s QID using the following format:
{{Institution |wikidata:Enter Institution QID here}}
additional clarification: Learn more about the Wiki institution template.
National Library of Wales [or] {{Institution:National Library of Wales}}[or]{{Institution |wikidata:Q666063}}
credit line (T)
description: How the artwork came into the organisation’s collection, if known
additional clarification: If this information is unavailable you can simply use your organisation’s name.
Gift of the Friends of RAMM, 1961
source (required) (U)
description: Information about the source of the image or the photographer
additional clarification: This field is the only required data field. You can always use your organisation’s name as the source. .
Royal Albert Memorial Museum & Art Gallery[or]{{Institution:Royal Albert Memorial Museum}}
partnership (V)
description: Information about any partnership (e.g., Wikimedia Foundation) that supported the project, digitisation or upload [or] use the following format for the Partnership template (if one exists): {{NameofPartnershipTemplate|Lang=en}}
additional clarification: For example, the GLAM-E Lab has a partnership template that we encourage our partners or anyone using our resources to include.
{{GLAM-E_Lab |Lang=en}}
Columns W-X
This information relates to the copyright status of the work. This informs users that the work is free from copyright and they are able to use the images however they wish.
permission (W)
description: The copyright status of the work, e.g., public domain [or] use the following format for Wiki templates if applying the ‘life + 70’ rule: {{PD-old-70}}
additional clarification: Learn more about the other available Wiki copyright tags.
Public Domain[or]{{PD-old-70}}
licen
description: This should highlight that the work has been released under a public domain machine-readable statement [or] use the following format for Wiki templates:
For CC0, {{CC0}}
For Public Domain Mark, {{CC-PD}}
For No Copyright - United States, {{ InFi | Standardized rights statement | {{ rights statement | http://rightsstatements.org/vocab/NoC-US/1.0/ }} }}
CC0 1.0[or]{{CC0}}
Columns Y-AA
This information relates to the Wikimedia sites.
other versions (Y)
description: This will populate the field with thumbnails of images on Wikimedia Commons with similar content or derivative files
additional clarification: If multiple versions you can create a gallery of the different versions, e.g., <gallery> Insert file names here </gallery>
<gallery>
File:Sandro Botticelli - La nascita di Venere - Google Art Project.jpg|Original from [[:w:Google Art Project|Google Art Project]]
File:Sandro Botticelli - La nascita di Venere - Google Art Project - edited.jpg|Edited to brighten
File:Sandro Botticelli - La nascita di Venere - Google Art ProjectFXD.jpg|thumb|none|upright=.5|Remastered color
<gallery>
wikidata: (Z)
description: Wikidata QID for the work (if one exists)
additional clarification: This is meant for QIDs of the artwork itself and not the QIDs for authors or subjects, e.g., the painting Portrait of a Man in a Red Suit has its own Wikidata page, so you would use this QID. Adding the artwork’s QID (if one exists) will auto-populate other information into the summary data.
Q16989403
categories (AA)
description: Any category or subcategory page linked to the item
additional clarification: Categories are intended to group together pages on similar subjects. By grouping the works by institution it allows you to track image use using GLAMorgan. You can have as many categories and subcategories you’d like, you just need to separate them with a semicolon.
Images from Royal Albert Memorial Museum and Art Gallery; Women Artists (Images from Royal Albert Memorial Museum and Art Gallery)
Useful Resources
‘Doing digitisation on a budget: a guide to low-cost digital projects’. This guide written by Mathilde Pavis and Andrea Wallace provides an overview of low-cost digitisation with examples of projects by institutions and organisations. It covers using Wikimedia Commons as part of this process.
‘Open licensing: a digital heritage leadership briefing’. This briefing written by Andrea Wallace and Michael Weinberg provides decision makers with a snapshot of open licensing across the UK heritage sector. It includes examples of institutional use of Wikimedia Commons.
‘Nudging Users to Reference Institutions When Using Public Domain Materials’. Creative Commons provides guidance on how to encourage and support users in referencing a work, its creator and host organisation when using digitised public domain collections.
Pattypan
‘Pattypan and Wikimedia Commons’. This presentation by Andrew Lih for the 2018 GLAM Wiki conference provides guidance on how to use Pattypan to batch upload files to Wikimedia Commons.
‘Leith Improvement Scheme - Pattypan upload to Wikimedia Commons’. Created by Ewan McAndrew for the University of Edinburgh, this video demonstrates the process of uploading images to Wikimedia Commons in bulk using Pattypan.
‘Learning patterns/Uploading files using Pattypan’. Meta-Wiki, the global community site for the Wikimedia Foundation's projects, has general guidelines on uploading files using Pattypan.
‘Pattypan: Beautiful descriptions. Minimal difficulty’. Created by Paweł Marynowski, this flyer provides a high-level overview of Pattypan.
‘Simple Pattypan Manual’. Wikimedia Commons also has a straightforward and simple Pattypan manual.
Wiki platforms
‘Guide for Cultural and Memory Institutions to make women visible on Wikipedia’. Written by Whose Knowledge?, this guide was created specifically to support institutions in joining and participating in Open GLAM with a specific focus on underrepresented communities.
‘Dos and Don’ts for adding images to Wikimedia Commons and Wikipedia’. Written by Whose Knowledge?, this guide will help you understand what kinds of images are appropriate for Wikimedia projects. It explains many of the things you should not do when uploading images, and others that you should do.
GLAMorgan. A tool that tracks the number of page views for articles which include images from a specific Category page.
GLAM Wiki Dashboard. A usage analysis tool for GLAM institutions that displays statistical data on image engagement across Wikimedia platforms. GLAM Wiki Dashboard offers additional visualisations to GLAMorgan, but can take months to set up an account.
How to Link Your Institution’s Collections to Wikidata?: a short manual to a semi-automatic way of using the “archives at” property. This manual establishes a semi-automatic way to achieve interlinking existing (online) archival finding aids with their respective Wikidata items of persons.
Association of Research Libraries White Paper on Wikidata: Opportunities and Recommendations. Written by the Association of Research Libraries, this White Paper recommends a variety of ways for librarians to use Wikidata in advancing global discovery of their collections, faculty, and institutions.
GLAM/Metadata standards and Wikimedia. This Wikimedia page collects widely-used metadata standards in the GLAM sector and indicates how they integrate with Wikimedia platforms.
GLAM/Resources/Data and media partnerships workflow. This Wikimedia page summarises the basic steps in data and media partnerships between Wikimedians and cultural institutions.
Persistent Identifiers and Wikidata. This blog post details how the Biodiversity Heritage Library harvested persistent identifiers from Wikidata as part of their longstanding project to disambiguate and deduplicate author records in the BHL database.
QuickStatements tool. This tool was created by Magnus Manske for editing Wikidata items based on a simple set of text commands.
About the GLAM-E Lab
The GLAM-E Lab is a joint initiative between the Centre for Science, Culture and the Law at the University of Exeter and the Engelberg Center on Innovation Law & Policy at NYU Law to work with smaller and less well-resourced UK and US cultural institutions and community organisations to build open access capacity and expertise.
The GLAM-E Lab provides legal counsel to GLAM institutions and cultural organisations as they develop open access programs. The solutions created for those institutions are then integrated into model internal policies and external terms of service that can be adopted by others. The goal of this approach is to use lessons learned from directly representing individual institutions to create self-serve model policies that work “off the shelf” for as many organisations as possible. We supplement these model policies with additional guides and resources to address common challenges.
Acknowledgements
Francesca Farmer, Research Fellow Lucy Hinnie, Digital Research Fellow Andrea Wallace, Co-Director Michael Weinberg, Co-Director
A special thank you to Jason Evans for his helpful comments.
The current version of this document is 1.0, released on October 31, 2024.
Contact us at info@glamelab.org or https://glamelab.org/
Please cite as: The GLAM-E Lab, “Image and Metadata Handbook for Wikimedia Commons” CC BY 4.0.

This project is funded by the UKRI’s Arts and Humanities Research Council.
